Oki C931dn C911dn/C931dn/C941dn Basic Users Manual - Spanish - Page 67
la configuración de la red., para seleccionar [Dirección puerta de
 |
View all Oki C931dn manuals
Add to My Manuals
Save this manual to your list of manuals |
Page 67 highlights
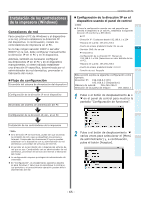
10 Pulse el botón de desplazamiento para seleccionar [Máscara subred] y, a continuación, pulse el botón [Aceptar]. Network Setup 1/2 Page 1 TCP/IP 2 NetBIOS over TCP 3 EtherTalk 4 IP Address Set 5 IPv4 Address 6 Subnet Mask Use Online button to return to standby screen 11 Introduzca la máscara de subred de la misma forma que la dirección IP. Cuando todas las entradas estén completadas, pulse el botón [Atrás]. Network SetupSubnet Mask 6 Subnet Mask xxx.xxx.xxx.xxx Conexión del PC 14 Pulse el botón [En línea] para completar la configuración de la red. 1 2 3 Configuración Antes de usar Impresión Operaciones básicas del dispositivo Use Online buttoUnsetoOrneltiunrenbtuotsttoanntdobryetsucrneen 4 12 Pulse el botón de desplazamiento para seleccionar [Dirección puerta de enlace] y, a continuación, pulse el botón [Aceptar]. Network Setup 1 Gateway Address 2/2 Page Apéndice Índice Use Online button to return to standby screen 13 Introduzca la dirección de la puerta de enlace de la misma forma que la dirección IP. Cuando todas las entradas estén completadas, pulse el botón [Atrás]. Network SetupGateway Address 1 Gateway Addrexsxsx.xxx.xxx.xxx Use Online buttoUnsetoOrneltiunrenbtuotsttoanntdobryetsucrneen - 67 -
-
 1
1 -
2
-
3
-
4
-
5
-
6
-
7
-
8
-
9
-
10
-
11
-
12
-
13
-
14
-
15
-
16
-
17
-
18
-
19
-
20
-
21
-
22
-
23
-
24
-
25
-
26
-
27
-
28
-
29
-
30
-
31
-
32
-
33
-
34
-
35
-
36
-
37
-
38
-
39
-
40
-
41
-
42
-
43
-
44
-
45
-
46
-
47
-
48
-
49
-
50
-
51
-
52
-
53
-
54
-
55
-
56
-
57
-
58
-
59
-
60
-
61
-
 62
62 -
 63
63 -
 64
64 -
 65
65 -
 66
66 -
 67
67 -
 68
68 -
 69
69 -
 70
70 -
 71
71 -
 72
72 -
73
-
74
-
75
-
76
-
77
-
78
-
79
-
80
-
81
-
82
-
83
-
84
-
85
-
86
-
87
-
88
-
89
-
90
-
91
-
92
-
93
-
94
-
95
-
96
-
97
-
98
-
99
-
100
-
101
-
102
-
103
-
104
-
105
-
106
-
107
-
108
-
109
-
110
-
111
-
112
-
113
-
114
-
115
-
116
-
117
-
118
-
119
-
120
-
121
-
122
-
123
-
124
-
125
-
126
-
127
-
128
-
129
-
130
-
131
-
132
-
133
-
134
-
135
-
136
-
137
-
138
-
139
-
140
-
141
-
142
-
143
-
144
-
145
-
146
-
147
 |
 |
