Oki C9600n Hole Punch Kit Technician's Installation Guide - Page 4
supplied with the hole punch
 |
View all Oki C9600n manuals
Add to My Manuals
Save this manual to your list of manuals |
Page 4 highlights
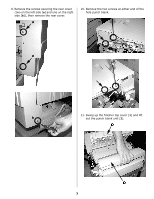
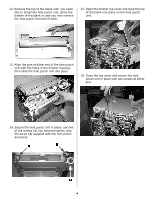
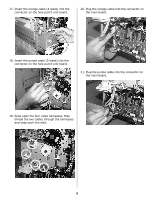
12. Remove the top of the blank unit: you need this to install the hole punch unit. Store the bottom of the blank in case you ever remove the hole punch from the finisher. 15. Open the finisher top cover and snap the top of the blank into place on the hole punch unit. 13. Align the pins at either end of the hole punch unit with the holes in the finisher housing, then slide the hole punch unit into place. 16. Close the top cover and secure the hole punch unit in place with two screws at either end. 14. Secure the hole punch unit in place: use two of the screws (1) you removed earlier, plus the screw (2) supplied with the hole punch accessory. 4
-
 1
1 -
 2
2 -
 3
3 -
 4
4 -
 5
5 -
 6
6 -
 7
7 -
 8
8
 |
 |

4
12. Remove the top of the blank unit: you need
this to install the hole punch unit. Store the
bottom of the blank in case you ever remove
the hole punch from the finisher.
13.
Align the pins at either end of the hole punch
unit with the holes in the finisher housing,
then slide the hole punch unit into place.
14.
Secure the hole punch unit in place: use two
of the screws (
1
) you removed earlier, plus
the screw (
2
) supplied with the hole punch
accessory.
15.
Open the finisher top cover and snap the top
of the blank into place on the hole punch
unit.
16. Close the top cover and secure the hole
punch unit in place with two screws at either
end.