Oki C9600n Hole Punch Kit Technician's Installation Guide - Page 8
d. Under [Finisher], [Output Bin], select - oki printer
 |
View all Oki C9600n manuals
Add to My Manuals
Save this manual to your list of manuals |
Page 8 highlights
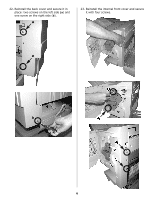
30. Test the operation of the hole punch unit: a. With a suitable document open in a software application, select [File] → [Print]. b. Select the appropriate Oki printer, then click [Properties]. c. Click the [Job Options] tab. d. Under [Finisher], [Output Bin], select [Finisher(Face-up)] or [Finisher(Face-down)] from the drop-down list. e. Under [Finisher], [Staple], select [Punch(Long-Edge)] or [Punch(Short-Edge)], then click [OK]. f. Print the document. 31. Demonstrate how to empty the punch collection box: a. Push in on the finisher release lever and slide the finisher away from the inverter. b. Remove the punch collection box from the finisher. c. Empty it, then put it back into the finisher. d. Slide the finisher back into the inverter. Make sure it locks in place. © 2005 Oki Data Americas, Inc. 58372901
-
 1
1 -
2
-
 3
3 -
 4
4 -
 5
5 -
 6
6 -
 7
7 -
 8
8
 |
 |
