Olympus C 4000 C-4000 Zoom Basic Manual (1.1 MB) - Page 14
Date/time setting - digital camera c
 |
View all Olympus C 4000 manuals
Add to My Manuals
Save this manual to your list of manuals |
Page 14 highlights
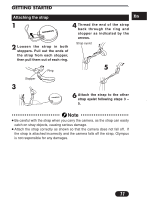
GETTING STARTED (Cont.) En Date/time setting 1 Set the mode dial to P. 2 Press . ● The monitor turns on automatically and the top menu appears. 3 Press í on the arrow pad to select MODE MENU. 4 Press ñ to select SETUP, then press í. 5 Press Ññ to select , then press í. 6 When is selected on the screen, press Ññ to select the date format. ● Select any one of the following formats: D-M-Y (Day/Month/Year) M-D-Y (Month/Day/Year) Y-M-D (Year/Month/Day) ● This step and the following steps show the procedure used when the date and time settings are set to Y-M-D. 7 Press í to move to the year (Y) setting. 8 Press Ññ to set the year. When the year is set, press í to move to the month (M) setting. ● Repeat this procedure until the date and time are completely set. ● To move back to the previous setting, press É. ● The first two digits of the year cannot be changed. ● The camera can only display the time in "number of hours", or what is commonly known as military time. Consequently, 2 p.m. would be 14:00 hours, or 12:00 hours + 2:00 hours =14:00 hours. 9 Press . ● If is pressed again, the menu will disappear. ● For a more accurate setting, do not press until the time is actually at 00 seconds. The camera's built-in clock starts when you press this button. 0 To turn the camera off, set the mode dial to OFF. Note ● The date setting will be canceled if the camera is left with no batteries for approximately 1 hour. If this happens, you will need to set the date again. 14
-
 1
1 -
2
-
3
-
4
-
5
-
6
-
7
-
8
-
 9
9 -
 10
10 -
 11
11 -
 12
12 -
 13
13 -
 14
14 -
 15
15 -
 16
16 -
 17
17 -
 18
18 -
 19
19 -
20
-
21
-
22
-
23
-
24
-
25
-
26
-
27
-
28
-
29
-
30
-
31
-
32
-
33
-
34
-
35
-
36
-
37
-
38
-
39
-
40
-
41
-
42
-
43
-
44
-
45
 |
 |