Olympus C-770 Reference Manual - Page 5
Shooting modes P.47, positions for - manual
 |
UPC - 050332146327
View all Olympus C-770 manuals
Add to My Manuals
Save this manual to your list of manuals |
Page 5 highlights
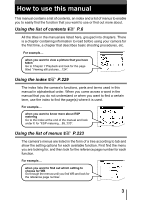
How to use this manual A sample page is shown below to explain how to read the instructions in this manual. Look at it carefully before taking or viewing pictures. See the reference pages for further details on how to use the power switch or menus. 1 Slide the power switch to one of these symbols. g"Power on/off" (P.25) 2 If you set the power switch to K in step 1, set the mode dial to one of these symbols. g"Shooting modes" (P.47) 3 Follow the arrows to perform menu operations. g"How to use the menus" (P.35) This shows the buttons and button positions for the function concerned. This sample page is only for your reference. It may differ from the actual page in this manual. 4
-
 1
1 -
 2
2 -
 3
3 -
 4
4 -
 5
5 -
 6
6 -
 7
7 -
 8
8 -
 9
9 -
 10
10 -
 11
11 -
12
-
13
-
14
-
15
-
16
-
17
-
18
-
19
-
20
-
21
-
22
-
23
-
24
-
25
-
26
-
27
-
28
-
29
-
30
-
31
-
32
-
33
-
34
-
35
-
36
-
37
-
38
-
39
-
40
-
41
-
42
-
43
-
44
-
45
-
46
-
47
-
48
-
49
-
50
-
51
-
52
-
53
-
54
-
55
-
56
-
57
-
58
-
59
-
60
-
61
-
62
-
63
-
64
-
65
-
66
-
67
-
68
-
69
-
70
-
71
-
72
-
73
-
74
-
75
-
76
-
77
-
78
-
79
-
80
-
81
-
82
-
83
-
84
-
85
-
86
-
87
-
88
-
89
-
90
-
91
-
92
-
93
-
94
-
95
-
96
-
97
-
98
-
99
-
100
-
101
-
102
-
103
-
104
-
105
-
106
-
107
-
108
-
109
-
110
-
111
-
112
-
113
-
114
-
115
-
116
-
117
-
118
-
119
-
120
-
121
-
122
-
123
-
124
-
125
-
126
-
127
-
128
-
129
-
130
-
131
-
132
-
133
-
134
-
135
-
136
-
137
-
138
-
139
-
140
-
141
-
142
-
143
-
144
-
145
-
146
-
147
-
148
-
149
-
150
-
151
-
152
-
153
-
154
-
155
-
156
-
157
-
158
-
159
-
160
-
161
-
162
-
163
-
164
-
165
-
166
-
167
-
168
-
169
-
170
-
171
-
172
-
173
-
174
-
175
-
176
-
177
-
178
-
179
-
180
-
181
-
182
-
183
-
184
-
185
-
186
-
187
-
188
-
189
-
190
-
191
-
192
-
193
-
194
-
195
-
196
-
197
-
198
-
199
-
200
-
201
-
202
-
203
-
204
-
205
-
206
-
207
-
208
-
209
-
210
-
211
-
212
-
213
-
214
-
215
-
216
-
217
-
218
-
219
-
220
-
221
-
222
-
223
-
224
-
225
-
226
-
227
-
228
-
229
-
230
-
231
-
232
-
233
-
234
-
235
-
236
-
237
-
238
-
239
-
240
-
241
-
242
-
243
-
244
-
245
-
246
-
247
-
248
-
249
-
250
-
251
-
252
-
253
-
254
-
255
-
256
-
257
-
258
-
259
-
260
-
261
-
262
-
263
-
264
-
265
-
266
 |
 |

4
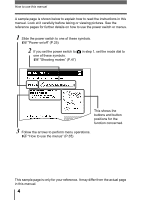
How to use this manual
A sample page is shown below to explain how to read the instructions in this
manual. Look at it carefully before taking or viewing pictures. See the
reference pages for further details on how to use the power switch or menus.
This sample page is only for your reference. It may differ from the actual page
in this manual.
2
If you set the power switch to
K
in step 1, set the mode dial to
one of these symbols.
g
“Shooting modes” (P.47)
This shows the
buttons and button
positions for the
function concerned.
1
Slide the power switch to one of these symbols.
g
“Power on/off” (P.25)
3
Follow the arrows to perform menu operations.
g
“How to use the menus” (P.35)