Olympus DS-150 DS-150 Operation Manual (English) - Page 7
Replacing The Batteries, Using The Ac Adapter, Setting The Clock And Id Number - voice recorder
 |
UPC - 050332127838
View all Olympus DS-150 manuals
Add to My Manuals
Save this manual to your list of manuals |
Page 7 highlights
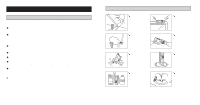
REPLACING THE BATTERIES When starts blinking on the LCD panel, replace the batteries as soon as possible. If [BATT] and light on the LCD panel, operation will stop. Replace the batteries immediately. If the recorder does not function normally after the batteries have been replaced, see "RESET" on page 32. USING THE AC ADAPTER ERASE SP DICT FOINLDDEEXR/ REC STOP Plug the optional AC adapter into a household power outlet and connect the power plug to the recorder's power connector (DC 3 V) ƾ as shown in the illustration. Do not connect the AC adapter to the recorder during recording. Always stop recording before connection. Otherwise it may not be possible to play back the voice data being recorded. Warning Misuse of the AC adapter can result in damage, fire or electric shock. Always use the dedicated AC adapter. Never use an adapter with different polarity or output voltage. Stop the recorder before disconnecting the AC adapter. When not using the recorder, always disconnect the AC adapter from the power outlet. 12 SETTING THE CLOCK AND ID NUMBER Once the clock and the user's ID number have been set, the user ID of the person creating the message and the time of the day are automatically recorded in the message header. To ease management of recorded messages, it is recommended that the clock and a 4-digit ID number be set beforehand. Follow the procedure below to set the clock: ᕃ ᕄ ᕅ ᕆ ERASE SP DICT MENU ERASE SP DICT MENU ERASE SP DICT MENU ᕇ ERASE SP DICT MENU ᕈ ERASE SP DICT MENU INDEX/ ᕉ INDEX/ FOLDER REC STOP INDEX/ INDEX/ ᕃ In the Stop mode, press and hold the MENU switch µ for at least 2 seconds. The menu will be displayed on the LCD panel ᕣ. ᕄ Turn the MENU switch's up/down control µ in the up direction within 4 seconds to display the [Date] and [Time]. ᕅ Press the MENU switch again. The cursor will blink in the year position. ᕆ Press the MENU switch's up/down control to change [Year]. ᕇ When the correct year is displayed, press the MENU switch. The blinking cursor moves to the [Month] position. ᕈ Follow the same procedure to set [Day], [Hour] and [Minute]. When the clock setting is completed, press the MENU switch to enter the ID number setting mode. (To set only the ID number, see page 14.) ᕉ If ID number setting is not required, press the STOP button ƹ instead of the MENU switch after clock setting. This completes menu setting and restores the Stop mode. (When the STOP button is pressed, the clock starts counting seconds.) tAll settings are automatically canceled after three minutes if no further operation takes place. 13
-
 1
1 -
 2
2 -
 3
3 -
 4
4 -
 5
5 -
 6
6 -
 7
7 -
 8
8 -
 9
9 -
 10
10 -
 11
11 -
 12
12 -
13
-
14
-
15
-
16
-
17
-
18
 |
 |
