Olympus DS-150 DS-150 Operation Manual (English) - Page 8
Basic Operation - data transfer kit
 |
UPC - 050332127838
View all Olympus DS-150 manuals
Add to My Manuals
Save this manual to your list of manuals |
Page 8 highlights
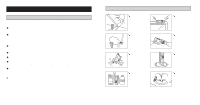
Follow the procedure below to set the user ID number: ᕃ ᕄ ERASE SP DICT MENU ERASE SP DICT MENU ᕅ ᕆ ERASE SP DICT MENU INDEX/ FOLDER INDEX/ FOLDER ᕃ In the Stop mode, press and hold the MENU switch µ for at least 2 seconds. The menu will be displayed on the LCD panel ᕣ. ᕄ twice the MENU switch's up/down control in the down direction to display [ID AAA] (when in the initial setting). The cursor will start blinking at the first digit's position. ᕅTurn the MENU switch's up/down control in the up direction to change the character displayed: [A] Ǟ [B] Ǟ [C] ...... [X] Ǟ [Y] Ǟ [Z] Ǟ [0] Ǟ [1] Ǟ [2 7] Ǟ [8] Ǟ [9] Ǟ [A] Ǟ [B]...... ᕆ When the desired character is displayed, press the MENU switch to set it. The blinking cursor moves to the next position. ᕇ Follow the same procedure to set each character. When ID setting is complete, press the MENU switch to enter the Format mode. (See page 31.) ᕈ Pressing the STOP button instead of the MENU switch after ID setting ends menu setting and restores the Stop mode. tIf the Format mode is entered in ᕇ but you do not need to format the built-in memory, press the STOP button. This ends menu setting and restores the Stop mode. 14 BASIC OPERATION RECORDING ᕃ ᕄ ᕅ ᕆ INDEX/ FOLDER Remaining Message No. memory time REC STOP ᕃ Make sure [NEW], memory remaining time, and the message number are displayed on the LCD panel. Ensure there is sufficient remaining time available for your message and select the folder ([A] or [B]), microphone sensitivity ([DICT] or [CONF]) and recording mode ([SP] and [LP]). ᕄ To change the folder, press the INDEX/FOLDER button ᕢ to move to the position after the last recording in the other folder. To change the microphone sensitivity or recording mode, use the menu (see page 29 for the change procedure). ᕅ Press the REC button ᕡ to start recording. The LED ᕥ lights and recording starts. ᕆ Press the STOP button to stop recording and enter the Stop mode. ᕇ You can monitor what is being recorded through an earphone plugged into the EAR jack ᕧ (recording monitor). t If [NEW] is not displayed when you press the REC button, insertion recording will start. This overwrites the previous recording so be sure you always check the display before pressing the REC button. t If [FULL] is displayed on the LCD panel, additional recording is not possible. In this case, erase unnecessary messages to free up more memory. If there are any messages that you want to preserve, transfer the voice data to a PC using the PC transfer kit (available as a standard or optional accessory). t Do not connect or disconnect the AC adapter plug during recording. Always enter the Stop mode before plugging or unplugging the adapter. Otherwise, you will not be able to play back the message being recorded. t The recording monitor volume cannot be adjusted. t Always use the SP mode if you want to record high-quality voice data suitable for transfer to a PC for use in voice recognition operations. (For more about voice recognition, see page 33.) 15
-
 1
1 -
2
-
 3
3 -
 4
4 -
 5
5 -
 6
6 -
 7
7 -
 8
8 -
 9
9 -
 10
10 -
 11
11 -
 12
12 -
 13
13 -
14
-
15
-
16
-
17
-
18
 |
 |
