Olympus DS320 DS-320 ViaVoice Kit Instructions (745 KB)
Olympus DS320 - Digital Voice Recorder Manual
 |
UPC - 050332130944
View all Olympus DS320 manuals
Add to My Manuals
Save this manual to your list of manuals |
Olympus DS320 manual content summary:
- Olympus DS320 | DS-320 ViaVoice Kit Instructions (745 KB) - Page 1
DIGITAL VOICE RECORDER DS-320 ViaVoice kit INSTRUCTIONS Please read these instructions for information about using the product correctly and safely. Keep the instructions handy for future reference. To ensure successful recordings, we recommend that you test the record function and volume before use - Olympus DS320 | DS-320 ViaVoice Kit Instructions (745 KB) - Page 2
Olympus Digital Voice Recorder DS-320. Before using your new recorder, read this manual carefully to ensure that you know how to operate it safely and correctly. Keep this manual for the "DSS Player" software and instruction manual are held by Olympus Optical Co., Ltd. IBM, PC/AT and ViaVoice are - Olympus DS320 | DS-320 ViaVoice Kit Instructions (745 KB) - Page 3
smoke, or a burning odor: 1 remove the batteries immediately while being careful not to burn yourself, and; 2call your dealer or local Olympus representative for servicing. AC Adapter Warning • Do not attempt to disassemble, repair or modify the AC adapter in any way. • Keep objects including water - Olympus DS320 | DS-320 ViaVoice Kit Instructions (745 KB) - Page 4
Hardware Section 4 - Olympus DS320 | DS-320 ViaVoice Kit Instructions (745 KB) - Page 5
14 Playing and Volume Control 18 Other Functions Recording Modes 25 Microphone Sensitivity 26 Using the Variable Control Voice Actuator (VCVA 27 Dictation Mode 28 Other Information Menu List 33 Troubleshooting 34 Identification of Parts 7 Hold 11 Setting Time/Date 11 Setting an ID - Olympus DS320 | DS-320 ViaVoice Kit Instructions (745 KB) - Page 6
DS-320 Main Features DS-320 Main Features Summary of product features: q The DS-320 digital voice recorder stores highly compressed DSS format voice messages in 16MB integrated flash memory. q The DS-320 supports two recording modes: SP (Standard Playback) mode and LP (Long Playback) mode. - Olympus DS320 | DS-320 ViaVoice Kit Instructions (745 KB) - Page 7
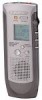
4 REW (Rewind) button 5 FF (Fast Forward) button 6 STOP button 7 Strap hook 8 Built-in speaker 9 REC (Record) button 0 INDEX/FOLDER button ! Display (LCD panel) @ ERASE button # Record indicator lamp $ Built-in microphone % Earphone jack ^ Microphone jack & HOLD switch * Battery cover ( POWER jack - Olympus DS320 | DS-320 ViaVoice Kit Instructions (745 KB) - Page 8
and turn on the display, press any one of the STOP, REC, PLAY, FF, or REW buttons, or the MENU/VOL switch. To put the recorder into standby mode (power saving mode) and shut off the display, put the HOLD switch in the HOLD position when the - Olympus DS320 | DS-320 ViaVoice Kit Instructions (745 KB) - Page 9
time setting for 1 second before appearing as shown at right. Remaining recording time Folder Message number* * The message number under "NEW" is the number of the next message to be recorded in this folder. For example, if you have three messages in this folder - Olympus DS320 | DS-320 ViaVoice Kit Instructions (745 KB) - Page 10
adapter (Olympus Model A321 or A322) into a household power outlet and connect the power plug to the recorder's power connector recorder during recording. Always stop recording before connection. Otherwise it may not be possible to play back the voice data being recorded. Warning • Stop the recorder - Olympus DS320 | DS-320 ViaVoice Kit Instructions (745 KB) - Page 11
playing until reaching at the end of message. • When setting the HOLD switch to the HOLD position while recording a message, the recorder continues recording until available recording time runs out. • The recorder automatically stops and the display becomes blank after completion of playing or - Olympus DS320 | DS-320 ViaVoice Kit Instructions (745 KB) - Page 12
. The minute cursor will flash. 9 Set the minute and press the STOP button. This completes the date/ time setup procedure. Note If you leave the recorder idle for more than 3 minutes during setup, any settings entered to that point will be canceled. - Olympus DS320 | DS-320 ViaVoice Kit Instructions (745 KB) - Page 13
the message when it is transferred to a PC. Setting IDs is recommended for easier management of recorded messages. To set an ID, stop the recorder and follow these steps: ERASE SP DICT /MVEONLU IFNODLEDXE/ R REC STOP 1 Press the MENU/VOL switch. The menu appears on the display. 1,3,5 Move - Olympus DS320 | DS-320 ViaVoice Kit Instructions (745 KB) - Page 14
up to 99 voice messages. New Recording 1 Press the INDEX/FOLDER button to choose a folder. The INDEX/FOLDER button toggles between folder A and folder B each ERASE SP DICT M/VEONLU 1 time you press it. 2 Press the REC button to start recording. Remaining recording time Folder Message - Olympus DS320 | DS-320 ViaVoice Kit Instructions (745 KB) - Page 15
. For more details see the relevant sections of the manual. Recording modes: SP (Standard Playback) mode/ LP (Long Playback) mode → P.25 Microphone sensitivity: CONF (conference recording)/ DICT (dictation recording) → P.26 Variable Control Voice Actuator (VCVA): OFF/ON → P.27 Notes • When "FULL - Olympus DS320 | DS-320 ViaVoice Kit Instructions (745 KB) - Page 16
Press the INDEX/FOLDER button to choose a folder. 2,6 5,7 1 Move the MENU/VOL switch down to choose the 2 message into which you want to insert recording. 3 4,8 3 Press the PLAY button to play the message. 4 Press the STOP button at the point where you want the insertion to start. 5 Press the - Olympus DS320 | DS-320 ViaVoice Kit Instructions (745 KB) - Page 17
. As soon as another operation (such as Playback) is executed, the recorder will go back to Overwrite mode. • Insert recording will not work if there is no recording time available. Listening While Recording Audio (Recording Monitor) Insert an earphone into the earphone jack to monitor what is - Olympus DS320 | DS-320 ViaVoice Kit Instructions (745 KB) - Page 18
up or down to choose the message you want to play. The time and date when the message was recorded are displayed. Folder Message number 3 Press the PLAY button. The recorder will start playing. The elapsed playing time appears on the display in hour-minute-second format (real-time counter - Olympus DS320 | DS-320 ViaVoice Kit Instructions (745 KB) - Page 19
flash. Resume Playing Press the PLAY button again. ➥Playing will resume at the point of interruption. Notes • The recorder will stop if you press the STOP button while it is paused. • If the recorder is paused for 30 minutes or longer, it enters standby mode and the display shuts off. (To release - Olympus DS320 | DS-320 ViaVoice Kit Instructions (745 KB) - Page 20
Forward While Playing) Press and hold the FF button while playing a message. Review (REV) (Rewind While Playing) Hold the REW button while playing a message. If you press the REW button again during a rewind operation the recorder will skip to the beginning of that message. • Parentheses denote - Olympus DS320 | DS-320 ViaVoice Kit Instructions (745 KB) - Page 21
and then "OK" appears on the display to show the message is erased. Message numbers of subsequent messages are changed automatically, and available recording time increases approximately by the length of the erased message Notes • If you do not press the ERASE button within 4 seconds after Step - Olympus DS320 | DS-320 ViaVoice Kit Instructions (745 KB) - Page 22
the erased messages Notes • If you do not press the ERASE button, or if you press the STOP button within 3 minutes after Step 3 above, the recorder will cancel message erasure and will return to the screen in Step 1. • If a group of erased messages has - Olympus DS320 | DS-320 ViaVoice Kit Instructions (745 KB) - Page 23
Erasing To Partially Erase a Message You can select part of a message to erase. ERASE SP DICT M/VEONLU 1 IFNODLEDXE/ R REC STOP 2,6 1 Press the INDEX/FOLDER button to choose a folder. 2 Move the MENU/VOL switch up or down to choose the message you want to partially erase. 5,7,8 3 3 Press - Olympus DS320 | DS-320 ViaVoice Kit Instructions (745 KB) - Page 24
IFNODLEDXE/ R REC STOP 9 Press the ERASE button for 1 second or longer. "OK" appears on the display when the partial erasure is finished. Remaining recording time is extended for about the length of the partial erasure Notes • If you do not press the ERASE button within 4 seconds after Step - Olympus DS320 | DS-320 ViaVoice Kit Instructions (745 KB) - Page 25
when recording mode is switched. • SP mode is recommended in the following situations: - A better quality recording is desired. - Meetings or lectures need to be clearly recorded. - Messages will be transferred to a PC for speech-to-text conversion with voice recognition software. Recording Modes - Olympus DS320 | DS-320 ViaVoice Kit Instructions (745 KB) - Page 26
Meetings and lectures sometimes cannot be recorded clearly depending on the speakers' voices and ambient acoustic conditions. Recording in SP (Standard Playback) mode is recommended in these situations. (See Recording Modes .... P.25) • If you are having trouble hearing the person speaking, it - Olympus DS320 | DS-320 ViaVoice Kit Instructions (745 KB) - Page 27
reached a preset volume, the built-in Variable Control Voice Actuator (VCVA) starts recording automatically, and stops when the volume drops. Particularly helpful for extended recording, the VCVA not only conserves memory by turning off recording during silent periods, but also makes playback more - Olympus DS320 | DS-320 ViaVoice Kit Instructions (745 KB) - Page 28
Mode Simply pressing the SP DICT button sets up the recorder for dictating or for recording messages to be transferred to a PC for speech-to-text conversion using voice recognition software. Dictation mode settings Recording mode: SP Microphone sensitivity: DICT Alarm: OFF To change settings - Olympus DS320 | DS-320 ViaVoice Kit Instructions (745 KB) - Page 29
appears on the display, along with "INDX", when the index point is reached IFNODLEDXE/ R REC STOP Notes • Additional index marks cannot be recorded while the record indicator lamp is flashing. • A message can have up to 16 index marks. Locating an Index Mark Press the INDEX/FOLDER button while - Olympus DS320 | DS-320 ViaVoice Kit Instructions (745 KB) - Page 30
Transferring Messages Transferring Messages A recorded message can be transferred from one folder to the other. The file is added as the destination folder Canceling a move In Step 5, press the STOP button before pressing the MENU/ VOL switch. The recorder will return to the screen in Step 2. 30 - Olympus DS320 | DS-320 ViaVoice Kit Instructions (745 KB) - Page 31
you press it. The "OFF" setting disables the system sounds. 4 Press the STOP button. This completes the setup procedure Guide of system sounds Tone Explanation Beep, long • Available recording memory is exhausted. beep, beep, • The recorder has finished playing the last long beep message - Olympus DS320 | DS-320 ViaVoice Kit Instructions (745 KB) - Page 32
"OK" appears on the display REC STOP when formatting is complete To Abort Formatting In Step 2, press the STOP button while "YES?" is flashing. The recorder will return to the initial screen before Step 1. Caution Formatting will clear the flash memory of all - Olympus DS320 | DS-320 ViaVoice Kit Instructions (745 KB) - Page 33
needle. • Pressing the reset button may cause the clock to change. Verify the correct time and reset the time and date. • Voice data is not erased when the recorder is reset. Press the MENU/VOL switch R-TIME (P.25) M-SENS (P.26) VCVA (P.27) R-MODE (P.16) ALARM (P.31) FORMAT (P.32) ID (P.13 - Olympus DS320 | DS-320 ViaVoice Kit Instructions (745 KB) - Page 34
Troubleshooting Troubleshooting Q.1 Nothing appears on the display A.1 The batteries are not inserted properly. The batteries are drained. The HOLD switch is set to the HOLD position. The recorder is in standby mode. Q.2 Won't run A.2 The HOLD switch is set to the HOLD position. The batteries are - Olympus DS320 | DS-320 ViaVoice Kit Instructions (745 KB) - Page 35
ME12 Used to get crisp recordings of your own voice by reducing the effects of ambient noise. Recommended to improve the accuracy when using voice-recognition software. AC adapter:A321 (US files to be transferred to a PC through a serial or a USB cable. 35 Specifications/Accessories (optional) - Olympus DS320 | DS-320 ViaVoice Kit Instructions (745 KB) - Page 36
Software Section 36 - Olympus DS320 | DS-320 ViaVoice Kit Instructions (745 KB) - Page 37
or IBM ViaVoice ... 58 How to Use This Manual 38 Creating a Voice Model 44 Connecting the Digital Voice Recorder DS-320 47 Voice File Playback Window 51 Voice File Playback Procedure 52 Sending Voice Files by E-mail 53 Voice Recognition 54 Troubleshooting 59 Technical Assistance and Support - Olympus DS320 | DS-320 ViaVoice Kit Instructions (745 KB) - Page 38
voice recorder. q Playback of voice files. q Recording of voices directly on a PC using the DS-320 digital voice recorder. q Conversion of DSS-format files into WAVE- format files. q Transmission of voice files via e-mail. q Conversion of recorded voices into text using voice recognition software - Olympus DS320 | DS-320 ViaVoice Kit Instructions (745 KB) - Page 39
Software Installing DSS Player Software In order to use the PC link functions, you must first install DSS Player and IBM ViaVoice in your PC. • When running Windows language selected here. Select the desired language. 3 A window entitled ["OLYMPUS DSS PLAYER SETUP"] appears. Be sure to exit all - Olympus DS320 | DS-320 ViaVoice Kit Instructions (745 KB) - Page 40
Installing IBM ViaVoice Software To use Voice recognition, you must also install IBM ViaVoice and then setup your sound system. During installation you will see the following windows. (This section does not show all windows you will see.) User Information Type your name and company name, if - Olympus DS320 | DS-320 ViaVoice Kit Instructions (745 KB) - Page 41
Installing IBM ViaVoice Software Adobe® Acrobat® Reader If Adobe Acrobat Reader is not already installed on your computer, select to view the ViaVoice Command Reference. Click when you have finished. Setup Complete This window indicates that you have successfully installed the software. 41 - Olympus DS320 | DS-320 ViaVoice Kit Instructions (745 KB) - Page 42
user names later but before they start ViaVoice for themselves. People using your speech system must have their own user names. 'Sharing' your user name with others will corrupt your personal speech files and cause recognition problems. For now, ignore the other three fields and click . 42 - Olympus DS320 | DS-320 ViaVoice Kit Instructions (745 KB) - Page 43
Up Your Microphone and Audio System for IBM ViaVoice Audio Setup Wizard This wizard presents several windows to help you set up your microphone. We recommend that you use the microphone that comes with the product until you are thoroughly comfortable with your speech system. The Audio Setup Wizard - Olympus DS320 | DS-320 ViaVoice Kit Instructions (745 KB) - Page 44
text again until it is greyed. When you have finished reading this text aloud, ViaVoice displays the Choosing a Story window. Select the story that you want to read aloud for creating your voice model. If the story you want has two Parts, select Part 1 first. Read the story aloud using your normal - Olympus DS320 | DS-320 ViaVoice Kit Instructions (745 KB) - Page 45
Model When ViaVoice has enough recorded data, you will see the Story Finished window. Click to have ViaVoice create your voice model. However, if you have a strong regional accent, we recommend that you click so that you can record more sentences, giving ViaVoice more - Olympus DS320 | DS-320 ViaVoice Kit Instructions (745 KB) - Page 46
Creating a Voice Model Creating a Voice Model You see this window after clicking . Wait until ViaVoice has fully processed your recording before turning off your computer or working with other processing-intensive programs. 46 - Olympus DS320 | DS-320 ViaVoice Kit Instructions (745 KB) - Page 47
serial cable to the DS-320 digital voice recorder. • For details or locations of the serial port on your PC, refer to your PC's user manual. • Do not unplug the serial connection cable during communication. Otherwise, the data may be corrupted. Connecting the Digital Voice Recorder DS-320 47 - Olympus DS320 | DS-320 ViaVoice Kit Instructions (745 KB) - Page 48
, see "Installing DSS Player Software". 4 5 1 Start Windows. 2 Connect the DS-320 digital voice recorder. For connections, see "Connecting Digital Voice Recorder DS-320". 3 Click the [Start] button. 4 Select [Programs] ➔ [Olympus DSS Player 3.5]. 5 Click [Olympus DSS Player]. 3 • When DSS - Olympus DS320 | DS-320 ViaVoice Kit Instructions (745 KB) - Page 49
and uncheck [Open Download Window After Start]. 2 1 Selected File Downloading Window 3 1 Main Window button Click to close the downloading window and open the main window. 2 Folder Select the folder in the DS-320 digital voice recorder. 3 Folder View Shows the list of voice files in the folder - Olympus DS320 | DS-320 ViaVoice Kit Instructions (745 KB) - Page 50
the file. . The DS-320 digital voice 3 Downloading the voice files. In the [DownLoad] menu, click [Download Selected Files]. • Be careful not to disconnect any cables during 3 downloading. • It is not possible to upload files from the PC to the DS-320 digital voice recorder. • Download times - Olympus DS320 | DS-320 ViaVoice Kit Instructions (745 KB) - Page 51
the downloading window. 2 Current Folder Provides selection of folders in the PC. 3 Voice File list box Shows the list of voice files in the folder selected in 2. 4 Playback control buttons Used for playing back or stopping audio files. 5 OLE button Click to export voice files to E-mail software or - Olympus DS320 | DS-320 ViaVoice Kit Instructions (745 KB) - Page 52
file you want to play back. The illustration shows the display when "C:\ProgramFiles\Olympus\DssPly32\ Message\Folder_A" has been selected. 2 Select the voice file. Select the voice file from the voice file list box. The illustration shows the display when the file "DS640001.dss" is selected - Olympus DS320 | DS-320 ViaVoice Kit Instructions (745 KB) - Page 53
to the instructions of your e-mail software. 1 Start DSS Player. 2 Launch your e-mail program and create a new message. 3 Attaching voice files. From the Voice Files list box of DSS Player, select the voice files to be attached and dragand-drop the OLE button to the mail creation window. (Move the - Olympus DS320 | DS-320 ViaVoice Kit Instructions (745 KB) - Page 54
. Select [Olympus DSS File] in the [Device] list box, then click the button. Voice Recognition 4 The [Audio Setup] window opens. Perform audio setup by following the instructions displayed on your screen. • For audio setup or enrolling using the DS-320 digital voice recorder, use the - Olympus DS320 | DS-320 ViaVoice Kit Instructions (745 KB) - Page 55
SP DICT mode button on the DS-320 digital voice recorder. Creating a Voice Model You must give ViaVoice a sample of your voice through the DS-320 microphone so that it can understand your recorded voice. The User Wizard makes it easy to do this. When you see this window, click , then read the - Olympus DS320 | DS-320 ViaVoice Kit Instructions (745 KB) - Page 56
When ViaVoice has enough data, the Story Finished window will appear. Click to have ViaVoice create your voice model. However, if you have a strong regional accent, we recommend that you click so that you can record more sentences, giving ViaVoice more data for analysis - Olympus DS320 | DS-320 ViaVoice Kit Instructions (745 KB) - Page 57
] icon . The voice recognition software window appears and voice recognition starts. • For more details on the functions of IBM ViaVoice (such as correction of converted characters), refer to the ViaVoice's online help. Notes on Recording for Voice Recognition When recording voices for use in - Olympus DS320 | DS-320 ViaVoice Kit Instructions (745 KB) - Page 58
WAVE format files. • DSS format This is the voice file format recorded by the DS-320. The file naming convention for this format is as [Olympus DSS Player] or [IBM ViaVoice] from the list. 4 Click [Add / Remove] (or [Change/ Delete] with Windows 2000). 5 The file deletion confirmation window appears - Olympus DS320 | DS-320 ViaVoice Kit Instructions (745 KB) - Page 59
Troubleshooting If you have problems, check the following items before calling for service. Symptom Possible Causes Software cannot be installed The DS-320 cannot be recognized The volume is too low Insufficient hard disk capacity. A connection cable is unplugged. DSS Player is not installed. - Olympus DS320 | DS-320 ViaVoice Kit Instructions (745 KB) - Page 60
, London EC1Y 0TX, United Kingdom, Tel. 020-7253-2772 http://www.olympus.com Declaration of Conformity Model Number: Trade Name: Responsible Party: Address: Telephone Number: DS-320 DIGITAL VOICE RECORDER OLYMPUS AMERICA INC. 2 Corporate Center Drive, Melville, NY 11747-3157, U.S.A. 1-800-622
-
 1
1 -
 2
2 -
 3
3 -
 4
4 -
 5
5 -
 6
6 -
 7
7 -
8
-
9
-
10
-
11
-
12
-
13
-
14
-
15
-
16
-
17
-
18
-
19
-
20
-
21
-
22
-
23
-
24
-
25
-
26
-
27
-
28
-
29
-
30
-
31
-
32
-
33
-
34
-
35
-
36
-
37
-
38
-
39
-
40
-
41
-
42
-
43
-
44
-
45
-
46
-
47
-
48
-
49
-
50
-
51
-
52
-
53
-
54
-
55
-
56
-
57
-
58
-
59
-
60
 |
 |

DIGITAL VOICE
RECORDER
DS-320
INSTRUCTIONS
Please read these instructions for information about using
the product correctly and safely.
Keep the instructions handy for future reference.
To ensure successful recordings, we recommend that
you test the record function and volume before use.
ViaVoice kit