Olympus IR 500 IR-500 Dock and Done 2.0 Supplement (English)
Olympus IR 500 - 4MP Digital Solutions Camera Manual
 |
UPC - 050332298798
View all Olympus IR 500 manuals
Add to My Manuals
Save this manual to your list of manuals |
Olympus IR 500 manual content summary:
- Olympus IR 500 | IR-500 Dock and Done 2.0 Supplement (English) - Page 1
Supplementary Information for REFERENCE MANUAL About the Functions Added in Dock&Done 2.0 Update Digital Camera IR-500 - Olympus IR 500 | IR-500 Dock and Done 2.0 Supplement (English) - Page 2
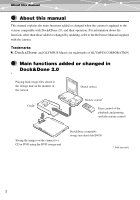
, refer to the Reference Manual supplied with the camera. Trademarks Q, and OLYMPUS Master are trademarks of OLYMPUS CORPORATION. Main functions added or changed in Dock&Done 2.0 POWER Playing back image files stored in the storage unit on the monitor of the camera Digital camera Cradle - Olympus IR 500 | IR-500 Dock and Done 2.0 Supplement (English) - Page 3
gP.5 Dock&Done function Remote control Camera setting Support for the optional Dock&Done-compatible DVD Storage gP.6 Playing back images stored on a storage unit gP.10 Saving images on the camera to the storage unit (ERASE STORED IMAGE)" (P.157) in the Reference Manual supplied with the camera. 3 - Olympus IR 500 | IR-500 Dock and Done 2.0 Supplement (English) - Page 4
automatically after printing is complete 19 Using the remote control for playback 20 Setting up the camera 20 Operating the camera 21 Using the direct buttons on the remote control 22 Others 23 Error message list 23 If a problem arises 24 List of added or changed menu items - Olympus IR 500 | IR-500 Dock and Done 2.0 Supplement (English) - Page 5
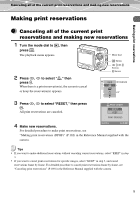
print reservations (DPOF)" (P.182) in the Reference Manual supplied with the camera. Tips • If you want to make additional reservations without canceling current reservations, select "KEEP" in step 3. • If you want to cancel print reservations for specific images, select "KEEP" in step 3, and - Olympus IR 500 | IR-500 Dock and Done 2.0 Supplement (English) - Page 6
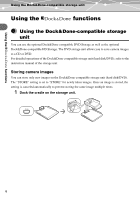
can use the optional Dock&Done-compatible DVD Storage as well as the optional Dock&Done-compatible HD Storage. The DVD storage unit allows you to save camera images to a CD or DVD. For detailed operations of the Dock&Done-compatible storage unit (hard disk/DVD), refer to the instruction manual of - Olympus IR 500 | IR-500 Dock and Done 2.0 Supplement (English) - Page 7
Using the Q Using the Dock&Done-compatible storage unit 2 Connect the AC adapter to the storage unit and the power cord to a wall outlet. 3 Set the Dock&Done mode/PC mode switch on the storage unit to "QDOCK," and turn on the storage unit. Wait until the ACCESS indicator on the storage - Olympus IR 500 | IR-500 Dock and Done 2.0 Supplement (English) - Page 8
Using the Q Using the Dock&Done-compatible storage unit 4 Set the camera on the cradle with the multi-swing display opened. • The camera turns on, and the "QDOCK MODE" screen appears. • The camera refer to the instruction manual of the DVD storage unit. Turn the camera connector dial of the cradle - Olympus IR 500 | IR-500 Dock and Done 2.0 Supplement (English) - Page 9
When the camera is off, the camera battery is charged by the AC adapter of the storage unit. • Packet-writing software is required on your PC if you want to view images stored on a disk using the DVD storage unit. For details about the packet-writing software, refer to the instruction manual of the - Olympus IR 500 | IR-500 Dock and Done 2.0 Supplement (English) - Page 10
unit Playing back images on the storage unit (Storage Playback) You can use the camera's monitor to view images stored on the Dock&Done-compatible storage unit (hard disk/DVD). Before operating the menus, make sure the camera, cradle and storage unit are set up. 1 If the "QDOCK MODE" screen is - Olympus IR 500 | IR-500 Dock and Done 2.0 Supplement (English) - Page 11
the Q functions Using the Dock&Done-compatible storage unit 4 Press a, b, c, d to select the image you want to during storage playback. 4M '05.06.02.14:03 10 To switch the display using the scroll bar When images on the storage unit are displayed in the calendar or index display, you can - Olympus IR 500 | IR-500 Dock and Done 2.0 Supplement (English) - Page 12
the Q functions Using the Dock&Done-compatible storage unit To play back movies on the storage unit Select the movie you want to play back in the index display, then - Olympus IR 500 | IR-500 Dock and Done 2.0 Supplement (English) - Page 13
remove the camera from the cradle or turn the camera off until the storage playback ends. • To use a Dock&Done-compatible HD Storage for storage playback, it is required that it supports the storage playback function. If your model does not support the function, you need to update the firmware of - Olympus IR 500 | IR-500 Dock and Done 2.0 Supplement (English) - Page 14
of the Dock&Done-compatible DVD Storage, refer to the instruction manual of the DVD storage unit. 1 Dock the cradle on the DVD storage unit, and connect the AC adapter to the DVD storage unit and the power cord to a wall outlet. Do not set the camera on the cradle yet. 2 Set the Dock&Done mode - Olympus IR 500 | IR-500 Dock and Done 2.0 Supplement (English) - Page 15
the Q functions Using the Dock&Done-compatible storage unit 6 Set an unused disk in the DVD storage unit. Wait until the ACCESS indicator on the DVD storage unit goes off. 7 Set the camera on the cradle with the multi- swing display opened. • The disk is formatted, images are stored, and then - Olympus IR 500 | IR-500 Dock and Done 2.0 Supplement (English) - Page 16
You can use your camera and a Dock&Done-compatible storage unit (hard disk/DVD) with a Dock&Done-compatible printer to play and print images stored on your camera or storage unit. For details about the operation of the Dock&Done-compatible storage unit or printer, refer to the instruction manual of - Olympus IR 500 | IR-500 Dock and Done 2.0 Supplement (English) - Page 17
Using the Q Printing images being played back 3 Set the Dock&Done mode/PC mode switch on the storage unit to "QDOCK," and turn on the storage unit. Wait until the ACCESS indicator on the storage unit goes off. ACCESS indicator DOCK PC I O 4 Set the camera on the cradle with the multi-swing - Olympus IR 500 | IR-500 Dock and Done 2.0 Supplement (English) - Page 18
9. SELECT SINGLE PRINT 10 PRINT MORE 11 Follow the screen instructions to select the images to be printed, number of prints, and paper size, etc. For details about the settings, see pages 196 and 197 in the Reference Manual supplied with the camera. (The order of steps may differ, but the setting - Olympus IR 500 | IR-500 Dock and Done 2.0 Supplement (English) - Page 19
Using the Q Configuring camera settings Configuring camera settings Resetting the print AND" to "CANCEL" or "KEEP." Setting this to "CANCEL" cancels all print reservations in the camera after printing. REMOTE CONTROL STORE AND PRINT AND MODE RESET CANCEL KEEP Note When "PRINT AND" is - Olympus IR 500 | IR-500 Dock and Done 2.0 Supplement (English) - Page 20
control (RM-100) to play back and print images. For details about the remote control, refer to the instruction manual of the remote control. Setting up the camera Follow the procedure below to set up your camera to use the remote control. 1 Turn the mode dial to q. The setup menu appears. POWER - Olympus IR 500 | IR-500 Dock and Done 2.0 Supplement (English) - Page 21
camera buttons. When using the remote control, set the camera on the cradle. 1 Connect the AC adapter to the cradle, and set the camera on the cradle. Set the camera on a Dock&Done-compatible storage unit. REPLAY: Displays the images on the camera. ALBUM: Displays the images on the camera in the - Olympus IR 500 | IR-500 Dock and Done 2.0 Supplement (English) - Page 22
remote control. Tips • When the AC adapter is not used as the power source of the camera, you cannot turn on the camera using the POWER button on the remote control. • The MENU button Picture rotation button (y) 21 5, 18 - - - In the Reference Manual supplied with the camera - 182 110 126 108 22 - Olympus IR 500 | IR-500 Dock and Done 2.0 Supplement (English) - Page 23
because its format is not compatible with the camera or the image data is damaged. This message is also displayed when sound data recorded to a still image using the postrecording function is selected in storage playback mode. Use image processing software to play back the sound data on a PC. You - Olympus IR 500 | IR-500 Dock and Done 2.0 Supplement (English) - Page 24
camera is correctly set on correctly. the cradle. ( The disk cannot be ejected from the DVD storage unit. The storage playback is not closed. Exit the storage playback and eject the disk again. Ref. page 13 - 13 Tip For problems other than those listed above, refer to the instruction manual - Olympus IR 500 | IR-500 Dock and Done 2.0 Supplement (English) - Page 25
the control frequency. For control does not match that of the details, refer to the instruction manual of - camera. the remote control. The camera is not set on the cradle in the Set the camera on the cradle with the correct direction. multi-swing display raised and the 21 remote control - Olympus IR 500 | IR-500 Dock and Done 2.0 Supplement (English) - Page 26
menu items The following is the list of menu items added or changed in Dock&Done 2.0. The items in boldface type are default settings. For information about menu items other than those changed, see "Menu list" (P.236) in the Reference Manual supplied with the camera. Playback menu (still image) Ref - Olympus IR 500 | IR-500 Dock and Done 2.0 Supplement (English) - Page 27
Others List of added or changed menu items Playback menu (movie) Ref. page Item Settings In this manual INFO m NO INFO/STANDARD/DETAIL STORE STORE/NOT STORE - CREATE SHARE START DISK* 14 In the Reference Manual supplied with the camera 110 105 98 113 119 121 123 126 127 172 136 129 - - Olympus IR 500 | IR-500 Dock and Done 2.0 Supplement (English) - Page 28
OUT NTSC/PAL - REMOTE OFF/ON CONTROL*1 20 STORE AND*1 ERASE/KEEP - PRINT AND*1 CANCEL/KEEP 19 MODE RESET YES/NO - In the Reference Manual supplied with the camera 148 151 152 153 155 159 160 162 163 164 166 167 38 168 170 - 157 - 171 *1 Items added or changed *2 You can switch - Olympus IR 500 | IR-500 Dock and Done 2.0 Supplement (English) - Page 29
Others List of added or changed menu items Storage playback menu* Item CLOSE STORAGE PRINT m STOP y 0 ERASE Settings Ref. page In this manual In the Reference Manual supplied with the camera - 13 - START 18 - NORMAL/SCROLL/FADER/ZOOM DOWN/ZOOM UP/ - 105 CHECKERBOARD/BLINDS/ SWIVEL - Olympus IR 500 | IR-500 Dock and Done 2.0 Supplement (English) - Page 30
support is available from 8 am to 10 pm (Monday to Friday) ET E-Mail: [email protected] Olympus software updates can be obtained at: http://www.olympus.com/digital ) phone services/provider do not permit access or request an additional prefix to +800 numbers. For all not listed European Countries
-
 1
1 -
 2
2 -
 3
3 -
 4
4 -
 5
5 -
 6
6 -
 7
7 -
8
-
9
-
10
-
11
-
12
-
13
-
14
-
15
-
16
-
17
-
18
-
19
-
20
-
21
-
22
-
23
-
24
-
25
-
26
-
27
-
28
-
29
-
30
 |
 |
Supplementary
Information for
REFERENCE MANUAL
About the Functions Added
in Dock&Done 2.0 Update
Digital Camera
IR-500