Onkyo TX-NR676 Owners Manual - Basic/Advanced - Page 4
> Before Start, > Install, > Initial Setup, > Playback, Advanced Manual, > Part Names - setup microphone
 |
View all Onkyo TX-NR676 manuals
Add to My Manuals
Save this manual to your list of manuals |
Page 4 highlights
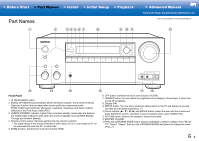
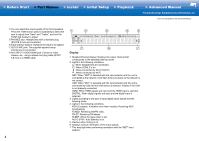
> Before Start > Part Names > Install > Initial Setup > Playback > Advanced Manual Troubleshooting | Supplementary Information, etc. (*)You can find details in the Advanced Manual. 14.You can adjust the sound quality of the front speakers. Press the TONE button (above) repeatedly to select the item to adjust from "Bass" and "Treble", and turn the TONE dial (below) to adjust. 15.PHONES jack: Headphones with a standard plug (Ø1/4"/6.3 mm) are connected. 16.Input selector buttons: Switches the input to be played. 17.SETUP MIC jack: The supplied speaker setup microphone is connected. 18.AUX INPUT AUDIO/HDMI jack: Connect a video camera, etc., using a stereo mini plug cable (Ø1/8"/ 3.5 mm) or a HDMI cable. 4 Display 1. Speaker/Channel display: Displays the output channel that corresponds to the selected listening mode. 2. Lights in the following conditions. Ë: When headphones are connected. Z2: When ZONE 2 is on. : When connected by BLUETOOTH. : When connected by Wi-Fi. NET: When "NET" is selected with the input selector and the unit is connected to the network. It will flash if the connection to the network is not correct. USB: When "NET" is selected with the input selector and the unit is connected by USB and the USB device is selected. Flashes if the USB is not properly connected. HDMI: When HDMI signals are input and the HDMI input is selected. DIGITAL: When digital signals are input and the digital input is selected. 3. Lights according to the type of input digital audio signals and the listening mode. 4. Lights in the following conditions. RDS (European, Australian and Asian models): Receiving RDS broadcasting. TUNED: Receiving AM/FM radio. FM ST: Receiving FM stereo. SLEEP: When the sleep timer is set. AUTO STBY: Auto Standby is on. 5. Flashes when muting is on. 6. Displays various information of the input signals. 7. This may light when performing operations with the "NET" input selector.
-
 1
1 -
 2
2 -
 3
3 -
 4
4 -
 5
5 -
 6
6 -
 7
7 -
 8
8 -
 9
9 -
 10
10 -
11
-
12
-
13
-
14
-
15
-
16
-
17
-
18
-
19
-
20
-
21
-
22
-
23
-
24
-
25
-
26
-
27
-
28
-
29
-
30
-
31
-
32
-
33
-
34
-
35
-
36
-
37
-
38
-
39
-
40
-
41
-
42
-
43
-
44
-
45
-
46
-
47
-
48
-
49
-
50
-
51
-
52
-
53
-
54
-
55
-
56
-
57
-
58
-
59
-
60
-
61
-
62
-
63
-
64
-
65
-
66
-
67
-
68
-
69
-
70
-
71
-
72
-
73
-
74
-
75
-
76
-
77
-
78
-
79
-
80
-
81
-
82
-
83
-
84
-
85
-
86
-
87
-
88
-
89
-
90
-
91
 |
 |
