Onkyo TX-RZ820 Owners Manual - English
Onkyo TX-RZ820 Manual
 |
View all Onkyo TX-RZ820 manuals
Add to My Manuals
Save this manual to your list of manuals |
Onkyo TX-RZ820 manual content summary:
- Onkyo TX-RZ820 | Owners Manual - English - Page 1
TX-RZ820 / AV RECEIVER Before Start 2 Auto Start-up Wizard 24 Playback 26 AV Component Playback 26 BLUETOOTH® Playback 26 Network Functions 27 USB Storage Device 28 Listening to advanced settings, refer to the "Advanced Manual" available on our website. http://www.onkyo.com/manual/txrz820/adv/en - Onkyo TX-RZ820 | Owners Manual - English - Page 2
Start Guide (1) 0 Basic Manual (This manual) firmware updates and service providers may cease services, meaning that some network services and content may become unavailable in the future. Furthermore, available services may vary depending on your area of residence. 0 Details on the firmware update - Onkyo TX-RZ820 | Owners Manual - English - Page 3
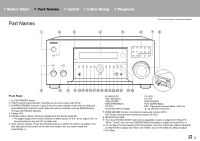
(*)You can find details in the Advanced Manual. Front Panel INPUT HDMI) CD (CD) TV (TV) PHN (PHONO) TUN: AM/FM Radio NET: Playing the Internet Radio, USB, etc. : BLUETOOTH function mode (P33). (*) 10.You can adjust the sound quality of the front speakers. Press the TONE button - Onkyo TX-RZ820 | Owners Manual - English - Page 4
> Playback (*)You can find details in the Advanced Manual. 12.SLEEP button: Set the sleep timer. better sound quality for compressed audio. 15.HDMI OUT button: Allows you to select the HDMI OUT : When ZONE 2/ZONE 3 is on. : When connected by BLUETOOTH. : When connected by Wi-Fi. NET: When "NET" - Onkyo TX-RZ820 | Owners Manual - English - Page 5
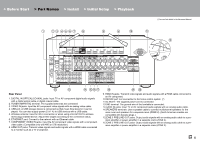
find details in the Advanced Manual. 90° when using a BLUETOOTH wireless technology enabled HDMI OUT jacks: Transmit video signals and audio signals with a HDMI cable connected to a monitor such as a TV or projector. 9. HDMI IN jacks: Transmit video signals and audio signals with a HDMI - Onkyo TX-RZ820 | Owners Manual - English - Page 6
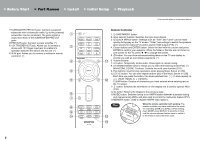
> Initial Setup > Playback (*)You can find details in the Advanced Manual. 17.SUBWOOFER PRE OUT jack: Connect a powered subwoofer with settings to switch the speakers given priority for output (P14) and to switch HDMI output (P16). (*) 4. Cursor buttons and ENTER button: Select the item with - Onkyo TX-RZ820 | Owners Manual - English - Page 7
> Before Start > Part Names > Install > Initial Setup > Playback Installation procedure 1 2 3 This unit can be used in a number of ways, depending on the layout of the speakers you are installing, and the connections made to external devices. Read the following to help make the installation - Onkyo TX-RZ820 | Owners Manual - English - Page 8
field. Furthermore, by installing surround back speakers, you can select the Dolby Atmos listening mode, which realizes the most up-to-date 3D sound, when the input format is Dolby Atmos. The front speakers should be positioned at ear height, while the surround speakers should be positioned just - Onkyo TX-RZ820 | Owners Manual - English - Page 9
height speakers. By installing height speakers, you can select the Dolby Atmos listening mode, which realizes the most up-to-date 3D sound including overhead sounds, when the input format is Dolby Atmos. Front high speakers or rear high speakers should be situated at least 3´/0.9 m higher than the - Onkyo TX-RZ820 | Owners Manual - English - Page 10
Atmos listening mode, which realizes the most up-to-date 3D sound including overhead sounds, when the input format is Dolby Atmos. Fit top front speakers Laboratories recommends placing this type of height speakers to obtain the best Dolby Atmos effect. 0 "Speaker combinations" (P13) introduces some - Onkyo TX-RZ820 | Owners Manual - English - Page 11
from overhead. By installing height speakers, you can select the Dolby Atmos listening mode, which realizes the most up-to-date 3D sound including overhead sounds, when the input format is Dolby Atmos. Place them either above the front speakers, above the surround speakers or above surround back - Onkyo TX-RZ820 | Owners Manual - English - Page 12
> Part Names > Install > Initial Setup > Playback ˎ1 ˎ2 Bi-Amping the Speakers With a 5.1 channel system, it is possible to connect front speakers that support Bi-Amping to improve the quality of the bass and treble. Bi-Amping compatible speakers need their terminals for the tweeters connected to - Onkyo TX-RZ820 | Owners Manual - English - Page 13
can connect two sets of ZONE SPEAKER; ZONE 2A and ZONE 2B. (North American models) (*3) No sound is played from the surround back speakers when playing audio from ZONE SPEAKER. (*4) No sound is played from the height speakers when playing audio from ZONE SPEAKER. (*5) You can connect both surround - Onkyo TX-RZ820 | Owners Manual - English - Page 14
> Before Start > Part Names > Install > Initial Setup > Playback Step2: Connect the Speakers 1/2˝ (12 mm) b a Standard Connections (Pages 8 to 11) Connect 12345678 for a 7.1 channel system. Connect 1234569: for a 5.1.2 channel system. Up to two powered subwoofers can be connected. The same signal - Onkyo TX-RZ820 | Owners Manual - English - Page 15
to "Standard Connections (Pages 8 to 11)" (P14) to connect the center speaker, surround speakers, and powered subwoofer. 0 Also refer to the instruction manual for your speakers when using connections for Bi-Amping. Setup 0 Settings for the speaker configuration you have connected need to be made in - Onkyo TX-RZ820 | Owners Manual - English - Page 16
audio from the TV through this unit. Connection to an ARC compatible TV is complete with one HDMI cable. Refer to the instruction manual for your TV to see if it supports ARC. (*2) Another TV or projector can be connected to the HDMI OUT SUB jack. Press Q (P6) on the remote control and use "Other - Onkyo TX-RZ820 | Owners Manual - English - Page 17
required in the Setup menu after Initial Setup is complete. Press on the remote controller and make the settings in "5. Hardware" - "HDMI". 0 To enjoy digital surround sound including Dolby Digital, audio output should be set to "Bitstream output" on the connected Blu-ray Disc player or other device - Onkyo TX-RZ820 | Owners Manual - English - Page 18
jack will be converted to HDMI video signals and then output from the HDMI OUT jack. 0 To other than BD/DVD. For details, see the Advanced Manual. Setup 0 The COMPONENT VIDEO IN jacks are does not support 480i or 576i output, use the VIDEO IN jack. 0 To enjoy digital surround sound including Dolby - Onkyo TX-RZ820 | Owners Manual - English - Page 19
> Before Start > Part Names > Install > Initial Setup > Playback 4. Connect the Audio Component Example of a connection with an audio component. Connect a CD player using a digital optical cable or analog audio cable. You can also connect a turntable that has an MM-type cartridge to the PHONO jack. - Onkyo TX-RZ820 | Owners Manual - English - Page 20
You can enjoy content from a Blu-ray Disc player on a TV equipped with an HDMI input jack in the separate room (ZONE 2) by playing a Blu-ray Disc player in content from another AV component. Only the video from devices connected to the HDMI IN1 to IN3 jacks can be played on the TV in the separate - Onkyo TX-RZ820 | Owners Manual - English - Page 21
of an external AV component to ZONE 3, connect using an analog audio cable. Output to ZONE 3 is not possible when you connect with an HDMI cable or digital optical/coaxial cable. Setup 0 Settings are required in Initial Setup, "4. Multi Zone Setup" (P25) to enjoy this feature. LINE 0 The audio - Onkyo TX-RZ820 | Owners Manual - English - Page 22
SPEAKER if you have connected the front speakers using Bi-Amping connection. 0 No sound is played from the surround back speakers or the height speakers when playing audio If you have connected to this unit with an HDMI cable or digital optical/coaxial cable, may be necessary to convert the audio - Onkyo TX-RZ820 | Owners Manual - English - Page 23
the antenna around while playing the radio to find the position with the best reception. Use a thumb tack or similar to attach the indoor FM antenna Setup, select the desired setting d method and follow the onscreen instructions to configure the connection. Power Cord Hookup This unit includes a - Onkyo TX-RZ820 | Owners Manual - English - Page 24
> Before Start > Part Names > Install > Initial Setup > Playback Initial Setup with Auto Start-up Wizard 1 INPUT TV 2 3 24 Initial Setup Starts Automatically When you turn the unit on for the first time after purchasing it, Initial Setup is automatically shown on the TV to enable you to make - Onkyo TX-RZ820 | Owners Manual - English - Page 25
recommended to manually adjust the images appear on the TV and that sound is played. ∫ 3. Network Connection ENTER, then follow the onscreen instructions. Keyboard Input To switch between Audio Return Channel If you have connected a TV that supports ARC, select "Yes". This unit's ARC setting turns - Onkyo TX-RZ820 | Owners Manual - English - Page 26
BD/DVD jack. Press TV to listen the TV's sound.To play a device connected to the AUX INPUT HDMI jack on the front panel, press AUX. 0 When the enter "0000". 0 This unit is displayed as "Onkyo TXRZ820 XXXXXX". 0 To connect another BLUETOOTH wireless technology enabled device, press and hold until " - Onkyo TX-RZ820 | Owners Manual - English - Page 27
functions provided through can be played. ENTER to play. firmware updates for this unit. Also see the 0 You may need to make some settings on 0 To return to the previous screen, press Advanced Manual for information about the PC in advance to use Windows (c). new features. Media® Player 11 - Onkyo TX-RZ820 | Owners Manual - English - Page 28
rear panel. 3. Press NET (a) on the remote controller to display the network service list screen. 4. With the cursors on the remote controller, select "USB", for some content you play, which may cause some interruption in sound. 0 Operation cannot be guaranteed for all USB storage devices. 0 - Onkyo TX-RZ820 | Owners Manual - English - Page 29
step setting: 2. Press MODE (e) on the remote controller, so that the "TunMode: Auto" is displayed on the display. Note that if you tune manually, the reception for FM broadcasts will be monaural rather than stereo, irrespective of the sensitivity of the reception. 1. Press TUNER (a) on the remote - Onkyo TX-RZ820 | Owners Manual - English - Page 30
> Before Start > Part Names > Install > Initial Setup > Playback 1 2 ∫ Presetting a Radio Station It allows you to register up to 40 of your favorite AM/FM radio stations. Registration Procedure After tuning into the AM/FM radio station you want to register, perform the following procedure. 1. - Onkyo TX-RZ820 | Owners Manual - English - Page 31
until the remote indicator blinks three or ZONE 3 and adjust with the MASTER "BLUETOOTH" in the separate room, times. VOLUME within 8 seconds. the main room the AM/FM radio. display. 0 You can also adjust the sound quality 0 Power consumption in standby mode of a power amplifier connected - Onkyo TX-RZ820 | Owners Manual - English - Page 32
> Before Start > Part Names > Install > Initial Setup > Playback 0 The information for a connected device can be displayed on the TV screen in a separate room. Press the button while the remote controller is in the mode for controlling ZONE 2. To turn off the function: Press Í while in the mode for - Onkyo TX-RZ820 | Owners Manual - English - Page 33
Advanced Manual. 0 The listening mode last selected for the source is remembered for each of the MOVIE/TV, MUSIC, and GAME buttons. If content you play is not supported ) which is best for playback of classical and opera pieces. Pure Audio Listening mode that provides purer sound quality by switching - Onkyo TX-RZ820 | Owners Manual - English - Page 34
HDMI Logo are trademarks or registered trademarks of HDMI Licensing LLC in the United States and other countries. The Wi-Fi CERTIFIED Logo is a certification mark of Wi-Fi Alliance®. AirPlay trademarks of Onkyo Corporation. " BLUETOOTH® word mark and logos are registered trademarks owned by Bluetooth - Onkyo TX-RZ820 | Owners Manual - English - Page 35
En 35 - Onkyo TX-RZ820 | Owners Manual - English - Page 36
East, Africa> Please contact an Onkyo distributor referring to Onkyo SUPPORT site. http://www.intl.onkyo.com/support/ The above-mentioned information is subject to change without prior notice. Visit the Onkyo web site for the latest update. (C) Copyright 2017 Onkyo & Pioneer Corporation Japan. All
-
 1
1 -
 2
2 -
 3
3 -
 4
4 -
 5
5 -
 6
6 -
 7
7 -
8
-
9
-
10
-
11
-
12
-
13
-
14
-
15
-
16
-
17
-
18
-
19
-
20
-
21
-
22
-
23
-
24
-
25
-
26
-
27
-
28
-
29
-
30
-
31
-
32
-
33
-
34
-
35
-
36
 |
 |

Before Start
.....................................................................
2
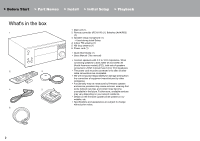
What's in the box
...............................................................
2
Part Names
......................................................................
3
Part Names
.......................................................................
3
Install
...............................................................................
7
Installation procedure
........................................................
7
Step1: Speaker Layout
......................................................
8
Step2: Connect the Speakers
..........................................
14
Step3: Connect the TV & AV Components
......................
16
Initial Setup
...................................................................
24
Initial Setup with Auto Start-up Wizard
............................
24
Playback
........................................................................
26
AV Component Playback
.................................................
26
BLUETOOTH
®
Playback
.................................................
26
Network Functions
...........................................................
27
USB Storage Device
.......................................................
28
Listening to the AM/FM Radio
.........................................
29
Multi-zone
........................................................................
31
Listening Mode
................................................................
33
For details about the Network Functions and listening modes, and
information regarding the advanced settings, refer to the
"Advanced Manual" available on our website.
TX-RZ820 / AV RECEIVER
En