Optoma EP7150 User Manual
Optoma EP7150 Manual
 |
UPC - 796435116309
View all Optoma EP7150 manuals
Add to My Manuals
Save this manual to your list of manuals |
Optoma EP7150 manual content summary:
- Optoma EP7150 | User Manual - Page 1
User Controls 14 Control Panel & Remote Control 14 On-Screen Display Menus 16 How to Operate ...16 Menu Tree ...17 Language ...18 Image-I ...19 Image-II (Computer Mode 21 Image-II (Video Mode 23 Audio ...25 Management ...26 Lamp Setting...27 Appendices 28 Troubleshooting 28 Replacing the Lamp - Optoma EP7150 | User Manual - Page 2
Reset" function from the On Screen Display "Lamp Setting" menu after replacing the lamp module (refer to page 27). Warning- When switching the projector off, please ensure the projector completes its cooling cycle before disconnecting power. Warning- Turn on the projector first and then the signal - Optoma EP7150 | User Manual - Page 3
Usage Notice Do: Turn off the product before cleaning. Use a soft cloth moistened with mild detergent to clean the display housing. Disconnect the power plug from AC outlet if the product is not being used for a long period of time. Don't: Block the slots and openings on the unit - Optoma EP7150 | User Manual - Page 4
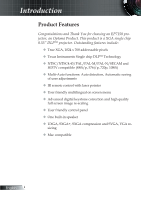
include: True XGA, 1024 x 768 addressable pixels Texas Instruments Single chip DLPTM Technology NTSC/NTSC4.43/PAL/PAL-M/PAL-N/SECAM and HDTV compatible (480i/p, 576i/p, 720p, 1080i) Multi-Auto functions: Auto detection, Automatic saving of user adjustments IR remote control with laser - Optoma EP7150 | User Manual - Page 5
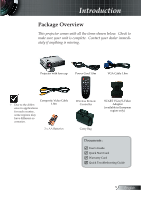
for each country, some regions may have different ac- cessories. 2 x AA Batteries Wireless Remote Controller Carry Bag SCART VGA/S-Video Adaptor (available in European region only) Documents : User's Guide Quick Start Card Warranty Card Quick Troubleshooting Guide 5 English - Optoma EP7150 | User Manual - Page 6
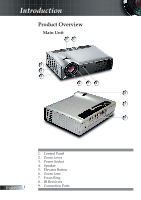
Introduction Product Overview Main Unit 21 3 4 5 6 78 2 1 9 English 6 1. Control Panel 2. Zoom Lever 3. Power Socket 4. Speaker 5. Elevator Button 6. Zoom Lens 7. Focus Ring 8. IR Receivers 9. Connection Ports - Optoma EP7150 | User Manual - Page 7
Introduction Control Panel 4 321 5 67 8 9 1. Enter 2. Menu (On/Off) 3. Power 4. Four Directional Select Keys 5. Source Select 6. Resync 7. Power LED 8. Lamp Indicator LED 9. Temp Indicator LED Connection Ports 6 543 2 1 1. VGA-In SCART Connector (PC Analog signal/SCART RGB/HDTV/ - Optoma EP7150 | User Manual - Page 8
Introduction Remote Control with Laser Pointer 8 1 1. Laser Button 2. Four Directional Select Keys 9 2 3. Keystone +/- 4. Page Up 5. Page Down 3 6. Source Select 7. Freeze 10 4 8. Power 9. Menu 11 5 10. Enter 11. Mute 12 6 12. Resync 13. Hide 13 7 English 8 - Optoma EP7150 | User Manual - Page 9
YPbPr (Optional Accessory) To ensure the projector works well with your computer, please set the display mode of your graphic card less than or equal to 1600 x 1200 resolution. Make sure the timing of the display mode is compatible with the projector. Refer to the "Compatibility Modes" section - Optoma EP7150 | User Manual - Page 10
On/Off the Projector Powering On the Projector 1. Remove the lens cap. 2. Ensure that the power cord and signal cable are securely connected. The Power LED will flash green. 3. Turn on the lamp by pressing "Power" button on the control panel. And the Power LED will turn green. 4. Turn on your - Optoma EP7150 | User Manual - Page 11
the power cord from the electrical outlet and the projector. 4. Do not turn on the projector immediately following a power off procedure. Warning Indicator When the "LAMP" indicator lights solid red, the projector will automatically shut itself down. Please contact your local reseller or service - Optoma EP7150 | User Manual - Page 12
Adjusting the Projected Image Adjusting the Projector Image Height The projector is equipped display angle. To lower the image: 1. Press the elevator button. 2. Lower the image, then release the button to lock the eleva- tor foot into position. 3. Use screw in feet to fine-tune the display - Optoma EP7150 | User Manual - Page 13
projector will focus at distances from 4.9 to 39.4 feet (1.5 to 12.0 meters) with mechanical travel. Zoom Lever Focus Ring Adjusting Projection .4cm) Distance 4.9' (1.5m) 9.8' (3.0m) 16.4' (5.0m) This graph is for user's reference only. 177.9"(451.8cm) 161.8"(410.9cm) 142.3" x 106.7" 361.4 x - Optoma EP7150 | User Manual - Page 14
User Controls Control Panel & Remote Control There are two ways for you to control the functions: Remote Control and Control Panel. Using the Control Panel 12 Power Source 1 Menu Four Directional Select Keys Enter Resync 2 Refer to the "Power On/Off the Projector" section on pages 10-11. Press " - Optoma EP7150 | User Manual - Page 15
User Controls Using the Remote Control Power Refer to the "Power On/Off the Projector" section on pages 10-11. Resync Automatically synchronizes the projector to to navigate through the menus. Display or exits the on-screen display menus for projector. Confirm your item selection. 15 English - Optoma EP7150 | User Manual - Page 16
User Controls On Screen Display Menus The Projector has multilingual On Screen Display menus that allow you to make image adjustments and change a variety of settings. The projector will automatically detect the source. How to Operate 1. To open the OSD menu, press "Menu" on the Remote Control or - Optoma EP7150 | User Manual - Page 17
Menu Tree User Controls 17 English - Optoma EP7150 | User Manual - Page 18
User Controls Language Language Choose the multilingual OSD menu. Use the your preferred language. Press "Enter" to finalize the selection. or key to select English 18 - Optoma EP7150 | User Manual - Page 19
User Controls Image-I Display Mode There are many factory presets optimized for various types of images. PC: For computer or notebook. (brightest image) Movie: For home theater. sRGB: For standard PC color. (best color reproduction) Bright: For bright mode. User: Memorize user's settings. - Optoma EP7150 | User Manual - Page 20
User Controls mum peaking. If you prefer a brighter image, adjust towards the maximum setting. For a smooth and more natural image, adjust towards the minimum setting. Color Temp. - Optoma EP7150 | User Manual - Page 21
User Controls Image-II (Computer Mode) Frequency "Frequency" changes the display data frequency to match the frequency of to choose your desired aspect ratio. 4:3 : The input source will be scaled to fit the projection screen. 16:9 : The input source will be scaled to fit the width of the screen. - Optoma EP7150 | User Manual - Page 22
User Controls Input Signal Display area Picture area Display on Screen "16:9 Image Position" function is supported under 16:9 aspect ratio. 16:9 Image Position Adjust the image position up or down, when you select the aspect ratio of 16:9. Press the to - Optoma EP7150 | User Manual - Page 23
User Controls Image-II (Video Mode) "Saturation", "Tint" and "Sharpness" function is not supported under DVI-D mode. to choose your desired aspect ratio. 4:3 : The input source will be scaled to fit the projection screen. 16:9 : The input source will be scaled to fit the width of the screen. - Optoma EP7150 | User Manual - Page 24
User Controls Input Signal Display area Picture area Display on Screen "16:9 Image Position" function is supported under 16:9 aspect ratio. 16:9 Image Position Adjust the image position up or down, when you select the aspect ratio of 16:9. Press the to - Optoma EP7150 | User Manual - Page 25
User Controls Audio Volume Press Press Mute to decrease the volume. to increase the volume. Choose the left icon to turn mute on. Choose the right icon to turn mute off. 25 English - Optoma EP7150 | User Manual - Page 26
User Controls Management Menu Location Choose the menu location on the display screen. Projection Front-Desktop The factory default setting. Rear-Desktop When you select this function, the projector reverses the image so you can project from behind a translucent screen. Signal Type - Optoma EP7150 | User Manual - Page 27
User Controls Lamp Setting Lamp Hours Displays the cumulative lamp operating time. Lamp Reset Resets the lamp life hour counter after replacing the lamp. Lamp Reminder Choose this function to show or to hide the warning message when the changing lamp message is displayed. The message will appear 30 - Optoma EP7150 | User Manual - Page 28
to the "Replacing the lamp" section. Make sure you have removed the lens cap and the projector is switched on. Ensure that the "Hide" feature is not turned on. Problem: Left of right edge of the image is missing or the image is unstable or noisy Press "Resync" on the remote control or press - Optoma EP7150 | User Manual - Page 29
IBM=> [Fn]+[F7] Toshiba => [Fn]+[F5] Mac Apple: System Preference-->Display-->Arrangement-->Mirror display If you experience difficulty changing resolutions or your monitor freezes, restart all equipment including the projector. Problem: The screen of the Notebook or PowerBook computer is not - Optoma EP7150 | User Manual - Page 30
sound. If this happens, the projector will not turn on until the lamp module has been replaced. To replace the lamp, follow the procedures in the "Replacing the Lamp". Problem: LED lighting message Message Power-LED (Green) Standby state (Input power cord) Flashing 0.5Hz Warming Flashing 1Hz - Optoma EP7150 | User Manual - Page 31
Appendices Problem: Message Reminders Fan fail: Over temperature: Power Off: Replace the lamp: 31 English - Optoma EP7150 | User Manual - Page 32
touch the lamp bulb. The bulb may shatter and cause injury if it is dropped. English 32 Lamp Replacement Procedure: 1. Switch off the power to the projector by pressing the Power button. 2. Allow the projector to cool down for at least 30 minutes. 3. Disconnect the power cord. 4. Use a screwdriver - Optoma EP7150 | User Manual - Page 33
XGA VESA XGA VESA XGA * VESA SXGA * VESA SXGA * VESA SXGA * VESA SXGA * VESA SXGA+ * VESA UXGA MAC LC 13" MAC II 13" MAC 16" MAC 19" * MAC MAC G4 i MAC DV * i MAC DV * i MAC DV Resolution 640 x 350 640 x 350 640 x 400 640 x 480 640 x 480 640 x 480 640 x 480 720 x 400 720 - Optoma EP7150 | User Manual - Page 34
Global Offices For service or support please contact your local office. USA 715 Sycamore Drive Milpitas, CA 95035, USA www.optomausa.com Tel : 408-383-3700 Fax: 408-383-3702 Service : [email protected] Canada 5630 Kennedy Road, Mississauga, ON, L4Z 2A9, Canada Tel : 905-882-4228 Fax: 905 - Optoma EP7150 | User Manual - Page 35
general notices of your Projector. FCC notice This device has been tested and found to comply installed and used in accordance with the instructions, may cause harmful interference to radio determined by turning the device off and on, the user is encouraged to try to correct the interference by one - Optoma EP7150 | User Manual - Page 36
interference, and 2.this device must accept any interference received, includ- ing interference that may cause undesired operation. Notice: Canadian users This Class B digital apparatus complies with Canadian ICES-003. Remarque à l'intention des utilisateurs canadiens Cet appareil numerique de la
-
 1
1 -
 2
2 -
 3
3 -
 4
4 -
 5
5 -
 6
6 -
 7
7 -
8
-
9
-
10
-
11
-
12
-
13
-
14
-
15
-
16
-
17
-
18
-
19
-
20
-
21
-
22
-
23
-
24
-
25
-
26
-
27
-
28
-
29
-
30
-
31
-
32
-
33
-
34
-
35
-
36
 |
 |

1
English
Table of Contents
Table of Contents
.........................................................................................
1
Usage Notice
................................................................................................
2
Precautions
..........................................................................................................
2
Introduction
..................................................................................................
4
Product Features
..................................................................................................
4
Package Overview
...............................................................................................
5
Product Overview
.................................................................................................
6
Main Unit
........................................................................................................................
6
Control Panel
.................................................................................................................
7
Connection Ports
...........................................................................................................
7
Remote Control with Laser Pointer
................................................................................
8
Installation
....................................................................................................
9
Connecting the Projector
......................................................................................
9
Powering On/Off the Projector
...........................................................................
10
Powering On the Projector
...........................................................................................
10
Powering Off the projector
...........................................................................................
11
Warning Indicator
.........................................................................................................
11
Adjusting the Projected Image
...........................................................................
12
Adjusting the Projector Image Height
..........................................................................
12
Adjusting the Projector Zoom / Focus
..........................................................................
13
Adjusting Projected Image Size
...................................................................................
13
User Controls
.............................................................................................
14
Control Panel & Remote Control
........................................................................
14
On-Screen Display Menus
.................................................................................
16
How to Operate
...........................................................................................................
16
Menu Tree
..........................................................................................................
17
Language
.....................................................................................................................
18
Image-I
........................................................................................................................
19
Image-II (Computer Mode)
...........................................................................................
21
Image-II (Video Mode)
.................................................................................................
23
Audio
............................................................................................................................
25
Management
................................................................................................................
26
Lamp Setting
................................................................................................................
27
Appendices
................................................................................................
28
Troubleshooting
..................................................................................................
28
Replacing the Lamp
...........................................................................................
32
Compatibility Modes
...........................................................................................
33
Optoma Global Offices
.......................................................................................
34
Regulation & Safety notices
...............................................................................
35