Optoma W515 User manual - Page 63
D Setup
 |
View all Optoma W515 manuals
Add to My Manuals
Save this manual to your list of manuals |
Page 63 highlights
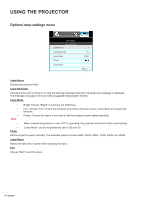
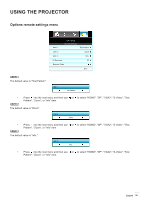
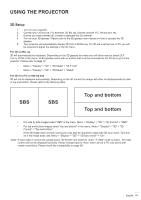
USING THE PROJECTOR 3D Setup 1. Turn on your projector. 2. Connect your 3D source. For example, 3D Blu ray, Games console, PC, Set top box, etc. 3. Ensure you have inserted 3D content or selected the 3D channel. 4. Turn on your 3D glasses. Please refer to the 3D glasses user manual on how to operate the 3D glasses. 5. Your projector will automatically display 3D from a 3D Blu-ray. For 3D via a set top box or PC you will be required to adjust the settings in the 3D menu. For 3D via Blu ray 3D will automatically be displayed. Depending on the 3D glasses you have you will either need to select DLP Link or VESA in the menu. VESA glasses come with an emitter that must be connected to the 3D Sync port of the projector. Please refer to page 14. ‡‡ Menu > "Display" > "3D" > "3D Mode" > "DLP Link" ‡‡ Menu > "Display" > "3D" > "3D Mode" > "VESA" For 3D via a PC or Set top box 3D will not be displayed automatically. Depending on the 3D content the image will either be displayed side by side or top and bottom. Please refer to the following table. SBS SBS Top and bottom Top and bottom ‡‡ For side by side images select "SBS" in the menu. Menu > "Display" > "3D" > "3D Format" > "SBS". ‡‡ For top and bottom images select "top and bottom" in the menu. Menu > "Display" > "3D" > "3D Format" > "Top and bottom". If the 3D image does not look correct you may also be required to adjust the 3D sync invert. Turn this on if the image looks odd. Menu > "Display" > "3D" > "3D Sync Invert" > "On". Note: If input video is normal 2D, please press "3D format" and switch to "Auto". If "SBS" mode is active , 2D video content will not be displayed correctly. Please change back to "Auto" when 3D via a PC only works with certain resolutions. Please check the compatibility on page 69. English 63
-
 1
1 -
2
-
3
-
4
-
5
-
6
-
7
-
8
-
9
-
10
-
11
-
12
-
13
-
14
-
15
-
16
-
17
-
18
-
19
-
20
-
21
-
22
-
23
-
24
-
25
-
26
-
27
-
28
-
29
-
30
-
31
-
32
-
33
-
34
-
35
-
36
-
37
-
38
-
39
-
40
-
41
-
42
-
43
-
44
-
45
-
46
-
47
-
48
-
49
-
50
-
51
-
52
-
53
-
54
-
55
-
56
-
57
-
 58
58 -
 59
59 -
 60
60 -
 61
61 -
 62
62 -
 63
63 -
 64
64 -
 65
65 -
 66
66 -
 67
67 -
 68
68 -
69
-
70
-
71
-
72
-
73
-
74
-
75
-
76
-
77
-
78
-
79
-
80
-
81
-
82
-
83
-
84
-
85
-
86
-
87
-
88
-
89
-
90
-
91
-
92
-
93
-
94
-
95
-
96
 |
 |