Oreck XL2800H2 Owners Guide - Page 4
Assembly To Replace Filter Dust Bag - cord for
 |
View all Oreck XL2800H2 manuals
Add to My Manuals
Save this manual to your list of manuals |
Page 4 highlights
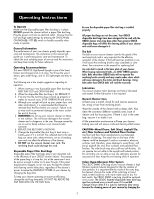
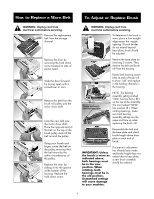
Assembly To assist you in identifying 10 components of your vacuum, 11 the parts have been numbered 9 as follows: 1 Handle section, upper 1 2 Tube, lower 3 Power head 4 Outer bag 5 Paper filter dust bag 5 4 12 6 Power cord 13 6 7 Retaining spring 2 8 Bag tension bar 9 Zip fastener 10 On/off switch 11 Cord hook 7 15 14 12 Plastic loop/cable clamp 8 13 Connector assembly 14 Fan housing 3 15 Cord assembly © Upper Handle © Connector Assembly Before assembling appliance. Remove two (2) screws from connector assembly (13). Slide upper handle section (1) over matching section of the connector assembly (13), aligning screw holes. Finally, insert screws in holes and tighten firmly until handle is not loose. Plug (Cord Assembly) Machine should be in upright position when inserting cord assembly into loop. Insert plug on cord assembly into handle. Wrap power cord (6) around cord wrap (11) and cord wrap (13) and secure to "U" shaped part on plug. To Replace Filter Dust Bag WARNING: Unplug cord from electrical outlet before servicing. BAG REMOVAL : 1. Unsnap bag door from base. 2. Gently pull bag from cardboard collar upwards. 3. Dust seal will close automatically BAG INSTALLATION : 1. Slide the cardboard collar onto bag dock door until the automatic closing dust seal tab hole is locked in position. 2. Firmly push bag dock door with both thumbs on indication point until it snaps. 4
-
 1
1 -
 2
2 -
 3
3 -
 4
4 -
 5
5 -
 6
6 -
 7
7 -
 8
8
 |
 |
