Panasonic 1100W Service Manual - Page 6
Operation And Digital Programmer Circuit Test Procedure - power supply
 |
UPC - 074000617384
View all Panasonic 1100W manuals
Add to My Manuals
Save this manual to your list of manuals |
Page 6 highlights
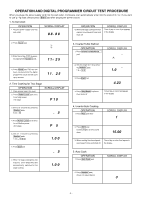
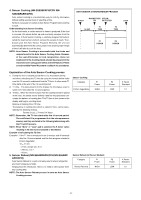
OPERATION AND DIGITAL PROGRAMMER CIRCUIT TEST PROCEDURE When you pluge the power supply cord into the wall outlet, microwave oven automatically enter into the state of lb / oz. If you want to use g / kg state, please press Start pad after pluging the power source. 1. To Set Clock OPERATION 1. Plug the power supply cord into wall outlet. SCROLL DISPLAY 88.88 OPERATION 8. When 2nd stage cooking time has elapsed, oven beeps 5 times and shuts off. SCROLL DISPLAY Time of day or colon if set appears in the display. 2. Press Clock pad. 3. Enter time of day (TOD) by pressing appropriate Number pads. 11 25 4. Press Clock pad. TOD has now been resistered into the digital programmer circuit and will count up by minutes. 11. 25 2. Time Cooking for Two Stage OPERATION 1. Place a water load in the oven. 2. Press Power Level pad once to set High power. (1st stage) SCROLL DISPLAY P 10 3. Set for 5 seconds by pressing Number pads. 5 sec.= 5 . 5 4. Press Power Level pad 46 times to set Medium power. (2nd stage) P 5 5. Set for 1 minute by pressing Number pads. 1 min.= 1 0 0 1.0 0 6. Press Start pad. . 5 7. When 1st stage cooking time has elapsed. Oven beeps twice and automatically switches to 2nd stage cooking. 1.0 0 3. Inverter Turbo Defrost OPERATION 1. Press Inverter Turbo Defrost pad. SCROLL DISPLAY 2. Set the weight for 1 lb by pressing Number pads. 1 lb = 1 0 1.0 3. Press Start Pad. 4.23 4. Press Stop/Reset Pad twice. Oven shuts off. Time of day or colon if set appears in the display. 4. Inverter Auto Cooking OPERATION 1. Press Rice pad twice. SCROLL DISPLAY 1 2. Press Start pad. Cooking begins as time counts down. 15.00 3. When cooking time has elapsed, oven beeps 5 times and shuts off. Time of day or colon if set appers in the display. 5. Auto Cook OPERATION 1. Press Auto Cook pad. SCROLL DISPLAY 2. Press Number pads. (Press 3 to select Bacon) 3 - 5 -
-
 1
1 -
 2
2 -
 3
3 -
 4
4 -
 5
5 -
 6
6 -
 7
7 -
 8
8 -
 9
9 -
 10
10 -
 11
11 -
 12
12 -
13
-
14
-
15
-
16
-
17
-
18
-
19
-
20
-
21
-
22
-
23
-
24
-
25
-
26
-
27
-
28
-
29
-
30
-
31
-
32
-
33
-
34
-
35
-
36
 |
 |
