Panasonic AG-AC160A Operating Instructions Basic - Page 23
Front side and rear side, SLOT SEL button of Vol.2
 |
View all Panasonic AG-AC160A manuals
Add to My Manuals
Save this manual to your list of manuals |
Page 23 highlights
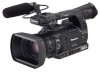
Description of parts Front side and rear side 12 3 4 5 6 7 8 9 10 11 14 15 16 12 17 18 13 19 20 21 22 23 1 Remote control sensor (front) (Page 29) 2 Natural light sensor (Page 22 of Vol.2) 3 Tally lamp (front) (Page 9 of Vol.2) 4 Built-in speaker (Page 66 of Vol.2) 5 AWB button (Page 20 of Vol.2) 6 Tripod hole (bottom) (Page 18) 7 Viewfinder (Page 5 of Vol.2) 8 Memory card slot cover and OPEN lever (Page 10 of Vol.2) 9 Memory card slot and memory card access lamp (Page 12 of Vol.2) 10 Tally lamp (rear) (Page 9 of Vol.2) 11 Remote control sensor (rear) (Page 29) 12 Battery release button (Page 26) 13 Battery compartment (Page 26) 14 HD indicator (Page 30) 15 SLOT SEL button (Page 12 of Vol.2) 16 Protective caps Keep protective caps fitted over connecting terminals that are not being used. 17 USB2.0 terminal (Page 68 of Vol.2) 18 Headphone jack (3.5 mm stereo mini jack) (Page 67 of Vol.2) 19 INDEX REMOTE jack (2.5 mm super mini jack) 20 CAM REMOTE jack* FOCUS/IRIS (3.5 mm mini jack) You can connect a remote control unit (optional) to control the FOCUS and IRIS operations. ZOOM S/S (2.5 mm super mini jack) You can connect a remote control unit to control the zoom and recording start/stop operation. * Do not connect any equipment except the remote control to the jack. Connecting any equipment other than the remote control may cause the image brightness to change or the images to appear out of focus. 21 SDI OUT terminal (Page 70 of Vol.2) 22 HDMI OUT terminal (Page 70 of Vol.2) 23 DV OUT terminal (Page 69 of Vol.2) 23
-
 1
1 -
2
-
3
-
4
-
5
-
6
-
7
-
8
-
9
-
10
-
11
-
12
-
13
-
14
-
15
-
16
-
17
-
 18
18 -
 19
19 -
 20
20 -
 21
21 -
 22
22 -
 23
23 -
 24
24 -
 25
25 -
 26
26 -
 27
27 -
 28
28 -
29
-
30
-
31
-
32
-
33
-
34
-
35
-
36
-
37
-
38
-
39
-
40
-
41
-
42
 |
 |
