Panasonic AG-AC160A Operating Instructions Basic - Page 29
Fitting the eye cup, The remote control, Inserting the battery, Remote control usable range
 |
View all Panasonic AG-AC160A manuals
Add to My Manuals
Save this manual to your list of manuals |
Page 29 highlights
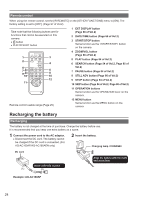
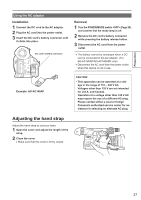
Preparation Fitting the eye cup Attach the eye cup by fitting the eye cup holder and the ridges of the eye cup together. ••Turning the eye cup after attaching it may cause the eye cup holder to come off. If the eye cup holder does come off, see "Cleaning the viewfinder" (Page 106 of Vol.2) and refit it. Eye cup holder Eye cup Ridges The remote control Inserting the battery 1 Remove the holder while pushing the catch in the direction shown by arrow (1). (2) (1) Remote control usable range For the remote control sensor, Distance: Approx. within 5 m Angle: Approx. 10° upward, 15° downward, and 15° sideways (using the accessory battery) 2 Insert the battery with the side marked with facing up. Remote control sensor (rear) 3 Return the holder to its original position. ••When the battery (CR2025) runs out, replace it with a new one. (Battery life depends on the frequency of usage but is approximated at about one year.) If the remote control unit fails to work even when it is operated near the camera's remote control sensor, it means that the battery has run out. ••Keep the battery out of the reach of children. Remote control sensor (front) ••These are the operation range values when the remote control is used indoors. If used outdoors or if strong light is hitting the remote control sensor, the remote control may not operate properly even within the said ranges. ••The remote control is set to [OFF] in the factory settings. When using the remote control, set the [IR REMOTE] on the [OTHER FUNCTIONS] menu to [ON]. (Page 97 of Vol.2) 29
-
 1
1 -
2
-
3
-
4
-
5
-
6
-
7
-
8
-
9
-
10
-
11
-
12
-
13
-
14
-
15
-
16
-
17
-
18
-
19
-
20
-
21
-
22
-
23
-
 24
24 -
 25
25 -
 26
26 -
 27
27 -
 28
28 -
 29
29 -
 30
30 -
 31
31 -
 32
32 -
 33
33 -
 34
34 -
35
-
36
-
37
-
38
-
39
-
40
-
41
-
42
 |
 |
