Panasonic HDC-TM300K Hd Sd Camcorder - Multi Language - Page 41
Adjusting LCD monitor, viewfinder
 |
UPC - 037988983957
View all Panasonic HDC-TM300K manuals
Add to My Manuals
Save this manual to your list of manuals |
Page 41 highlights
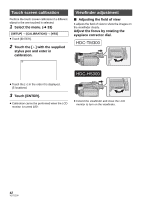
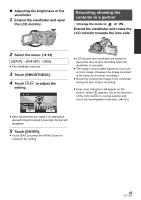
Preparation Setup 7 Adjusting LCD monitor/ viewfinder ≥ These settings will not affect the images actually recorded. LCD monitor adjustment ∫ Adjusting the brightness and color level of the LCD monitor ∫ Power LCD This makes it easier to view the LCD monitor in bright places including outdoors. Select the menu. (l 33) [SETUP] # [POWER LCD] # desired setting ≥ It is possible to set from the quick menu. (l 34) +2 : Makes even brighter +1 : Makes brighter 0: Normal -1 : Makes less bright A: Brightness of the LCD is automatically adjusted depending on the ambient brightness. (It is not displayed in the Manual Mode or in the Playback Mode.) It adjusts brightness and color density on the LCD monitor. 1 Select the menu. (l 33) [SETUP] # [LCD SET] # [YES] 2 Touch the desired setting item. [BRIGHTNESS]: Brightness of the LCD monitor [COLOR]: Color level of the LCD monitor 3 Touch / to adjust settings. ≥ If you use the AC adaptor, the +1 indication appears and the screen becomes brighter automatically when the power is turned on. ≥ The recordable time will become shorter when you use this unit with the LCD monitor lit up. ≥ After adjustments are made if no operations are performed for about 2 seconds, the bar will disappear. 4 Touch [ENTER]. ≥ Touch [EXIT] or press the MENU button to exit the menu screen. 41 VQT1Z09
-
 1
1 -
2
-
3
-
4
-
5
-
6
-
7
-
8
-
9
-
10
-
11
-
12
-
13
-
14
-
15
-
16
-
17
-
18
-
19
-
20
-
21
-
22
-
23
-
24
-
25
-
26
-
27
-
28
-
29
-
30
-
31
-
32
-
33
-
34
-
35
-
 36
36 -
 37
37 -
 38
38 -
 39
39 -
 40
40 -
 41
41 -
 42
42 -
 43
43 -
 44
44 -
 45
45 -
 46
46 -
47
-
48
-
49
-
50
-
51
-
52
-
53
-
54
-
55
-
56
-
57
-
58
-
59
-
60
-
61
-
62
-
63
-
64
-
65
-
66
-
67
-
68
-
69
-
70
-
71
-
72
-
73
-
74
-
75
-
76
-
77
-
78
-
79
-
80
-
81
-
82
-
83
-
84
-
85
-
86
-
87
-
88
-
89
-
90
-
91
-
92
-
93
-
94
-
95
-
96
-
97
-
98
-
99
-
100
-
101
-
102
-
103
-
104
-
105
-
106
-
107
-
108
-
109
-
110
-
111
-
112
-
113
-
114
-
115
-
116
-
117
-
118
-
119
-
120
-
121
-
122
-
123
-
124
-
125
-
126
-
127
-
128
-
129
-
130
-
131
-
132
-
133
-
134
-
135
-
136
-
137
-
138
-
139
-
140
-
141
-
142
-
143
-
144
-
145
-
146
-
147
-
148
-
149
-
150
-
151
-
152
-
153
-
154
-
155
-
156
-
157
-
158
-
159
-
160
-
161
-
162
-
163
-
164
-
165
-
166
-
167
-
168
-
169
-
170
-
171
-
172
 |
 |
