Panasonic KXFLB756 KXFLB756 User Guide - Page 17
Connections
 |
UPC - 037988809622
View all Panasonic KXFLB756 manuals
Add to My Manuals
Save this manual to your list of manuals |
Page 17 highlights
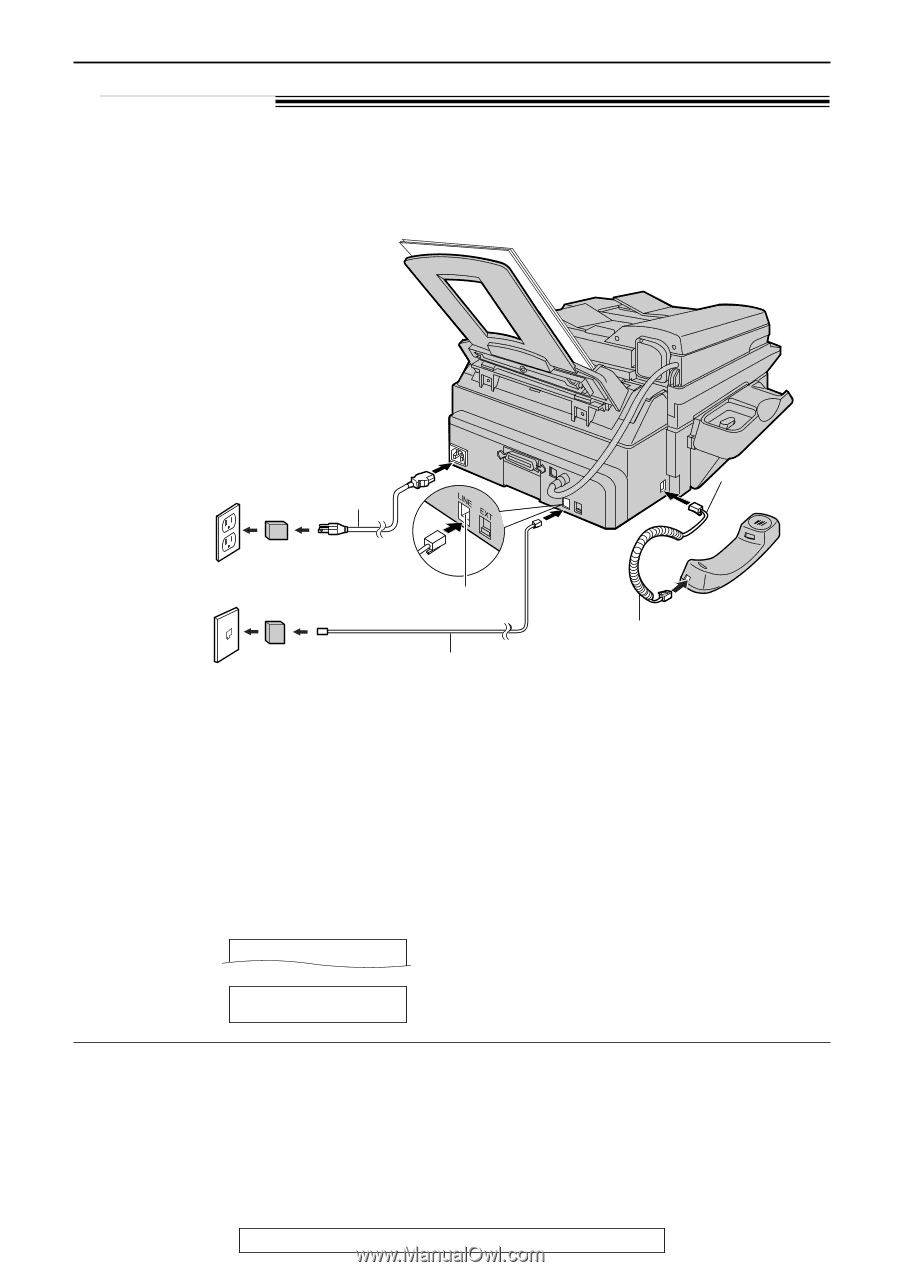
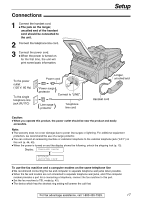
Connections! 1 Connect the handset cord. G The jack on the longer, uncoiled end of the handset cord should be connected to the unit. 2 Connect the telephone line cord. 3 Connect the power cord. G When the power is turned on for the first time, the unit will print some basic information. Setup To the power outlet (120 V, 60 Hz) To the single telephone line jack (RJ11C) Power cord ( ) Power surge protector Connect to "LINE". ( ) Line surge protector Telephone line cord Longer, uncoiled end Handset cord Caution: G When you operate this product, the power outlet should be near the product and easily accessible. Note: G The warranty does not cover damage due to power line surges or lightning. For additional equipment protection, we recommend the use of a surge protector. G You can connect an answering machine or extension telephone to the external telephone jack ("EXT") on this unit (p. 44, 45). G When the power is turned on and the display shows the following, unlock the shipping lock (p. 12). Display: CARRIAGE ERROR / RELEASE SHIPPING LOCK To use the fax machine and a computer modem on the same telephone line G We recommend connecting the fax and computer to separate telephone wall jacks when possible. G When the fax and modem are not connected to separate telephone wall jacks, and if the computer modem provides a port for a connecting a telephone, connect the fax machine to this port. G Set the fax machine to TEL mode (p. 42). G The device which has the shortest ring setting will answer the call first. For fax advantage assistance, call 1-800-435-7329. 17
-
 1
1 -
2
-
3
-
4
-
5
-
6
-
7
-
8
-
9
-
10
-
11
-
 12
12 -
 13
13 -
 14
14 -
 15
15 -
 16
16 -
 17
17 -
 18
18 -
 19
19 -
 20
20 -
 21
21 -
 22
22 -
23
-
24
-
25
-
26
-
27
-
28
-
29
-
30
-
31
-
32
-
33
-
34
-
35
-
36
-
37
-
38
-
39
-
40
-
41
-
42
-
43
-
44
-
45
-
46
-
47
-
48
-
49
-
50
-
51
-
52
-
53
-
54
-
55
-
56
-
57
-
58
-
59
-
60
-
61
-
62
-
63
-
64
-
65
-
66
-
67
-
68
-
69
-
70
-
71
-
72
-
73
-
74
-
75
-
76
-
77
-
78
-
79
-
80
-
81
-
82
-
83
-
84
-
85
-
86
-
87
-
88
-
89
-
90
-
91
-
92
 |
 |