Panasonic PTDS8500U PTDS8500U User Guide - Page 65
To display the adjustment marker, ADJUST]., Press <ENTER> button., UPPER], [LOWER], [RIGHT]
 |
UPC - 885170010994
View all Panasonic PTDS8500U manuals
Add to My Manuals
Save this manual to your list of manuals |
Page 65 highlights
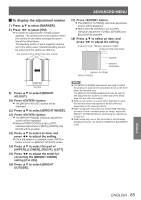
ADVANCED MENU JJTo display the adjustment marker 7777 Press ▲▼ to select [MARKER]. 8888 Press ◄► to select [ON]. zzA marker for adjusting the overlap position appears. The optimal point is the position where the red line of one frame overlaps the green line of the other frame. The blending widths of each projector must be set to the same value. Optimal blending cannot be achieved if the widths are different. The optimal point is where these lines overlap. 1111 Press button. zzThe [BRIGHT OUTSIDE] individual adjustment screen will be displayed. zzWhen [INTERLOCKED] is set to [OFF], individual adjustment of [RED], [GREEN] and [BLUE] will be possible. 1111 Press ▲▼ to select an item, and press ◄► to adjust the setting. Projection range BRIGHT adjustment (right) Edge blending width (right) MAKER BRIGHT BLENDING BRIGHT OUTSIDE BRIGHT INSIDE Green line Red line 999 Press ▲▼ to select [BRIGHT ADJUST]. 1111 Press button. zzThe [BRIGHT ADJUST] screen will be displayed. 1111 Press ▲▼ to select [BRIGHT INSIDE]. 1111 Press button. zzThe [BRIGHT INSIDE] individual adjustment screen will be displayed. zzWhen [INTERLOCKED] is set to [OFF], individual adjustment of [RED], [GREEN] and [BLUE] will be possible. 1111 Press ▲▼ to select an item, and press ◄► to adjust the setting. zzOnce adjustment is complete, press button to return to [BRIGHT ADJUST] screen. 1111 Press ▲▼ to select the part of [UPPER], [LOWER], [RIGHT], [LEFT]. 1111 Press ◄► to adjust the width for correcting the [BRIGHT INSIDE] setting (0 to 255). 1111 Press ▲▼ to select [BRIGHT OUTSIDE]. Note zzThe [BRIGHT INSIDE] adjustments are used to match the projector's main-screen-area black levels to the level within the blended area. The [BRIGHT OUTSIDE] adjustments may be used to fine adjust the thin borders on either side of the blend area, but are often not needed. zzWhen a rear screen or screen with a high gain is used, the blended areas may appear to be discontinuous depending on the viewing position. zzWhen using both horizontal and vertical edge blending functions to form a multiple projector image, adjust the [BRIGHT BLENDING] before performing the adjustment in Step 11). zzWhen using only one of the horizontal or vertical edge blending functions, set all items of [BRIGHT BLENDING] to [0]. Settings ENGLISH - 65
-
 1
1 -
2
-
3
-
4
-
5
-
6
-
7
-
8
-
9
-
10
-
11
-
12
-
13
-
14
-
15
-
16
-
17
-
18
-
19
-
20
-
21
-
22
-
23
-
24
-
25
-
26
-
27
-
28
-
29
-
30
-
31
-
32
-
33
-
34
-
35
-
36
-
37
-
38
-
39
-
40
-
41
-
42
-
43
-
44
-
45
-
46
-
47
-
48
-
49
-
50
-
51
-
52
-
53
-
54
-
55
-
56
-
57
-
58
-
59
-
 60
60 -
 61
61 -
 62
62 -
 63
63 -
 64
64 -
 65
65 -
 66
66 -
 67
67 -
 68
68 -
 69
69 -
 70
70 -
71
-
72
-
73
-
74
-
75
-
76
-
77
-
78
-
79
-
80
-
81
-
82
-
83
-
84
-
85
-
86
-
87
-
88
-
89
-
90
-
91
-
92
-
93
-
94
-
95
-
96
-
97
-
98
-
99
-
100
-
101
-
102
-
103
-
104
-
105
-
106
-
107
-
108
-
109
-
110
-
111
-
112
-
113
-
114
-
115
-
116
-
117
-
118
-
119
-
120
-
121
-
122
-
123
-
124
-
125
-
126
-
127
-
128
-
129
 |
 |