Panasonic SC-HTB770S SC-HTB770S Owner's Manual (English) - Page 19
Place the speakers using the leg stands
 |
View all Panasonic SC-HTB770S manuals
Add to My Manuals
Save this manual to your list of manuals |
Page 19 highlights
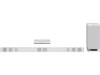
When placing the speakers on a table Place the speakers using the leg stands ∏ 2 Front speakers ∏ 1 Metal bracket ∏ 1 Center speaker ∏ 2 Leg stands ∏ 3 Speaker cables WHITE: Left RED: Right GREEN: Center ∏ 6 Screws ≥For a safety measure to prevent the speakers from falling, refer to page 24. ≥To prevent damage or scratches, lay down a soft cloth and perform the assembly on it. Assemble the speakers following steps 1 and 2 of "Place the speakers horizontally" (> 12, 13). Attach the leg stands. Red connector: With the speaker facing down, the speaker attached to the red connector cable is to be placed on the left side. White connector: With the speaker facing down, the speaker attached to the white connector cable is to be placed on the right side. ≥ Keep the screws out of reach of children to prevent swallowing. Getting started A Screw (supplied) ≥ Tighten securely. B Screw hole Red White Align the higher or lower holes with the projecting parts on the speaker. ≥ By changing the position that the stand is attached to the projecting parts, the height can be adjusted by 9 mm (11/32q). C Right speaker connector D Left speaker connector 19 RQT9778
-
 1
1 -
2
-
3
-
4
-
5
-
6
-
7
-
8
-
9
-
10
-
11
-
12
-
13
-
 14
14 -
 15
15 -
 16
16 -
 17
17 -
 18
18 -
 19
19 -
 20
20 -
 21
21 -
 22
22 -
 23
23 -
 24
24 -
25
-
26
-
27
-
28
-
29
-
30
-
31
-
32
-
33
-
34
-
35
-
36
-
37
-
38
-
39
-
40
-
41
-
42
-
43
-
44
 |
 |
