Panasonic SCHTB170 SCHTB170 User Guide - Page 12
Supplied accessories, Additionally required accessories commercially available
 |
View all Panasonic SCHTB170 manuals
Add to My Manuals
Save this manual to your list of manuals |
Page 12 highlights
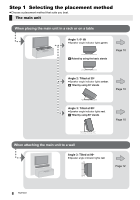
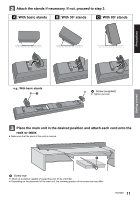
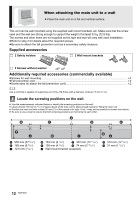
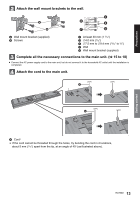
When attaching the main unit to a wall ≥ Place the main unit on a flat and vertical surface. This unit can be wall mounted using the supplied wall mount brackets, etc. Make sure that the screw used and the wall are strong enough to support the weight of at least 33 kg (72.8 lbs). The screws and other items are not supplied as the type and size will vary with each installation. ≥Refer to step 2 for details about the required screws. ≥Be sure to attach the fall prevention cord as a secondary safety measure. Supplied accessories ∏ 2 Safety holders ∏ 2 Wall mount brackets ∏ 2 Screws without washer Additionally required accessories (commercially available) ≥Screws for wall mounting...k4 ≥Fall prevention cord ...k2 ≥Screw eyes (to attach the fall prevention cord k2 Use a cord that is capable of supporting over 33 kg (72.8 lbs) (with a diameter of about 1.5 mm (1/16q)). Locate the screwing positions on the wall. ≥ Use the measurements indicated below to identify the screwing positions on the wall. ≥ Leave at least 100 mm (3 15/16q) of space above of the main unit to allow enough space for fitting the main unit. ≥ Position the main unit with at least 50 mm (2q) of free space to its right. If not, it may not be possible to access the buttons. ≥ Be sure to use a level to ensure that both screwing positions are horizontal to each other. A 950 mm (37 6/16q) E 165 mm (6 8/16q) I 12.5 mm (31/64q) B 153 mm (6 1/32q) C 322 mm (12 11/16q) F 105 mm (4 2/16q) G 74 mm (2 15/16q) J Wall mount bracket (supplied) D 310 mm (12 7/32q) H 31 mm (1 7/32q) 12 RQT9841
-
 1
1 -
2
-
3
-
4
-
5
-
6
-
 7
7 -
 8
8 -
 9
9 -
 10
10 -
 11
11 -
 12
12 -
 13
13 -
 14
14 -
 15
15 -
 16
16 -
 17
17 -
18
-
19
-
20
-
21
-
22
-
23
-
24
-
25
-
26
-
27
-
28
-
29
-
30
-
31
-
32
 |
 |
