Panasonic SCHTB170 SCHTB170 User Guide - Page 13
Attach the wall mount brackets to the wall., Complete all the necessary connections to the main unit
 |
View all Panasonic SCHTB170 manuals
Add to My Manuals
Save this manual to your list of manuals |
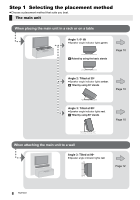
Page 13 highlights
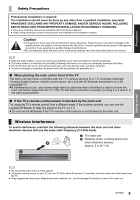
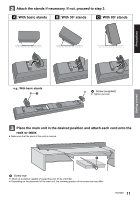
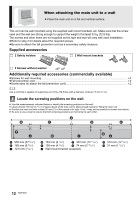
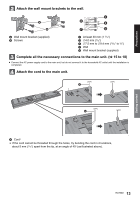
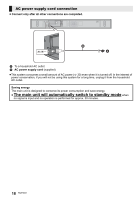
Precautions Attach the wall mount brackets to the wall. A Wall mount bracket (supplied) B Screws C At least 30 mm (1 3/16q) D ‰4.0 mm (5/32q) E ‰7.5 mm to ‰9.4 mm (19/64q to 3/8q) F Wall G Wall mount bracket (supplied) Complete all the necessary connections to the main unit. (> 15 to 18) ≥ Connect the AC power supply cord to the main unit, but do not connect it to the household AC outlet until the installation is completed. Attach the cord to the main unit. H Cord§ § If the cord cannot be threaded through the holes, try bending the cord in 2 locations, about 5 mm (3/16q) apart from the tip, at an angle of 45o (as illustrated above). Getting started 13 RQT9841
-
 1
1 -
2
-
3
-
4
-
5
-
6
-
7
-
 8
8 -
 9
9 -
 10
10 -
 11
11 -
 12
12 -
 13
13 -
 14
14 -
 15
15 -
 16
16 -
 17
17 -
 18
18 -
19
-
20
-
21
-
22
-
23
-
24
-
25
-
26
-
27
-
28
-
29
-
30
-
31
-
32
 |
 |

Getting started
RQT9841
13
Precautions
Attach the wall mount brackets to the wall.
Complete all the necessary connections to the main unit. (
>
15 to 18)
≥
Connect the AC power supply cord to the main unit, but do not connect it to the household AC outlet until the installation is
completed.
Attach the cord to the main unit.
A
Wall mount bracket (supplied)
B
Screws
C
At least 30 mm (1
3
/
16
q
)
D
‰
4.0 mm (
5
/
32
q
)
E
‰
7.5 mm to
‰
9.4 mm (
19
/
64
q
to
3
/
8
q
)
F
Wall
G
Wall mount bracket (supplied)
H
Cord
§
§
If the cord cannot be threaded through the holes, try bending the cord in 2 locations,
about 5 mm (
3
/
16
q
) apart from the tip, at an angle of 45
o
(as
illustrated above).