Panasonic SXKN7000 SXKN7000 User Guide
Panasonic SXKN7000 - ELECTRONIC KEYBOARD Manual
 |
View all Panasonic SXKN7000 manuals
Add to My Manuals
Save this manual to your list of manuals |
Panasonic SXKN7000 manual content summary:
- Panasonic SXKN7000 | SXKN7000 User Guide - Page 1
KEYBOARD SX-KN7000 Operating Instructions ENGLISH Before connecting, operating or adjusting this product, please read these instructions completely. Please keep this manual for future reference. QQTG0671 - Panasonic SXKN7000 | SXKN7000 User Guide - Page 2
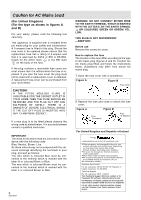
plug (figures A and B). Confirm the AC mains plug fitted and follow the instructions below. Illustrations may differ from actual AC mains plug. 1. Open the fuse 01 289 8333 Technical Support For UK customers: 0870 1 505610 This Technical Support Hot Line number is for Panasonic PC software related - Panasonic SXKN7000 | SXKN7000 User Guide - Page 3
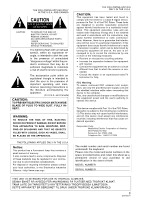
the user to the presence of important operating and maintenance (servicing) instructions in the literature accompanying the appliance. (for U.S.A. and Canada One Panasonic Way Secaucus, NJ, 07094 USA Telephone No.: 1-800-211-7262 The model number and serial number are found underneath the keyboard. - Panasonic SXKN7000 | SXKN7000 User Guide - Page 4
4 QQTG0671 - Panasonic SXKN7000 | SXKN7000 User Guide - Page 5
in performance; or (e) The unit has been dropped or the cabinet damaged. 2. Servicing-Do not attempt to service the unit beyond that described in these operating instructions. Refer all other servicing to authorized servicing personnel. 3. Replacement parts-When parts need replacing ensure the - Panasonic SXKN7000 | SXKN7000 User Guide - Page 6
att den här produkten under användningen tar emot radiostörningar, orsakade av mobiltelefoner. Öka avståndet mellan produkten och mobiltelefonen om störningarna är uppenbara. 6 QQTG0671 SERVICE MUST BE CARRIED OUT BY DEALER OR OTHER QUALIFIED PERSON - Panasonic SXKN7000 | SXKN7000 User Guide - Page 7
and effects 34 Overview of sounds and effects 34 Selecting sounds 35 Digital Drawbar 36 Organ Tabs 37 Accordion Register 38 Assigning parts to the keyboard 39 Effects (PART 42 Effects (GLOBAL 44 Controller 46 Transpose 47 Techni-chord 48 Part II Playing the rhythm 49 Overview of rhythm - Panasonic SXKN7000 | SXKN7000 User Guide - Page 8
Naming 85 Panel Write 86 Song Select 86 Punch Record 87 Step Record 88 Track Assign 95 Quantize 96 Song Clear 97 Track Clear 97 Note Edit 98 Drum Edit 99 After Touch Setting 100 Copy and paste the recorded data 101 Changing the note position etc. of the recorded data 105 Part V - Panasonic SXKN7000 | SXKN7000 User Guide - Page 9
197 About the backup memory and performance data 198 Separately sold options 198 Terminals 199 Symptoms which appear to be signs of trouble 201 Error messages 203 Index 205 Specifications 207 Supplied accessories Please check the supplied accessories. Music stand AC cord STYLE CONVERT DISK - Panasonic SXKN7000 | SXKN7000 User Guide - Page 10
Controls and functions MUSIC STYLIST You can choose to have all the settings of this instrument automatically set. (Refer to page 61.) AUTO PLAY CHORD Add an automatic accompaniment to your selected rhythm.(Refer to page 53.) RHYTHM GROUP Various rhythm patterns are available for each rhythm group - Panasonic SXKN7000 | SXKN7000 User Guide - Page 11
7 6 DISK IN USE DISK PROGRAM MENUS LOAD SD LOAD 8 5 CUSTOM PANEL SET 1 4 CUSTOMIZE CONDUCTOR 2 3 FAVORITES TRANSPOSE Raise or lower the key of the entire keyboard. (Refer to page 47.) CONDUCTOR Assign a different sound to each part, then assign the desired parts to sections of the - Panasonic SXKN7000 | SXKN7000 User Guide - Page 12
Basic functions Getting started Before you play MAIN APC/SEQUENCER VOLUME VOLUME MAX MAX MIC VOLUME LINE IN VOLUME MAX MAX MIN MIN MIN MIN DEMO PERFORMANCE PADS AUTO SETTING BANK STOP AUTO PLAY CHORD MODE OFF/ON 8 & 16 BEAT ROCK & POP BALLAD RHYTHM GROUP JAZZ & SWING - Panasonic SXKN7000 | SXKN7000 User Guide - Page 13
of sounds is contained on two or more screen "pages". To see a different part of the list, press either PAGE button. 4 Play the keyboard. • Your Keyboard features Touch Response. You control the volume by playing the keys harder or softer. 5 Set the MAIN VOLUME to an appropriate level with the - Panasonic SXKN7000 | SXKN7000 User Guide - Page 14
Basic functions See and listen to the demonstration MAIN VOLUME APC/SEQUENCER VOLUME MAX MAX MIC VOLUME LINE IN VOLUME MAX MAX MIN MIN MIN MIN DEMO PERFORMANCE PADS AUTO SETTING BANK STOP AUTO PLAY CHORD MODE OFF/ON 8 & 16 BEAT ROCK & POP BALLAD RHYTHM GROUP JAZZ & SWING - Panasonic SXKN7000 | SXKN7000 User Guide - Page 15
Basic functions Add effects MAIN APC/SEQUENCER VOLUME VOLUME MAX MAX MIC VOLUME LINE IN VOLUME MAX MAX MIN MIN MIN MIN DEMO PERFORMANCE PADS AUTO SETTING BANK STOP AUTO PLAY CHORD MODE OFF/ON 8 & 16 BEAT ROCK & POP BALLAD RHYTHM GROUP JAZZ & SWING BALLROOM MOVIE & SHOW - Panasonic SXKN7000 | SXKN7000 User Guide - Page 16
Basic functions Play back commercial song disks (DIRECT PLAY) MAIN APC/SEQUENCER VOLUME VOLUME MAX MAX MIC VOLUME LINE IN VOLUME MAX MAX MIN MIN MIN MIN DEMO PERFORMANCE PADS AUTO SETTING BANK STOP AUTO PLAY CHORD MODE OFF/ON 8 & 16 BEAT ROCK & POP BALLAD RHYTHM GROUP - Panasonic SXKN7000 | SXKN7000 User Guide - Page 17
Basic functions Play back SD cards (SD-AUDIO PLAY) MAIN APC/SEQUENCER VOLUME VOLUME MAX MAX MIC VOLUME LINE IN VOLUME MAX MAX MIN MIN MIN MIN DEMO PERFORMANCE PADS AUTO SETTING BANK STOP AUTO PLAY CHORD MODE OFF/ON 8 & 16 BEAT ROCK & POP BALLAD RHYTHM GROUP JAZZ & SWING - Panasonic SXKN7000 | SXKN7000 User Guide - Page 18
Basic functions Select the registration for a music style (MUSIC STYLIST) MAIN VOLUME APC/SEQUENCER VOLUME MAX MAX MIC VOLUME LINE IN VOLUME MAX MAX MIN MIN MIN MIN DEMO PERFORMANCE PADS AUTO SETTING BANK STOP AUTO PLAY CHORD MODE OFF/ON 8 & 16 BEAT ROCK & POP BALLAD RHYTHM - Panasonic SXKN7000 | SXKN7000 User Guide - Page 19
category. • When you select a style, the sounds and rhythm which are best suited for the selected style are automatically selected. 5 Play the keyboard. • When you specify a chord, an intro is played, after which the automatic rhythm starts. • You can also search for a style alphabetically or - Panasonic SXKN7000 | SXKN7000 User Guide - Page 20
Basic functions Automatic panel settings (ONE TOUCH PLAY) MAIN APC/SEQUENCER VOLUME VOLUME MAX MAX MIC VOLUME LINE IN VOLUME MAX MAX MIN MIN MIN MIN DEMO PERFORMANCE PADS AUTO SETTING BANK STOP AUTO PLAY CHORD MODE OFF/ON 8 & 16 BEAT ROCK & POP BALLAD RHYTHM GROUP JAZZ & - Panasonic SXKN7000 | SXKN7000 User Guide - Page 21
G7 C 7 Use your left hand to play the chords and your right hand to play the melody. • Pressing a key on the left area of the keyboard will cause the automatic rhythm pattern to start playing (synchro start). 8 At the end of your performance, press the INTRO & ENDING 1 or 2 button. INTRO - Panasonic SXKN7000 | SXKN7000 User Guide - Page 22
Basic functions Store your panel settings (PANEL MEMORY) MAIN VOLUME APC/SEQUENCER VOLUME MAX MAX MIC VOLUME LINE IN VOLUME MAX MAX MIN MIN MIN MIN DEMO PERFORMANCE PADS AUTO SETTING BANK STOP AUTO PLAY CHORD MODE OFF/ON 8 & 16 BEAT ROCK & POP BALLAD RHYTHM GROUP JAZZ & - Panasonic SXKN7000 | SXKN7000 User Guide - Page 23
Basic functions Recall your favorite panel settings at the press of a single button (CUSTOM PANEL) MAIN APC/SEQUENCER VOLUME VOLUME MAX MAX MIC VOLUME LINE IN VOLUME MAX MAX MIN MIN MIN MIN DEMO PERFORMANCE PADS AUTO SETTING BANK STOP AUTO PLAY CHORD MODE OFF/ON 8 & 16 BEAT - Panasonic SXKN7000 | SXKN7000 User Guide - Page 24
Basic functions Record your performance (SEQUENCER) MAIN APC/SEQUENCER VOLUME VOLUME MAX MAX MIC VOLUME LINE IN VOLUME MAX MAX MIN MIN MIN MIN DEMO PERFORMANCE PADS AUTO SETTING BANK STOP AUTO PLAY CHORD MODE OFF/ON 8 & 16 BEAT ROCK & POP BALLAD RHYTHM GROUP JAZZ & SWING - Panasonic SXKN7000 | SXKN7000 User Guide - Page 25
INTRO & ENDING 1 2 START/STOP 1 2 3 4 BEAT OTHER PART & FR CONTRAST HELP MUTE SEQUENCER RESET COUNT INTRO AB 3 Play the song on the keyboard. 4 When you have finished playing, press the EASY REC button again to turn it off. SEQUENCER PLAY EASY REC PIANO GUITAR MALLET & ORCH - Panasonic SXKN7000 | SXKN7000 User Guide - Page 26
Basic functions Save data on an SD card MAIN VOLUME APC/SEQUENCER VOLUME MAX MAX MIC VOLUME LINE IN VOLUME MAX MAX MIN MIN MIN MIN DEMO PERFORMANCE PADS AUTO SETTING BANK STOP AUTO PLAY CHORD MODE OFF/ON 8 & 16 BEAT ROCK & POP BALLAD RHYTHM GROUP JAZZ & SWING BALLROOM - Panasonic SXKN7000 | SXKN7000 User Guide - Page 27
Basic functions MAIN APC/SEQUENCER VOLUME VOLUME MAX MAX MIC VOLUME LINE IN VOLUME MAX MAX MIN MIN MIN MIN DEMO PERFORMANCE PADS AUTO SETTING BANK STOP AUTO PLAY CHORD MODE OFF/ON 8 & 16 BEAT ROCK & POP BALLAD RHYTHM GROUP JAZZ & SWING BALLROOM MOVIE & SHOW ENTERTAINER - Panasonic SXKN7000 | SXKN7000 User Guide - Page 28
Basic functions Load rhythm data from a Technics pattern disk (COMPOSER LOAD) MAIN VOLUME APC/SEQUENCER VOLUME MAX MAX MIC VOLUME LINE IN VOLUME MAX MAX MIN MIN MIN MIN DEMO PERFORMANCE PADS AUTO SETTING BANK STOP AUTO PLAY CHORD MODE OFF/ON 8 & 16 BEAT ROCK & POP BALLAD - Panasonic SXKN7000 | SXKN7000 User Guide - Page 29
of the selected sounds and rhythms etc. and when setting the functions. Let's take a look. • The display illustrations shown in this User's Manual are examples for the sake of clarification; the actual displays on your instrument may differ from the illustrations. Normal display (HOME PAGE) This is - Panasonic SXKN7000 | SXKN7000 User Guide - Page 30
from the menu display by pressing the corresponding button to the left or right of the display indicated by the and arrows. • In this manual, the steps describing how to select a function from a menu display are generally abbreviated as follows, for example: "On the PROGRAM MENUS display, select - Panasonic SXKN7000 | SXKN7000 User Guide - Page 31
the previous display. DISPLAY HOLD EXIT MUTE Press the button corresponding to the ∧ or ∨ but- ton on the display to change the value. • In this manual, this procedure is written as follows: "Use the ∧ and ∨ buttons to adjust the pitch." TEMPO/PROGRAM If the TEMPO/PROGRAM indicator is lit while you - Panasonic SXKN7000 | SXKN7000 User Guide - Page 32
the display on your instrument may be different from the illustrated display in this manual depending on the region in which your instrument was purchased and the selected display • The MUTE KEYS function silences the sound of the keyboard keys. This is convenient when you wish to pretend to play the - Panasonic SXKN7000 | SXKN7000 User Guide - Page 33
About the display • The PANIC function interrupts the sound, for example, when it fails to cease during a MIDI performance. 5. While pressing the SET button, specify where you wish to paste (put) the item. • While the SET button is depressed, the display appears as shown below. Use the buttons to - Panasonic SXKN7000 | SXKN7000 User Guide - Page 34
into the following parts. RIGHT 1, RIGHT 2, LEFT: These are the parts the performer plays on the keyboard. • These are independent from the playback parts. For example one can to perform on the keyboard while playing back a song disk with 16-part standard MIDI files (SMF). PART1 to 16: SMF song - Panasonic SXKN7000 | SXKN7000 User Guide - Page 35
TABS ACCORDION REGISTER PAD SYNTH BASS DRUM KITS EW MEMORY EXPANSION • The sounds in DRUM KITS are percussion sounds that you play by striking the keyboard keys. • MEMORY is reserved for storing sounds you modify. (Refer to page 177.) • EW EXPANSION is used to select preset sounds of the WAVE - Panasonic SXKN7000 | SXKN7000 User Guide - Page 36
Part I Sounds and effects Sounds and effects 3. Use the ∧ and ∨ buttons to select a GROUP of sound. 4. Use the buttons on both side of the display to select the sound. • The numerical value that is displayed for each sound is the MIDI [BANK MSB, LSB]-PROGRAM CHANGE number. • GM2 sounds are - Panasonic SXKN7000 | SXKN7000 User Guide - Page 37
(for example 8') refers to the pitch of a rank of pipes in a pipe organ. If 8' is used as the standard (the pitch as played on the keyboard), a 16' rank pitch will be one octave below the 8' rank pitch, and a 4' rank pitch one octave above. When the C3 key is pressed, the sounds - Panasonic SXKN7000 | SXKN7000 User Guide - Page 38
Part I Sounds and effects TREMOLO Tremolo is a rapid oscillation in volume, like the effect of a rotating speaker. The tremolo speed can be changed while you are playing. • The SOUND DSP (ROTARY SPEAKER/ ROCK ROTARY) is used for the tremolo effect. This effect does not work if the SOUND DSP button - Panasonic SXKN7000 | SXKN7000 User Guide - Page 39
a different sound to each section. CONDUCTOR CONDUCTOR settings LEFT RIGHT2 RIGHT1 CONDUCTOR LEFT RIGHT2 RIGHT1 How sounds are assigned to the keyboard All keys produce the RIGHT 1 sound. RIGHT 1 All keys produce the RIGHT 2 sound. CONDUCTOR LEFT RIGHT2 RIGHT1 CONDUCTOR LEFT RIGHT2 - Panasonic SXKN7000 | SXKN7000 User Guide - Page 40
than G2, C3 or G3. 1. Press and hold the SPLIT POINT button for a few seconds. SPLIT POINT • The following display appears. 2. Press a key on the keyboard to specify the desired split point. • A split point is set at the location of the pressed key, and is indicated on the - Panasonic SXKN7000 | SXKN7000 User Guide - Page 41
quickly change the octave of the RIGHT 1 and RIGHT 2 parts. Use this convenient function to expand the octave range of the keyboard, especially during a split-keyboard performance. Use the R1/R2 OCTAVE buttons (+ and - ) to change the octave. R1/R2 OCTAVE _ + • Press the + button to raise the - Panasonic SXKN7000 | SXKN7000 User Guide - Page 42
Part I Sounds and effects Effects (PART) MAIN APC/SEQUENCER VOLUME VOLUME MAX MAX MIC VOLUME LINE IN VOLUME MAX MAX MIN MIN MIN OFF DEMO RHYTHM GROUP AUTO SETTING BANK STOP AUTO PLAY CHORD MODE OFF/ON MODERN DANCE GOSPEL & BLUES COUNTRY RHYTHM GROUP MARCH 8 & 16 ROCK & - Panasonic SXKN7000 | SXKN7000 User Guide - Page 43
Sounds and effects Part I Sounds and effects SOUND DSP The SOUND DSP works like a studio effects processor, providing effects such as CHORUS, PHASER, DELAY and DISTORTION. • There are five SOUND DSP groups, consisting of three for RIGHT 1, RIGHT 2 and LEFT, and two for the automatic accompaniment - Panasonic SXKN7000 | SXKN7000 User Guide - Page 44
Part I Sounds and effects Effects (GLOBAL) You can apply effects to the whole instrument. REVERB REVERB applies a reverberation effect to the sound. Press the REVERB button to turn it on. REVERB MAIN VOLUME APC/SEQUENCER VOLUME MAX MAX MIC VOLUME LINE IN VOLUME MAX MAX MIN MIN MIN OFF - Panasonic SXKN7000 | SXKN7000 User Guide - Page 45
Sounds and effects Part I Sounds and effects MULTI Various effects can be applied. Press the MULTI button to turn it on. MULTI Type and parameter settings 1. Press and hold the MULTI button for a few seconds. • The display looks similar to the following. 2. Use the ∧ and ∨ buttons to select the - Panasonic SXKN7000 | SXKN7000 User Guide - Page 46
applied. In this case, the effect does not change even if the MIC REVERB setting is adjusted. Controller Use the controllers (left next to the keyboard) to change the nuance of the sound while you are playing. PITCH BEND The pitch of the instrument can be continuously changed with the PITCH - Panasonic SXKN7000 | SXKN7000 User Guide - Page 47
Sounds and effects Part I Sounds and effects Transpose MAIN APC/SEQUENCER VOLUME VOLUME MAX MAX MIC VOLUME LINE IN VOLUME MAX MAX MIN MIN MIN OFF DEMO RHYTHM GROUP AUTO SETTING BANK STOP AUTO PLAY CHORD MODE OFF/ON MODERN DANCE GOSPEL & BLUES COUNTRY RHYTHM GROUP MARCH - Panasonic SXKN7000 | SXKN7000 User Guide - Page 48
it on. TECHNI-CHORD Type setting 1. Press and hold the TECHNI-CHORD button for a few seconds. • The display looks similar to the following. 3. Play the keyboard. • The melody you play with your right hand is automatically played in chords which are based on the chords you play with your left hand - Panasonic SXKN7000 | SXKN7000 User Guide - Page 49
Part II Playing the rhythm Overview of rhythm performance An explanation follows of the terms related to this instrument's rhythm performance. Rhythm and accompaniment pattern Each rhythm is comprised of not only a DRUMS pattern, but also of accompaniment patterns called BASS and ACCOMP. The - Panasonic SXKN7000 | SXKN7000 User Guide - Page 50
Part II Playing the rhythm Selecting rhythms MAIN APC/SEQUENCER VOLUME VOLUME MAX MAX MIC VOLUME LINE IN VOLUME MAX MAX MIN MIN MIN OFF DEMO RHYTHM GROUP AUTO SETTING BANK STOP AUTO PLAY CHORD MODE OFF/ON MODERN DANCE GOSPEL & BLUES COUNTRY RHYTHM GROUP MARCH 8 & 16 - Panasonic SXKN7000 | SXKN7000 User Guide - Page 51
START/STOP button light to indicate the beat. Synchronized start With the synchronized start feature, the rhythm pattern starts when you play a key on the keyboard. 1. Select a rhythm. 2. Press the SYNCHRO & BREAK button to turn it on. SYNCHRO & BREAK 3. Play a key to the left of the - Panasonic SXKN7000 | SXKN7000 User Guide - Page 52
PANEL 4 CUSOMIZE CONDUCTOR 2 3 FAVORITES Intro, fill-in and ending patterns fitting each different rhythm pattern are permanently recorded in your Keyboard, thus allowing a versatile rhythm performance. INTRO Begin the rhythm performance with an intro pattern. 1. Press the INTRO & ENDING 1 or - Panasonic SXKN7000 | SXKN7000 User Guide - Page 53
PANEL MEMORY 7 6 LOAD SD CARD LOAD 8 5 CUSTOM PANEL SET 1 4 CUSOMIZE CONDUCTOR 2 3 FAVORITES Simply by playing a chord on the keyboard, the AUTO PLAY CHORD function automatically plays an accompaniment pattern which matches perfectly the selected rhythm. With a real accompaniment as - Panasonic SXKN7000 | SXKN7000 User Guide - Page 54
Refer to page 57.) PIANIST mode In the PIANIST mode, the entire keyboard can be used to specify chords (FINGERED mode) for the automatic accompaniment; a RIGHT part is assigned to all the keys, and the keyboard does not split. • If the CHORD FINDER procedure is used, you can - Panasonic SXKN7000 | SXKN7000 User Guide - Page 55
and ENDING, the automatic accompaniment is also used in these patterns. • In the ONE FINGER mode, the sound assigned to the left section of the keyboard (LEFT part) does not sound in the initialized condition. • You can set the mode which determines how the LEFT part sounds during an AUTO PLAY - Panasonic SXKN7000 | SXKN7000 User Guide - Page 56
• The display changes to the following. APC VOLUME To adjust the volume balance between the automatic accompaniment and the parts you play manually on the keyboard, the volume of all the automatic accompaniment parts (DRUMS, ACCOMP, and BASS) can be lowered as one. APC/SEQUENCER VOLUME MAX 2. Use - Panasonic SXKN7000 | SXKN7000 User Guide - Page 57
the chord. Use the TYPE buttons to select the type of chord. • A typical way to finger the specified chord (TYPICAL) is illustrated on a keyboard diagram. • Each time the INVERSION button is pressed, different INVERSION fingerings are illustrated in order. (If there is no INVERSION fingering for the - Panasonic SXKN7000 | SXKN7000 User Guide - Page 58
function With the break function, the rhythm starts when the left keyboard is played and stops when the fingers are removed from the keys until the FADE IN is turned off or until step 3 is executed. 3. Play the keyboard or press the START/STOP button. • The volume slowly builds to its preset level. - Panasonic SXKN7000 | SXKN7000 User Guide - Page 59
Playing the rhythm Part II Playing the rhythm FADE OUT At the end of the song, the volume of each part gradually fades to nothing. 1. Start the performance. 2. Turn on the FADE OUT button at the point you want the fade-out to start. FADE IN OUT FADE SET Adjust the settings for the FADE IN - Panasonic SXKN7000 | SXKN7000 User Guide - Page 60
Playing the rhythm Part II Playing the rhythm Sound Arranger MAIN APC/SEQUENCER VOLUME VOLUME MAX MAX MIC VOLUME LINE IN VOLUME MAX MAX MIN MIN MIN OFF DEMO RHYTHM GROUP AUTO SETTING BANK STOP AUTO PLAY CHORD MODE OFF/ON MODERN DANCE GOSPEL & BLUES COUNTRY RHYTHM GROUP - Panasonic SXKN7000 | SXKN7000 User Guide - Page 61
FAVORITES ONE TOUCH PLAY automatically sets a suggested combination of sounds and an appropriate tempo for your chosen rhythm style. 3. Play the keyboard. 1. Select a rhythm pattern. • When you specify a chord, the automatic • Do not select the MEMORY button. rhythm begins to play immediately - Panasonic SXKN7000 | SXKN7000 User Guide - Page 62
the sounds, effects, volume balances, rhythm and tempo etc. which are best suited for the selected music style are automatically selected. 5. Play the keyboard. • When you specify a chord, the automatic rhythm begins to play immediately. Setup by era You can select a style from a specific music era - Panasonic SXKN7000 | SXKN7000 User Guide - Page 63
sounds, effects, volume balances, rhythm and tempo etc. which are best suited for the selected style are automatically selected. 4. Play the keyboard. • When you specify a chord, the automatic rhythm begins to play immediately. • On the MUSICAL CATEGORY, MUSICAL ERA, ALPHABETICAL LIST (ALPHABET) or - Panasonic SXKN7000 | SXKN7000 User Guide - Page 64
MUSIC STYLE ARRANGER button to turn it on. MUSIC STYLE ARRANGER How to change the music style during your performance While you are playing the keyboard with the MUSIC STYLE ARRANGER on, press the FILL IN 1 or FILL IN 2 button. FILL IN 1 2 3. Use the VARIATION buttons to select a style (1 to - Panasonic SXKN7000 | SXKN7000 User Guide - Page 65
Part II Playing the rhythm Playing the rhythm PANEL MEMORY: The PANEL MEMORY number (BANK A: 1 to 4) changes. You can store your desired panel settings in the PANEL MEMORY beforehand and switch from one to another quickly. • After a few seconds, the display exits the setting mode. • You can also - Panasonic SXKN7000 | SXKN7000 User Guide - Page 66
number button (1 to 8). • The panel setup changes to the one stored in the specified memory. • You can then change the sound settings, etc. manually; however, the contents of the memory remain unchanged until you store them again. • The "Control Preset" bank of the PERFORMANCE PADS or the Foot - Panasonic SXKN7000 | SXKN7000 User Guide - Page 67
Part II Playing the rhythm PANEL MEMORY mode You can define which panel settings are recalled when the PANEL MEMORY is used. 1. Press and hold the SET button for a few sec- onds. • The display changes to the following. 2. Select the mode. NORMAL: The sounds and volume balance, and CONDUCTOR status - Panasonic SXKN7000 | SXKN7000 User Guide - Page 68
Part III Performance Pads Playing phrases MAIN APC/SEQUENCER VOLUME VOLUME MAX MAX MIC VOLUME LINE IN VOLUME MAX MAX MIN MIN MIN OFF DEMO RHYTHM GROUP AUTO SETTING BANK STOP AUTO PLAY CHORD MODE OFF/ON MODERN DANCE GOSPEL & BLUES COUNTRY RHYTHM GROUP MARCH 8 & 16 ROCK & - Panasonic SXKN7000 | SXKN7000 User Guide - Page 69
Part III Performance Pads Copying phrases You can copy the desired data, as phrases, from the SEQUENCER to each pad memory of a "User Bank". • Chord data also can be copied to pad buttons 5 and 6 (SOLO). PHRASE COPY Copy a phrase from one pad to another. 1. Press the PROGRAM MENUS button to turn - Panasonic SXKN7000 | SXKN7000 User Guide - Page 70
Part III Performance Pads SEQ TO PAD COPY 1. Record a phrase in the SEQUENCER, or load data from a disk. • After this procedure, please do not change the song number. • For details about SEQUENCER operation, refer to page 74. • For information about loading data, refer to pages 125, 140. 2. Press - Panasonic SXKN7000 | SXKN7000 User Guide - Page 71
Part III Performance Pads Compile You can assign desired phrases from different banks in "Compile Bank" 1 and 2. 1. Press the PROGRAM MENUS button to turn it on. PROGRAM MENUS 6. Use the BANK and PHRASE ∧ and ∨ buttons to select the desired bank and phrase you wish to assign. • The "Control" - Panasonic SXKN7000 | SXKN7000 User Guide - Page 72
Part III Performance Pads Record a phrase "User Bank" A, B and C are reserved for storing your original phrases. • You can also copy phrases which are recorded in the SEQUENCER. 1. Press the PROGRAM MENUS button to turn it on. • The display looks similar to the following. 6. Press the OK button - Panasonic SXKN7000 | SXKN7000 User Guide - Page 73
to move the cursor to the position you wish to input. • The cursor moves in 1/8-note increments. 3. Input the chord by playing it on the keyboard. • The chord name is shown. 4. Press the OK button. 5. Repeat steps 2 to 4 to store the rest of the chord progression. • To delete a chord which has - Panasonic SXKN7000 | SXKN7000 User Guide - Page 74
Part IV Sequencer Outline of the Sequencer MAIN APC/SEQUENCER VOLUME VOLUME MAX MAX MIC VOLUME LINE IN VOLUME MAX MAX MIN MIN MIN OFF DEMO RHYTHM GROUP AUTO SETTING BANK STOP AUTO PLAY CHORD MODE OFF/ON MODERN DANCE GOSPEL & BLUES COUNTRY RHYTHM GROUP MARCH 8 & 16 ROCK - Panasonic SXKN7000 | SXKN7000 User Guide - Page 75
Part IV SEQUENCER menu The configuration of the SEQUENCER setting display is as follows. 1. Press the PROGRAM MENUS button to turn it on. PROGRAM MENUS • The display looks similar to the following. Sequencer 2. Select SEQUENCER. • The display looks similar to the following. < - Panasonic SXKN7000 | SXKN7000 User Guide - Page 76
a piano roll display. DRUM EDIT (page 99) Store and correct DRUMS part data on a special display. AFTER TOUCH SETTING (page 100) Specify whether or not keyboard after touch is recorded as data. COPY & PASTE Copy recording data and paste it to the desired location. TRACK COPY (page 101) Copy data of - Panasonic SXKN7000 | SXKN7000 User Guide - Page 77
Part IV Sequencer Slide Show This instrument can show various images which change automatically corresponding to the music progression just like the DEMO performance. Using the Slide Show function, you can create a multi-media show of images synchronizing with the sound. Schematic PICTURE 1 PIC - Panasonic SXKN7000 | SXKN7000 User Guide - Page 78
Part IV Sequencer Sequencer parts The following summary explains what is stored in each SEQUENCER part. Part name [name on display] RIGHT1 [RT1] RIGHT2 [RT2] LEFT [LFT] PART1 [P 1] - PART9 [P 9] PART11 [P 11] - PART16 [P16] Used for Recording the performance of each part (REALTIME/STEP) - Panasonic SXKN7000 | SXKN7000 User Guide - Page 79
PLAY EASY REC 4. Press the OK button. • The display changes to the REALTIME RECORD display. 5. Play the keyboard. • Recording begins as soon as you start the rhythm or play the keyboard. • The display changes to the following. 6. When you have finished recording, press the EASY REC button to - Panasonic SXKN7000 | SXKN7000 User Guide - Page 80
is recorded with the timing exactly as you played it on the keyboard. Use this mode to record your performance in up to 16 tracks whether the part assigned to that track sounds when it is played on the keyboard during recording. For the LOCAL ON/OFF during playback, use the TRACK ASSIGN display - Panasonic SXKN7000 | SXKN7000 User Guide - Page 81
the button is pressed. • When set to ON, the metronome volume setting display is momentarily shown. • The metronome sound is not recorded. 10.Play the keyboard. • Recording begins. • You can also press the START/STOP button to start the rhythm and begin recording. • If the metronome is on, when you - Panasonic SXKN7000 | SXKN7000 User Guide - Page 82
Press the START/STOP button. • If the metronome is on, cycle recording of the specified measures begins after a twomeasure count. 6. Play the keyboard. • The specified measures are repeated, during which time you can record by adding notes little by little at the correct timing (over-dubbing). • If - Panasonic SXKN7000 | SXKN7000 User Guide - Page 83
Part IV Sequencer Sequencer Play Play back your recorded performance. 1. Press the SEQUENCER PLAY button to turn it on. SEQUENCER PLAY EASY REC • The display looks similar to the following. 2. Use the SONG ∧ and ∨ button to select the song number you wish to play back. 3. Use the balance - Panasonic SXKN7000 | SXKN7000 User Guide - Page 84
Part IV Sequencer CYCLE PLAY You can have specified measures played back repeatedly. 1. On the SEQUENCER PLAY display, specify "PLAY" for track numbers you wish to have played back. 2. Press the CYCLE button. • The display looks similar to the following. • The measure in which the END command - Panasonic SXKN7000 | SXKN7000 User Guide - Page 85
IV Sequencer SEQUENCER VOLUME When playing the keyboard along with a recorded performance, you can parts when it is too loud relative to the volume of your manual performance. • The volume of all sounds other than your manual performance- including PERFORMANCE PADS, MIDI input, etc.- is lowered. - Panasonic SXKN7000 | SXKN7000 User Guide - Page 86
Part IV Sequencer Panel Write You can change the panel status which is in effect at the beginning of the song. These are the settings which are recalled when the SEQUENCER RESET button is pressed. 1. On the SEQ MENU display, use the SONG ∧ and ∨ buttons to select the song number. Then select - Panasonic SXKN7000 | SXKN7000 User Guide - Page 87
STOP button at the point you want to stop recording. • Punch recording stops immediately. • You can also begin punch-in recording by playing the keyboard. • You can specify the punch-in/punch-out points with the optional Foot Switch (sold separately). (Refer to page 179.) 3. Select the track which - Panasonic SXKN7000 | SXKN7000 User Guide - Page 88
erased. Step Record STEP RECORD is simply a method of making a tune by storing the sounds note-by-note on the display. Instead of playing the keyboard directly as in the REALTIME RECORD mode, you can take your time to input each single note. This is an especially effective method for storing - Panasonic SXKN7000 | SXKN7000 User Guide - Page 89
% of the note length. NORM (normal): 80% STAC (staccato): 50% CUTT (cutting): 25% 8. Specify the pitch and velocity of the note by playing the keyboard. • The dot on the display where the note is stored changes to a * mark. • When recording chords, you can store multiple notes at one position. • Any - Panasonic SXKN7000 | SXKN7000 User Guide - Page 90
Part IV Sequencer Correcting the data 1. In the STEP RECORD mode, specify the track you wish to correct. 2. Use the MEAS buttons to go to the measure you wish to modify. Use the CURSOR buttons to move the cursor to the point ( * ) you wish to edit. • The data stored at that point is shown on the - Panasonic SXKN7000 | SXKN7000 User Guide - Page 91
Part IV Sequencer 11.When you have finished assigning, press the PROGRAM MENUS button to turn it off. • When you play back the song, the images appear on the display and change automatically corresponding to the music progression (Slide Show). • The moment where the images are displayed may be - Panasonic SXKN7000 | SXKN7000 User Guide - Page 92
specify the chords with your left hand, the chords change automatically. • The chord length is specified with the CHORD STEP RECORD keys on the keyboard. DELETE Note value keys Whole note . Dotted half-note Half-note . Dotted quarter-note Quarter-note Eighth-note Reset key Press to begin storing - Panasonic SXKN7000 | SXKN7000 User Guide - Page 93
Store a rest by pressing a note value key without specifying a chord. 5. At the end of the chord progression, press the End key ( ). • The Keyboard exits the recording mode. • During playback, playback of the recorded chord progression stops at this point. For automatic repeat playback of the chord - Panasonic SXKN7000 | SXKN7000 User Guide - Page 94
progression, press the END button. • If the REP button is pressed instead of the END button, during playback the recorded rhythm progression is repeated. • The Keyboard exits the recording mode. 94 QQTG0671 Sequencer - Panasonic SXKN7000 | SXKN7000 User Guide - Page 95
Part IV Sequencer Track Assign Each SEQUENCER part is already assigned to a track number. However, you can use the TRACK ASSIGN function to assign parts to tracks as you wish. 1. On the SEQ MENU display, use the SONG SELECT ∧ and ∨ buttons to select the song number. Then select RECORD & EDIT. 2. - Panasonic SXKN7000 | SXKN7000 User Guide - Page 96
Part IV Sequencer Quantize The QUANTIZE function can correct the timing of your performance after it has been recorded. If the rhythm is slightly out of sync or inexact, it will automatically be corrected to the specified quantize level. 1. On the SEQ MENU display, select RECORD & EDIT. 2. On the - Panasonic SXKN7000 | SXKN7000 User Guide - Page 97
Part IV Sequencer Song Clear Erase the recorded contents of all tracks. 1. On tne SEQ MENU display, select RECORD & EDIT. 2. On the RECORD & EDIT display, selct SONG CLEAR. • The display looks similar to the following. 4. Press the OK button. • The confirmation display appears. Press the YES - Panasonic SXKN7000 | SXKN7000 User Guide - Page 98
the note length. • Examples of note lengths ( = 96) 91: tenuto (95%) 76: normal (80%) 48: staccato (50%) 24: cutting (25%) 3. Play a key on the keyboard to specify the note pitch (NOTE NUMBER) and velocity (how hard the key is played). 4. Repeat steps 1 to 3 to input more note data. 6. Select the - Panasonic SXKN7000 | SXKN7000 User Guide - Page 99
Part IV Sequencer CYCLE PLAY You can aurally check the data you are editing by accessing the CYCLE PLAY display from the NOTE EDIT display. • If you wish other tracks to be played back, they should be selected beforehand on the SEQUENCER PLAY display. (Refer to page 83.) 1. On the NOTE EDIT - Panasonic SXKN7000 | SXKN7000 User Guide - Page 100
is played). 3. Press the ENTER button to store the data. • Instead of the ENTER button, you can store data (including velocity data) by playing the keyboard. In this case, the instrument is that specified on the display, regardless of which key is played. 4. Repeat steps 1 to 3 to input more DRUMS - Panasonic SXKN7000 | SXKN7000 User Guide - Page 101
Part IV Sequencer Copy and paste the recorded data You can copy and paste specific portions of the recorded data. Select the function 1. On the SEQ MENU display, use the SONG SELECT ∧ and ∨ buttons to select the number of the song. Then select COPY & PASTE. • The display looks similar to the - Panasonic SXKN7000 | SXKN7000 User Guide - Page 102
Part IV Sequencer TRACK MERGE Merge the recorded contents of two tracks (source tracks) and store the merged contents in a third track (destination track). • When the TRACK MERGE function is ex- ecuted, the data is erased from the two source tracks. MEASURE COPY Copy recorded data of specified - Panasonic SXKN7000 | SXKN7000 User Guide - Page 103
Part IV Sequencer MEASURE ERASE Erase the recorded contents of specific measures. You can also specify which type of data is to be erased. • Note that only the contents of the measures are erased, not the measures themselves; the length of the performance remains the same. MEASURE DELETE Delete - Panasonic SXKN7000 | SXKN7000 User Guide - Page 104
Part IV Sequencer MEASURE INSERT Insert specified measures at a specified point. • The length of the performance accordingly in- creases by the number of inserted measures. APC TO SMF CONVERT This function converts data to Standard MIDI File (SMF) format, allowing you to play back song data - Panasonic SXKN7000 | SXKN7000 User Guide - Page 105
Part IV Sequencer Changing the note position etc. of the recorded data You can change the note pitch and position etc. of recorded data. Select the function 1. On the SEQ MENU display, use the SONG SELECT ∧ and ∨ buttons to select the number of the song. Then select RANGE EDIT. • The display - Panasonic SXKN7000 | SXKN7000 User Guide - Page 106
Part IV Sequencer VELOCITY CHANGE Modify the recorded velocity in specific measures of specific tracks. TRANSPOSE Change of key of specific measures of specific tracks. 1. Use the TRACK ∧ and ∨ buttons to select the track you wish to edit. • You cannot select the track for the CONTROL, RHYTHM or - Panasonic SXKN7000 | SXKN7000 User Guide - Page 107
Part IV ADVANCE/DELAY Speed up or delay the sound production of specified performance data. 1. Use the TRACK ∧ and ∨ buttons to select the track you wish to edit. • You cannot select the track for the CONTROL, RHYTHM or CHORD part. • If ALL is selected, all tracks will be edited. 2. Use the FIRST - Panasonic SXKN7000 | SXKN7000 User Guide - Page 108
Part V Composer Outline of the Composer MAIN APC/SEQUENCER VOLUME VOLUME MAX MAX MIC VOLUME LINE IN VOLUME MAX MAX MIN MIN MIN OFF DEMO RHYTHM GROUP AUTO SETTING BANK STOP AUTO PLAY CHORD MODE OFF/ON MODERN DANCE GOSPEL & BLUES COUNTRY RHYTHM GROUP MARCH 8 & 16 ROCK & - Panasonic SXKN7000 | SXKN7000 User Guide - Page 109
Part V COMPOSER menu 1. Press the PROGRAM MENUS button to turn it on. • The display looks similar to the following. 2. Select COMPOSER. • The display looks similar to the following. Composer Summary of the COMPOSER menu items RECORDING MEMORY-A Create a memory in the MEMORY A bank. RECORDING - Panasonic SXKN7000 | SXKN7000 User Guide - Page 110
Part V Composer Simple recording method With EASY COMPOSER you can easily create a unique rhythm pattern by selecting a different style for each part of the rhythm. 1. On the COMPOSER MENU display, select EASY COMPOSER. • The display looks similar to the following. 5. Use the VARI ∧ and ∨ - Panasonic SXKN7000 | SXKN7000 User Guide - Page 111
Part V Composer • To assign a name to each VARIATION, press the VARIATION button and select a number. 3. On the RECORD MEMORY display, press the OK button. • The display looks similar to the following. KEY SETTING Set the key and chord in which you wish the recorded pattern to be played. If the - Panasonic SXKN7000 | SXKN7000 User Guide - Page 112
NOTE CLR: Data is erased one note or one percussion instrument (DRUMS part) sound at a time. • Hold and press this button, and press the keyboard key that corresponds to the note or percussion instrument (DRUMS part) sound you wish to erase. ALL ERAS: The performance recorded in the selected part - Panasonic SXKN7000 | SXKN7000 User Guide - Page 113
Part V Composer 5. Use the buttons below the display to switch to a different recording part, and proceed to record each part in turn. 6. When you have finished recording the rhythm, turn off the PROGRAM MENUS button. Chord Modify Change For data that has already been recorded, you can select the - Panasonic SXKN7000 | SXKN7000 User Guide - Page 114
Part V Composer Part Setting You can make detailed settings for each part. 1. On the REALTIME RECORDING display, press the PART SETTING button. • The settings comprise two pages of the dis- play. Use the PAGE buttons to switch pages. 2. Use the PART ∧ and ∨ buttons to select a part. 3. Use the ∧ - Panasonic SXKN7000 | SXKN7000 User Guide - Page 115
Part V Composer DSP SET Press the DSP SET button if you wish to make detailed settings for the ACCOMP DSP effect. • Two types of DSP can be used for the auto- matic accompaniment. • You can specify whether or not to apply DSP1 to each part or to apply it to all the automatic accompaniment parts. - Panasonic SXKN7000 | SXKN7000 User Guide - Page 116
CORD button. • The display changes to the STEP RECORD display similar to the following. 5. Specify the pitch and velocity of the note by playing the keyboard. • The dot on the display where the note is stored changes to a * mark. • When recording chords, you can store multiple notes at one position - Panasonic SXKN7000 | SXKN7000 User Guide - Page 117
Part V Measure Edit You can edit the recorded data one measure at a time. Select the function you wish to edit. 1. During recording, press the MEASURE EDIT button. • The display looks similar to the following. Composer 2. Select the function. 3. Follow the procedure to edit the function (see below - Panasonic SXKN7000 | SXKN7000 User Guide - Page 118
Part V Composer MEASURE ERASE Erase the recorded contents of specific measures. • Note that only the contents of the measures are erased, not the measures themselves; the length of the performance remains the same. 1. Use the PART ∧ and ∨ buttons to specify the part. • If ALL is selected, data is - Panasonic SXKN7000 | SXKN7000 User Guide - Page 119
Part V Composer Pattern Copy Use this function to copy a pattern from a rhythm or from SEQUENCER data. PATTERN COPY Copy a rhythm to the COMPOSER. • You can also copy a pattern from the MEMORY. 1. On the COMPOSER MENU display, select PATTERN COPY. • The display looks similar to the following. - Panasonic SXKN7000 | SXKN7000 User Guide - Page 120
Part V Composer SEQ TO COMPOSER COPY Data from the SEQUENCER can be copied to a COMPOSER memory. For example, you can use a rhythm pattern on a song disk as the automatic accompaniment for your own performance. 1. Play back the song you wish to copy from SEQUENCER to confirm the tracks, the - Panasonic SXKN7000 | SXKN7000 User Guide - Page 121
Part V Composer Custom Style Copy 20 settings (STYLE) including COMPOSER patterns can be stored in the CUSTOM memory area of the RHYTHM GROUP, one MEMORY (BANK) at a time. The patterns stored in CUSTOM are retained even when the power to this instrument is turned off. You can use them during your - Panasonic SXKN7000 | SXKN7000 User Guide - Page 122
MIDI, FAVORITES, HOME PAGE and ALL CUSTOM STYLE as frequently loaded and saved data, it is recommended that you save it with other data as Keyboard backup data. • A * mark indicates that data can be loaded to and from a specific memory (SINGLE LOAD). • The SEQUENCER contents can be saved in one-song - Panasonic SXKN7000 | SXKN7000 User Guide - Page 123
compatibility of data such as NOTE data (keyboard performance data), VELOCITY (how hard the keyboard is played), PROGRAM NUMBER data (voice number the MIDI data, such as karaoke lyrics, can be displayed. This instrument supports this format, making it possible to view the lyrics on the display while - Panasonic SXKN7000 | SXKN7000 User Guide - Page 124
Disk Drive Part VI Disk Drive Outline of the procedure MAIN APC/SEQUENCER VOLUME VOLUME MAX MAX MIC VOLUME LINE IN VOLUME MAX MAX MIN MIN MIN OFF DEMO RHYTHM GROUP AUTO SETTING BANK STOP AUTO PLAY CHORD MODE OFF/ON MODERN DANCE GOSPEL & BLUES COUNTRY RHYTHM GROUP MARCH - Panasonic SXKN7000 | SXKN7000 User Guide - Page 125
Disk Drive Part VI Disk Drive Loading data Recall (load) the data from the disk to this instrument's memories. • Note that the load procedure causes any data which is currently stored in the relevant memories to be erased. LOAD Load data that saved to a disk into this instrument's memory. 1. - Panasonic SXKN7000 | SXKN7000 User Guide - Page 126
Part VI Disk Drive Disk Drive SINGLE LOAD You can specify which data to load from a disk into a specific PANEL MEMORY, COMPOSER (MEMORY), SOUND MEMORY, EFFECT MEMORY or SEQUENCER (when SONG SAVE was executed) memory. 1. Use the PAGE buttons to access the PAGE 3/3 SINGLE LOAD display. • The - Panasonic SXKN7000 | SXKN7000 User Guide - Page 127
Disk Drive Part VI Disk Drive COMPOSER LOAD Load COMPOSER data only from a disk. 1. In the RHYTHM GROUP section, press and hold the LOAD (MEMORY) button for a few seconds. 8 & 16 BEAT ROCK & POP BALLAD RHYTHM GROUP JAZZ & SWING BALLROOM MOVIE & SHOW ENTERTAINER ORGANIST 60s & 70s MODERN - Panasonic SXKN7000 | SXKN7000 User Guide - Page 128
on the display. For a "minus one" performance, use the MUTE CH buttons to select the channel you wish to mute. Following this, you can play a keyboard performance on the channel which was last set to MUTE. • For DOC disks: You can use the PART 1, PART 2 and ORCH (other accompaniment parts) buttons - Panasonic SXKN7000 | SXKN7000 User Guide - Page 129
Disk Drive Part VI Disk Drive Song Medley Songs saved from the SEQUENCER to a disk (disk data) in the TECHNICS FORMAT can be played back in a medley. 1. On the DISK MENU display, select SONG MEDLEY from the display. • The display looks similar to the following. 2. Select the order of files in - Panasonic SXKN7000 | SXKN7000 User Guide - Page 130
disk is inserted into the Disk Drive slot and you attempt to execute the save or load procedure, the DISK FORMAT display appears. Follow the instructions shown to format the disk. • Note that this procedure clears any data which is currently stored on the disk. 1. Select the type of format (2DD - Panasonic SXKN7000 | SXKN7000 User Guide - Page 131
Disk Drive Part VI SAVE 1. Insert a formatted disk into the Disk Drive slot. Push it all the way in until you hear a click. • A disk which is used with this instrument for the first time must first be formatted. 2. On the DISK MENU display, select SAVE. • The display looks similar to the following. - Panasonic SXKN7000 | SXKN7000 User Guide - Page 132
Disk Drive Part VI Disk Drive Specify the kind of data you wish to save to the disk. To maximize effective use of disk memory or to minimize the save time, select only the type of data you wish to save. 1. Use the PAGE buttons to access the 2/3 SAVE OPTION display. • The display - Panasonic SXKN7000 | SXKN7000 User Guide - Page 133
Disk Drive Part VI Disk Drive SMF FORMAT 0 This instrument's SEQUENCER data can be saved in the "Standard MIDI File" format (FORMAT 0) for use on other instruments. • What you can save in the SMF format (FOR- MAT 0) is ordinary performance data, such as note data. Data such as chord and rhythm - Panasonic SXKN7000 | SXKN7000 User Guide - Page 134
Disk Drive Part VI Disk Drive Custom Style Load/Save Load and save each style data of the CUSTOM in a special file. • All CUSTOM styles are backed up in a Technics file as ALL CUSTOM STYLE. 1. Insert the disk to load from or save to in the disk drive. 2. On the DISK MENU display, select CUSTOM - Panasonic SXKN7000 | SXKN7000 User Guide - Page 135
Disk Drive Part VI Disk Drive Disk management Various disk management procedures, such as file erase, file copy, and disk format, are available from the DISK TOOLS menu. DISK TOOLS 1. Insert the disk into the Disk Drive slot. 2. On the DISK MENU display, select DISK TOOLS from the display. • The - Panasonic SXKN7000 | SXKN7000 User Guide - Page 136
Disk Drive Part VI Disk Drive Set the automatic display when a disk is inserted When a disk is inserted in the Disk Drive, the display automatically changes to a disk-procedure display. Follow this procedure to customize the automatic display. PREFERENCES 1. On the DISK MENU display, select - Panasonic SXKN7000 | SXKN7000 User Guide - Page 137
into the Disk Drive slot. • The display changes to the STYLE TYPE SELECT display. 4. Select the style type. 5. Press the OK button. 6. Follow the instructions on the display to per- form the desired operation. • The operation differs depending on the type of disk. • For Technics type data, all of - Panasonic SXKN7000 | SXKN7000 User Guide - Page 138
data saved on the SD card. (Refer to pages 143, 144.) SD-AUDIO Audio data recorded from music CDs or downloaded from network music distribution services and saved on the SD card SD-SOUND SMF data saved on the SD card Outline of the procedure 1. Open the lid of the SD - Panasonic SXKN7000 | SXKN7000 User Guide - Page 139
SD card Part VII SD card SD IN USE • This indicator lights when accessing to the SD card. To prevent data loss, do not eject the card or turn off the power while this indicator is lit. Removing the SD card Attention Note that no sound is produced when performing SD card operations, such as LOAD - Panasonic SXKN7000 | SXKN7000 User Guide - Page 140
SD card Part VII SD card Loading data Load the data from the SD card to this instrument's memories. • Note that the load procedure causes any data which is currently stored in the relevant memories to be erased. SD LOAD Load data that saved to a card into this instrument's memory. 1. Insert - Panasonic SXKN7000 | SXKN7000 User Guide - Page 141
Part VII SD card ALPHABET Load the file from an alphabetical list of all songs saved in TECHNICS format on the SD card. NUMBER From all songs saved in the TECHNICS FORMAT on the SD card, select a song by specifying the song number. SD card 1. Use the ∧ and ∨ buttons to change the alpha- betical - Panasonic SXKN7000 | SXKN7000 User Guide - Page 142
Part VII SD card SD card SD-SOUND LOAD (SMF) Load SD-SOUND (SMF) data from the SD card. 1. On the LOAD (PAGE 1/3) display, press the SD-SOUND button. • The display looks similar to the following. • For cards which contain SD-SOUND data only, this display appears automatically when LOAD is - Panasonic SXKN7000 | SXKN7000 User Guide - Page 143
SD card Part VII SD card SD-Audio Play Play back audio data on the SD card saved by a PC, etc. 1. Insert the SD card with the stored data to be played into the SD slot. (See page 138.) 4. Press the buttons next to the SD slot to play back the data. • Close the lid securely after inserting the - Panasonic SXKN7000 | SXKN7000 User Guide - Page 144
and set ON/OFF to the part. The part being muted last is assigned to the keyboard, so that you can play the part with the keyboard. You can also assign the part to play with the keyboard using the CONDUCTOR. • Adjust the volume for playback using VOLUME. The set volume will be - Panasonic SXKN7000 | SXKN7000 User Guide - Page 145
SD card Part VII SD card Playlist The instrument handles the SD-AUDIO/SD-SOUND files in PLAYLIST units. The explanation of the PLAYLIST is as follows. PLAYLIST type There are two types of PLAYLIST. < DEFAULT PLAYLIST: (Total list)> A collection of all data saved in an SD card. If you delete a - Panasonic SXKN7000 | SXKN7000 User Guide - Page 146
SD card Part VII SD card SD Song Medley Songs saved from the SEQUENCER to an SD card in the TECHNICS FORMAT can be played back in a melody. 1. On the SD MENU display, select SD SONG MEDLEY. • The display looks similar to the following. Making a USER LIST You can create up to three USER LISTs. - Panasonic SXKN7000 | SXKN7000 User Guide - Page 147
Part VII SD card Saving Data The internal data of this instrument can be saved on the SD card. SAVE 1. Insert an SD card for saving into the SD slot. (See page 138.) 2. Press SD button to turn it on. 3. On the SD MENU display, select SAVE. • The display looks similar to the following. 3. Select - Panasonic SXKN7000 | SXKN7000 User Guide - Page 148
Part VII SD card Specify the kind of data you wish to save to the SD card. To maximize effective use of SD card memory or to minimize the save time, select only the type of data you wish to save. 1. Use the PAGE buttons to access the 2/3 dis- play. • The display looks similar to the - Panasonic SXKN7000 | SXKN7000 User Guide - Page 149
SD card Part VII SD card 3. Use the buttons below the display to assign a name. 4. Press the OK button. • The display returns to the SAVE display. 5. Use the FROM SONG buttons to select the SEQUENCER song number you wish to save. • The song name to save from is shown below the FROM SONG button. - Panasonic SXKN7000 | SXKN7000 User Guide - Page 150
SD card Part VII SD card Create an album of your favorite songs The FAVORITE SONGS display allows you to create an album of your favorite songs which are aligned in a desired order, making it easy to load your favorite song to play back immediately. FAVORITE SONGS 1. Insert the SD card which - Panasonic SXKN7000 | SXKN7000 User Guide - Page 151
SD card Part VII SD card • Use the FROM ∧ and ∨ buttons to select the file number to load. Use the TO ∧ and ∨ buttons to select the CUSTOM number to load to. Press the LOAD button. SAVE Use the FROM ∧ and ∨ buttons to select the CUSTOM number to save, and press the SAVE button. To overwrite a - Panasonic SXKN7000 | SXKN7000 User Guide - Page 152
Part VII SD-SOUND EXPORT: Convert SD-SOUND data to generic SMF data for use on an external instrument. • SONGs in a specified PLAYLIST except for DEFAULT PLAYLIST are exported to the "IMEXPORT" directory at one time. • Pressing ALL DELETE will delete all files; however, "read only" files will not be - Panasonic SXKN7000 | SXKN7000 User Guide - Page 153
Sound Part VIII Sound Outline of the Sound MAIN APC/SEQUENCER VOLUME VOLUME MAX MAX MIC VOLUME LINE IN VOLUME MAX MAX MIN MIN MIN OFF DEMO RHYTHM GROUP AUTO SETTING BANK STOP AUTO PLAY CHORD MODE OFF/ON MODERN DANCE GOSPEL & BLUES COUNTRY RHYTHM GROUP MARCH 8 & 16 ROCK - Panasonic SXKN7000 | SXKN7000 User Guide - Page 154
Part VIII Sound Part Setting Set the various sound attributes for each part. Selecting an attribute 1. On the SOUND MENU display, select PART SETTING. 2. Use the PART SELECT ∧ and ∨ buttons to select the part. 3. Use the buttons below the display to adjust each attribute (explained in detail - Panasonic SXKN7000 | SXKN7000 User Guide - Page 155
PART EXPRESSION on the FOOT CONTROLLERS display. (Refer to page 180.) AFTER TOUCH: Use the AFTER TOUCH ON/OFF button to enable or disable the keyboard aftertouch. ORIGINAL TUNING: Use the ORIG. TUNING ON/OFF button to enable or disable the tuning for each sound. • For details about ORIGINAL TUNING - Panasonic SXKN7000 | SXKN7000 User Guide - Page 156
Part VIII Sound Sound FILTER RESONANCE: Use the RESONANCE ∧ and ∨ buttons to adjust the amount of resonance (0 to 127). BRIGHTNESS: Use the BRIGHTNESS ∧ and ∨ buttons to adjust the brightness of the sound (0 to 127). ATTACK TIME: Use the ATTACK ∧ and ∨ buttons to specify the attack time - Panasonic SXKN7000 | SXKN7000 User Guide - Page 157
Sound Part VIII Sound Mixer Use the MIXER display to visually adjust the major settings of each part. Use this display to make broad, general changes to the settings. 1. On the SOUND MENU display, select MIXER. • The MIXER display consists of 5 pages. Use the PAGE buttons to switch among the - Panasonic SXKN7000 | SXKN7000 User Guide - Page 158
Sound Part VIII Sound EQUALIZER HIGH: Sound quality correction in the high range. Select EQUALIZER HI FC; use the buttons below the display to set the standard frequency. Select EQUALIZER HI GAIN; use the buttons below the display to set the ratio of change. EQUALIZER LOW: Sound quality - Panasonic SXKN7000 | SXKN7000 User Guide - Page 159
Part VIII Sound Master Tuning This setting is used to fine-tune the pitch of the entire instrument. This is convenient when the Keyboard is played with other instruments or with a recorded performance. 1. On the SOUND MENU display, select MASTER TUNING. • The display changes to the following. - Panasonic SXKN7000 | SXKN7000 User Guide - Page 160
VIII Sound ORIGINAL tuning Each instrument of each sound has its own original tuning data. This setting affects the tuning curve that spans the entire keyboard. So, for example, the acoustic piano-type sounds duplicate those of a real piano, in that the high notes are tuned slightly higher and the - Panasonic SXKN7000 | SXKN7000 User Guide - Page 161
Sound Part VIII Sound Separate Setting You can output a desired part or parts through the two SUB OUT terminals. 1. On the SOUND MENU display, select SEPA- RATE SETTING. • The display looks similar to the following. 3. Use the PART ASSIGN button to select the part or parts for output. • The - Panasonic SXKN7000 | SXKN7000 User Guide - Page 162
Part IX Reverb & Effect Outline of the Reverb & Effect MAIN VOLUME APC/SEQUENCER VOLUME MAX MAX MIC VOLUME LINE IN VOLUME MAX MAX MIN MIN MIN OFF DEMO RHYTHM GROUP AUTO SETTING BANK STOP AUTO PLAY CHORD MODE OFF/ON MODERN DANCE GOSPEL & BLUES COUNTRY RHYTHM GROUP MARCH 8 - Panasonic SXKN7000 | SXKN7000 User Guide - Page 163
Part IX Reverb & Effect Equalizer You can apply a 5-band equalizer to the final output of this instrument. • The equalizer is applied to both the L and R outputs. 1. On the REVERB & EFFECT display, select EQUALIZER. • The display looks similar to the following. 3. If necessary, use the buttons - Panasonic SXKN7000 | SXKN7000 User Guide - Page 164
Part X Sound Edit Outline of the Sound Edit MAIN APC/SEQUENCER VOLUME VOLUME MAX MAX MIC VOLUME LINE IN VOLUME MAX MAX MIN MIN MIN OFF DEMO RHYTHM GROUP AUTO SETTING BANK STOP AUTO PLAY CHORD MODE OFF/ON MODERN DANCE GOSPEL & BLUES COUNTRY RHYTHM GROUP MARCH 8 & 16 ROCK - Panasonic SXKN7000 | SXKN7000 User Guide - Page 165
(To specify the percussion instrument you wish to edit, use the ∧ and ∨ buttons to select the sound name, or alternatively, while pressing the keyboard key for the corresponding sound, press the NOTE SELECT button.) • To record the DIGITAL DRAWBAR/ORGAN TABS settings, first adjust the settings, then - Panasonic SXKN7000 | SXKN7000 User Guide - Page 166
Part X Sound Edit Tone Edit Modify the separate tones which comprise the sound. About tones A sound may be made up of at most four tones. 1st tone SOUND 2nd tone 3rd tone • A special process is used to produce realsounding piano type tones. For this reason, some edit procedures for piano - Panasonic SXKN7000 | SXKN7000 User Guide - Page 167
select the tone you wish to copy to. 4. Press the OK button. • Tone copy is executed. KEY LAYER Adjust the relation of tone output to keyboard location. 1. Use the PAGE buttons to view the 2/4 display. • The display looks similar to the following. 2. Use the buttons to the left of the display - Panasonic SXKN7000 | SXKN7000 User Guide - Page 168
overlapping the L-FADE and H-FADE curves of each different tone, you can change the way the tone sounds relative to how hard or softly the keyboard is played. 5. Repeat steps 2 to 4 for the other tones, as desired. 2. Use the buttons to the left of the display to select a tone. 3. Use the - Panasonic SXKN7000 | SXKN7000 User Guide - Page 169
. 7. Use the RIGHT SPLIT ∧ and ∨ buttons to set the octave of the right part when the keyboard is split. 8. Use the LEFT SPLIT ∧ and ∨ buttons to set the octave of the left part when the keyboard is split. 9. Repeat steps 2 to 8 for the other tones, as desired. 2. Use the buttons to the - Panasonic SXKN7000 | SXKN7000 User Guide - Page 170
Part X Sound Edit PITCH ENVELOPE TOUCH & KEY FOLLOW Specify how the pitch envelope changes in relation to note pitch. 1. Use the PAGE buttons to view the 3/3 display. 4. Change the key follow settings for the AT- TACK (ATK), DECAY (DCY) and RELEASE (RLS). • Use the ∧ and ∨ buttons corresponding - Panasonic SXKN7000 | SXKN7000 User Guide - Page 171
Part X Sound Edit 4. Use the CUTOFF ∧ and ∨ buttons to set the frequency range which is cut by the filter. 5. Use the RESO ∧ and ∨ buttons to specify the resonance value (dB). • Resonance is effect which adds character to the sound by emphasizing the harmonic components of frequencies close to the - Panasonic SXKN7000 | SXKN7000 User Guide - Page 172
TOUCH ∧ and ∨ buttons to set the amount of volume change in relation to how hard the keyboard is played. • At a - value, the softer the keyboard is played, the louder the sound. At a + value, the harder the keyboard is played, the louder the sound. 5. Use the CURVE ∧ and ∨ buttons to select the type - Panasonic SXKN7000 | SXKN7000 User Guide - Page 173
, DECAY and RELEASE. • Use the ∧ and ∨ buttons corresponding to the ENVELOPE KEY FOLLOW attributes to adjust the settings. Use the RANGE buttons to specify the keyboard range. Sound Edit 173 QQTG0671 - Panasonic SXKN7000 | SXKN7000 User Guide - Page 174
the waveform. SIN: Sine wave TRI: Triangle wave SQR: Square wave SAW: Saw tooth wave DELAY Delay time is the time elapsed from when the keyboard key is pressed until the modulation begins. 3. Use the buttons to the left of the display to select a tone. 4. Use the LFO SETTINGS ∧ and ∨ buttons - Panasonic SXKN7000 | SXKN7000 User Guide - Page 175
Part X Sound Edit Effect Edit These are settings related to the various effects applied to your edited sound. EFFECT 1. On the SOUND EDIT menu display, select EFFECT. • The display looks similar to the following. DIGITAL EFFECT 1. Use the PAGE buttons to view the 2/2 display. • The display - Panasonic SXKN7000 | SXKN7000 User Guide - Page 176
Part X Sound Edit Controller Edit Specify how operation of the controllers, such as the wheels, etc., affects the sound. CONTROLLER 1. On the SOUND EDIT menu display, select CONTROLLER. • The display looks similar to the following. 5. Use the TONE ENABLE ON/OFF ∧ and ∨ buttons to set the - Panasonic SXKN7000 | SXKN7000 User Guide - Page 177
Part X Sound Edit 3. Use the buttons below the display to assign a name. • Press the ABC button to enter alphabetical characters. While the SHIFT button is pressed, upper case letters are entered. • Press the 123 button to enter numbers, etc. While the SHIFT button is pressed, you can enter - Panasonic SXKN7000 | SXKN7000 User Guide - Page 178
Return the settings and memories to the factory-preset status. (Refer to page 197.) OVERALL TOUCH SENSITIVITY (page 179) Adjust the amount of keyboard touch response. FOOT CONTROLLERS (page 179) Assign functions to the separately sold Foot Switch and Foot Controller, etc. PANEL MEMORY MODE Define - Panasonic SXKN7000 | SXKN7000 User Guide - Page 179
sensitivity is turned off. 2. Use the L and M buttons to select the function. AFTER TOUCH ON/OFF: Enable or disable the aftertouch effect for the keyboard (ON/OFF). CURVE: Adjust the curve of the sound change relative to how hard the keys are pressed (1 to 10). THRESHOLD: Specify how hard a key - Panasonic SXKN7000 | SXKN7000 User Guide - Page 180
Part XI Control P. MEM BANK DEC.: Change to the previous PANEL MEMORY bank in order. PANEL MEMORY 1 to 8: The specified PANEL MEMORY number is turned on. P. MEM INC.+DEC.: Press the switch to increment the PANEL MEMORY number selection by one; release the switch to return to the previous number. - Panasonic SXKN7000 | SXKN7000 User Guide - Page 181
Part XII Customize Outline of Customize functions MAIN APC/SEQUENCER VOLUME VOLUME MAX MAX MIC VOLUME LINE IN VOLUME MAX MAX MIN MIN MIN OFF DEMO RHYTHM GROUP AUTO SETTING BANK STOP AUTO PLAY CHORD MODE OFF/ON MODERN DANCE GOSPEL & BLUES COUNTRY RHYTHM GROUP MARCH 8 & 16 - Panasonic SXKN7000 | SXKN7000 User Guide - Page 182
Part XII Customize Home Page Setting Arrange the contents of the normal display to suit your tastes. 1. On the CUSTOMIZE MENU display, select HOMEPAGE. • The display looks similar to the following. USER EDIT By arranging the various display parts, you can create your own USER type display. 1. - Panasonic SXKN7000 | SXKN7000 User Guide - Page 183
Part XII Customize Display Time Out Numerous message displays and setting displays conveniently guide you through the operation steps of this instrument. Once you become familiar with the operation of your instrument, however, you may wish to shorten or - Panasonic SXKN7000 | SXKN7000 User Guide - Page 184
Part XII Customize Wallpaper Setting You can change the background pattern (WALLPAPER) on your display. 1. On the CUSTOMIZE MENU display, select WALLPAPER SETTING. • The display looks similar to the following. HOME PAGE/SOUND & RHYTHM SELECT: The standard display and the displays to select the - Panasonic SXKN7000 | SXKN7000 User Guide - Page 185
Part XII Customize Custom Panel Mode Specify the range of settings which are recalled by the CUSTOM PANEL button. 1. On the CUSTOMIZE MENU display, select CUSTOM PANEL MODE. • The display looks similar to the following. 2. Use the buttons left to the display to select a mode. PANEL MEMORY: The - Panasonic SXKN7000 | SXKN7000 User Guide - Page 186
Part XII Customize Video Out Mode Setting Select the output mode for the VIDEO OUT terminal when viewing display images, such as SLIDE SHOW or lyrics, on your external video monitor or TV. 1. On the CUSTOMIZE MENU display, select VIDEO OUT MODE SETTING. • The display looks similar to the following - Panasonic SXKN7000 | SXKN7000 User Guide - Page 187
MIDI Part XIII MIDI What is MIDI? MIDI (Musical Instrument Digital Interface) is the international standard for digital communication of electronic musical instrument data. This means that any equipment which has a MIDI terminal- such as electronic musical instruments and personal computers- can - Panasonic SXKN7000 | SXKN7000 User Guide - Page 188
MIDI Part XIII MIDI channels Many different kinds of performance data are sent using just one MIDI cable. This is possible because MIDI signals are sent and received through 16 different "basic channels" (numbered 1 to 16). In order for the exchange of data to take place, the channels on the - Panasonic SXKN7000 | SXKN7000 User Guide - Page 189
MIDI Part XIII MIDI Outline of MIDI functions MAIN APC/SEQUENCER VOLUME VOLUME MAX MAX MIC VOLUME LINE IN VOLUME MAX MAX MIN MIN MIN OFF DEMO RHYTHM GROUP AUTO SETTING BANK STOP AUTO PLAY CHORD MODE OFF/ON MODERN DANCE GOSPEL & BLUES COUNTRY RHYTHM GROUP MARCH 8 & 16 - Panasonic SXKN7000 | SXKN7000 User Guide - Page 190
Part XIII MIDI MIDI Part Setting Follow this procedure to set the functions which can be set for each part: MIDI CHANNELs, the OCTAVE data to NOTE data during transmission, and LOCAL CONTROL (whether or not the sound generator of this instrument is active during transmission). 1. On the MIDI - Panasonic SXKN7000 | SXKN7000 User Guide - Page 191
Part XIII MIDI MIDI Control Messages Enable or disable the exchange of various control data. 1. On the MIDI MENU display, select CONTROL MESSAGES. • The display looks similar to the following. • The CONTROL MESSAGES display consists of 3 pages. Use the PAGE buttons to switch between pages. 3. - Panasonic SXKN7000 | SXKN7000 User Guide - Page 192
a trade- mark of Yamaha Corporation. DRUMS TYPE NX SOUND: Keyboard percussion instrument sounds correspond to the same key note numbers for connected not converted. * "Previous models" include all Technics instrument models except for: KN7000/6500/6000 PR604/804/603/703/903/1000 3. Use ∧ and ∨ - Panasonic SXKN7000 | SXKN7000 User Guide - Page 193
ON data is set to a fixed value. (1 to 127) • Select VELOCITY FIXED VALUE. Use the ∧ and ∨ buttons to change the value. TECHNI-CHORD OUTPUT ON: Keyboard notes generated by the TECHNI-CHORD function are also transmitted. OFF: Only key note data of the pressed keys is transmitted. TRANSPOSE OUTPUT ON - Panasonic SXKN7000 | SXKN7000 User Guide - Page 194
not used) or WITH APC (the performance includes AUTO PLAY CHORD). Notice When an instrument such as an organ or accordion with separate or divided keyboards dedicated to melody and chords is used as the master instrument, if this instrument's split point is set to a note below the lowest note of - Panasonic SXKN7000 | SXKN7000 User Guide - Page 195
in which to store the settings (USER SETTING 1, 2, 3). 4. Use the WITH SPLIT POINT? button to specify whether or not to also store the keyboard split point (YES/NO). 5. Press the WRITE button. Program Change MIDI Out Use this function to immediately transmit specific PROGRAM CHANGE and BANK SELECT - Panasonic SXKN7000 | SXKN7000 User Guide - Page 196
the included CD-ROM to the computer first. (Refer to the separate manual for more information.) 1. Turn off the power to this instrument. 2. transmission KN as master: The mode when this instrument is used as the master keyboard. KN as slave: The mode when this instrument is used as a slave - Panasonic SXKN7000 | SXKN7000 User Guide - Page 197
The display looks similar to the following. • Initialization begins. When initialization is completed, "COMPLETED!" is shown on the display and the Keyboard returns to the normal performance mode. • The USER MIDI, FAVORITES, HOME PAGE settings and CUSTOM styles are not initialized by this procedure - Panasonic SXKN7000 | SXKN7000 User Guide - Page 198
turn off the power before connecting the Foot Controller. PLUG-IN feature This model is compatible with third-party extension plug-in software for the KN7000. See plug-in documentation for information about software features and operation. 198 QQTG0671 - Panasonic SXKN7000 | SXKN7000 User Guide - Page 199
Terminals Back panel terminals (Left side) VIDEO OUT The display images or lyrics when playing songs, and the image of the display are output through this terminal. • The output mode (NTSC/PAL) can be selected. (See page 186.) USB This terminal allows connection to a personal computer with a USB - Panasonic SXKN7000 | SXKN7000 User Guide - Page 200
(Right side) MIC A microphone can be connected to this terminal. (Refer to page 45.) LINE IN This terminal receives input signals from an external instrument. To receive a monaural signal, connect to the R/MONO terminal. • The input signal volume can be adjusted using the LINE IN VOLUME controller - Panasonic SXKN7000 | SXKN7000 User Guide - Page 201
changes in performance may occur in the Technics Keyboard but do not indicate trouble. Phenomenon The buttons, keys, etc. malfunction. is muted. (Refer to page 29.) • The LOCAL CONTROL for a part performed on the keyboard is set to OFF. Set the LOCAL CONTROL to ON. (Refer to page 190.) Only - Panasonic SXKN7000 | SXKN7000 User Guide - Page 202
It or playback. does not indicate a problem. When the procedure to load from a performed, the contents of the keyboard memory card, the keyboard memory changes to that of song which is stored in the keyboard memory, save it on a consult your dealer or service center. • This instrument has - Panasonic SXKN7000 | SXKN7000 User Guide - Page 203
you 18 tried to load is not 24/48/96/192/288/384 PPQ. A problem has occurred with your 20 SEQUENCER Data. This might be due to a damaged The file that you are trying to load was 43 saved on a previous KN keyboard. It is only possible to load using the "PERFORMANCE" option. It is impossible - Panasonic SXKN7000 | SXKN7000 User Guide - Page 204
setting and turn the power back on. This Bitmap is in the wrong format for 63 the KN and cannot be loaded. See the Owners Manual for more details. 64 Please select the Panel Memory that you want to name. It is not possible to use the CHORD 65 FINDER in - Panasonic SXKN7000 | SXKN7000 User Guide - Page 205
Index A ACCORDION REGISTER 38 AMPLITUDE 172 APC CONTROL (MIDI 192 APC/SEQUUENCER VOLUME 56 AUTO PLAY CHORD 53 AUTO PLAY CHORD INPUT (MIDI 193 AUTO PLAY CHORD OUTPUT (MIDI 194 AUTO SETTING 69 AUX IN 200 B BACKUP 122 Backup memory 198 BANK 68 BANK VIEW 65 BASIC 54 BEAT 51 BEND RANGE - Panasonic SXKN7000 | SXKN7000 User Guide - Page 206
T TAP TEMPO 51 TECHNI-CHORD 48 TEMPO/PROGRAM 51 TONE 166 TONE SELECT 166 TRACK ASSIGN 95 TRACK CLEAR 97 TRACK MERGE 102 TRANSPOSE 47 Troubleshooting 201 U USB 199 V VARIATION 50 VARIATION (SOUND DSP 43 VELOCITY CHANGE 106 VIDEO OUT 199 Volume balance 29 W WALL PAPER SETTING 184 WAVE - Panasonic SXKN7000 | SXKN7000 User Guide - Page 207
Specifications SOUNDS RHYTHMS KEYBOARD SOUND GENERATOR MAX. POLYPHONY NUMBER OF SOUNDS MUSIC STYLE ARRANGER SOUND ARRANGER MUSIC STYLIST ONE TOUCH PLAY TECHNI-CHORD PANEL MEMORY SEQUENCER COMPOSER DISK SX-KN7000 61 KEYS (WITH INITIAL TOUCH) PCM 128 NOTES 1236 SOUNDS (1187 SOUNDS + 2 ORGAN - Panasonic SXKN7000 | SXKN7000 User Guide - Page 208
SX-KN7000 SD CARD LOAD, SAVE, FAVORITES SONGS, TECHNICS SONG MEDLEY, SD-AUDIO PLAY, SD-SOUND PLAY, CUSTOM STYLE LOAD/SAVE, SD CARD TOOLS, SD PREFERENCES SOUND - Panasonic SXKN7000 | SXKN7000 User Guide - Page 209
Tone Cabinets, Panasonic Digital Pianos Technics Keyboards Panasonic Keyboards, Synthesizers, Sound problem is not handled to your satisfaction, then write to the warrantor's Consumer Affairs Department at the addresses listed for the warrantor. PARTS AND SERVICE (INCLUDING COST OF AN IN-HOME SERVICE - Panasonic SXKN7000 | SXKN7000 User Guide - Page 210
MEMO 210 QQTG0671 - Panasonic SXKN7000 | SXKN7000 User Guide - Page 211
Matsushita Electric Industrial Co., Ltd. Web Site: http://www.panasonic.co.jp/global/ ENGLISH QQTG0671 Se0402S0
-
 1
1 -
 2
2 -
 3
3 -
 4
4 -
 5
5 -
 6
6 -
 7
7 -
8
-
9
-
10
-
11
-
12
-
13
-
14
-
15
-
16
-
17
-
18
-
19
-
20
-
21
-
22
-
23
-
24
-
25
-
26
-
27
-
28
-
29
-
30
-
31
-
32
-
33
-
34
-
35
-
36
-
37
-
38
-
39
-
40
-
41
-
42
-
43
-
44
-
45
-
46
-
47
-
48
-
49
-
50
-
51
-
52
-
53
-
54
-
55
-
56
-
57
-
58
-
59
-
60
-
61
-
62
-
63
-
64
-
65
-
66
-
67
-
68
-
69
-
70
-
71
-
72
-
73
-
74
-
75
-
76
-
77
-
78
-
79
-
80
-
81
-
82
-
83
-
84
-
85
-
86
-
87
-
88
-
89
-
90
-
91
-
92
-
93
-
94
-
95
-
96
-
97
-
98
-
99
-
100
-
101
-
102
-
103
-
104
-
105
-
106
-
107
-
108
-
109
-
110
-
111
-
112
-
113
-
114
-
115
-
116
-
117
-
118
-
119
-
120
-
121
-
122
-
123
-
124
-
125
-
126
-
127
-
128
-
129
-
130
-
131
-
132
-
133
-
134
-
135
-
136
-
137
-
138
-
139
-
140
-
141
-
142
-
143
-
144
-
145
-
146
-
147
-
148
-
149
-
150
-
151
-
152
-
153
-
154
-
155
-
156
-
157
-
158
-
159
-
160
-
161
-
162
-
163
-
164
-
165
-
166
-
167
-
168
-
169
-
170
-
171
-
172
-
173
-
174
-
175
-
176
-
177
-
178
-
179
-
180
-
181
-
182
-
183
-
184
-
185
-
186
-
187
-
188
-
189
-
190
-
191
-
192
-
193
-
194
-
195
-
196
-
197
-
198
-
199
-
200
-
201
-
202
-
203
-
204
-
205
-
206
-
207
-
208
-
209
-
210
-
211
 |
 |
QQTG0671
ENGLISH
SX-
KN7000
KEYBOARD
Operating Instructions
KN7000
KEYBOARD
Before connecting, operating or adjusting this product, please read these
instructions completely. Please keep this manual for future reference.