Panasonic WJ-NV300 Operating Instructions - Page 114
Zooming, Move to home position, Focus adjustment
 |
View all Panasonic WJ-NV300 manuals
Add to My Manuals
Save this manual to your list of manuals |
Page 114 highlights
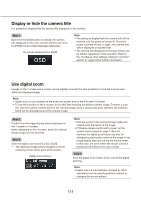
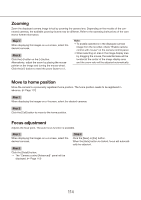
Zooming Zoom the displayed camera image in/out by zooming the camera lens. Depending on the models of the connected cameras, the available zooming factors may be different. Refer to the operating instructions of the camera for further information. Step 1 When displaying the images on a 4-screen, select the desired cameras. Step 2 Click the [-] button or the [+] button. Alternatively, adjust the zoom by placing the mouse pointer on the image and turning the mouse wheel. Click the [x1] button to reset the zoom factor to x1. Note: • To enable operations in the displayed camera image from the recorder, check "Enable camera control with mouse" on the camera control panel. • When selecting an area in the image display area by dragging the mouse, the selected area will be located at the center of the image display area and the zoom ratio will be adjusted automatically. Move to home position Move the camera to a previously registered home position. The home position needs to be registered in advance. (☞ Page 117) Step 1 When displaying the images on a 4-screen, select the desired cameras. Step 2 Click the [Call] button to move to the home position. Focus adjustment Adjusts the focal point. The auto focus function is available. Step 1 When displaying the images on a 4-screen, select the desired cameras. Step 2 Click the [Detail] button. →→ The "Camera control [Advanced]" panel will be displayed. (☞ Page 112) Step 3 Click the [Near] or [Far] button. When the [Auto] button is clicked, focus will automatically be adjusted. 114
-
 1
1 -
2
-
3
-
4
-
5
-
6
-
7
-
8
-
9
-
10
-
11
-
12
-
13
-
14
-
15
-
16
-
17
-
18
-
19
-
20
-
21
-
22
-
23
-
24
-
25
-
26
-
27
-
28
-
29
-
30
-
31
-
32
-
33
-
34
-
35
-
36
-
37
-
38
-
39
-
40
-
41
-
42
-
43
-
44
-
45
-
46
-
47
-
48
-
49
-
50
-
51
-
52
-
53
-
54
-
55
-
56
-
57
-
58
-
59
-
60
-
61
-
62
-
63
-
64
-
65
-
66
-
67
-
68
-
69
-
70
-
71
-
72
-
73
-
74
-
75
-
76
-
77
-
78
-
79
-
80
-
81
-
82
-
83
-
84
-
85
-
86
-
87
-
88
-
89
-
90
-
91
-
92
-
93
-
94
-
95
-
96
-
97
-
98
-
99
-
100
-
101
-
102
-
103
-
104
-
105
-
106
-
107
-
108
-
 109
109 -
 110
110 -
 111
111 -
 112
112 -
 113
113 -
 114
114 -
 115
115 -
 116
116 -
 117
117 -
 118
118 -
 119
119 -
120
-
121
-
122
-
123
-
124
-
125
-
126
-
127
-
128
-
129
-
130
-
131
-
132
-
133
-
134
-
135
-
136
-
137
-
138
-
139
-
140
-
141
-
142
-
143
-
144
-
145
-
146
-
147
-
148
-
149
-
150
-
151
-
152
-
153
-
154
-
155
-
156
-
157
-
158
-
159
-
160
-
161
-
162
-
163
-
164
-
165
-
166
-
167
-
168
-
169
-
170
-
171
-
172
-
173
-
174
-
175
-
176
-
177
-
178
-
179
-
180
-
181
-
182
-
183
-
184
-
185
-
186
-
187
-
188
-
189
 |
 |