Pfaff 645F Owner's Manual
Pfaff 645F Manual
 |
View all Pfaff 645F manuals
Add to My Manuals
Save this manual to your list of manuals |
Pfaff 645F manual content summary:
- Pfaff 645F | Owner's Manual - Page 1
MODEL I SZA-645F C S. 1 / I -1 pI It * - -- *0 - - :- 4 4aç t -t : C I INSTRUCTIONS for the use and maintenance of your sewing machine - Pfaff 645F | Owner's Manual - Page 2
the needle. 2. Make sure you pull out the power cord plug whenever you want to change needle, sewing foot, bobbin or needle plate, when you clean and oil the machine, or when you have to interrupt sewing and leave the machine for a while. 3. Be sure to use only a 15-watt light bulb in the - Pfaff 645F | Owner's Manual - Page 3
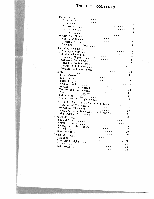
Needles 5 Changing Needle 5 Changing Presser Foot 6 Threading Machine 6 Winding Bobbin 7 Bobbin Winder Stop 7 Threading Removing Thread Thread 12 13 14 Fabric Feed 14 Sewing Light And Light Switch 15 ThaTOrotpefRroaertmioMonvakeoinfTghTehDeiWffMeorraekcnhtinTeypes of Stitches 15 - Pfaff 645F | Owner's Manual - Page 4
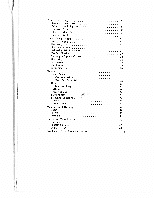
Overlock Stitch Hems Blindstitching Buttons Thread Shank Buttonholes Stitching Buttonhole Zippers Corded Seam Mending And Darning Tears Patches Darning Caring for Your Machine Cleahing Shuttle Cleaner Oiling Problems - And Probable Causes 23 23 23 24 24 24 25 25 25 26 26 27 28 28 29 29 30 31 31 - Pfaff 645F | Owner's Manual - Page 5
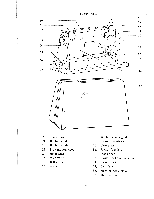
KNOW THE PARTS FRONT VIEW 12 10 11 1. Handle 2. Limit lever 3. Upper thread guide 4. Take-up lever 5. Dial tension 6. Thread tension 7. Thread guide 8. Needle bar 9. Needle clamp 10. Needle plate 11. Shuttle Cover 18 19 12. Stitch indication panel 13. Stitch pattern dial 14. Stitch length dial 15. - Pfaff 645F | Owner's Manual - Page 6
37 20. Spool pins 21. Bobbin winder 22. Bobbin winder stop 23. Stop motion knob 24. Hand wheel 25. Main switch 26. Belt cover 27. Socket 28. Bobbin winder guide 29. Pressure regulator 30. Face plate 31. Presser foot lever 32. Presser bar 33. Presser foot thumb screw 34. Presser foot 35 - Pfaff 645F | Owner's Manual - Page 7
11 1. 3 Bobbins 2. 3 Needles (Size 14) 3. 1 Double needle (Size 14) 4. 2 Felt pads (for spool pins) 5. Zipper foot 6. Straight stitch foot 7. Stretch stitch foot 8. Buttonhole foot 9. Button sewing foot 10. Quilting attachment 11. 2 Screwdrivers 12. Cloth - Pfaff 645F | Owner's Manual - Page 8
In case of setting the extension plate, you can use it for flat bed sewing machine. • In case of removing the extension plate, you can use it for free arm sewing machine. ACCESSORY BOX Accessories for your sewing machine are located in the built-in accessory box on the right side of extension plate - Pfaff 645F | Owner's Manual - Page 9
and man-made fibers blunt the needle faster. • Never use a bent needle. • If your machine is skipping stitches, replace the needle before looking for trouble elsewhere. Ball Point Needles are designed to sew knits and stretch fabrics. The ball point tip can slip between the fabric threads, while - Pfaff 645F | Owner's Manual - Page 10
changes. Raise needle to its highest position by turning hand wheel toward you. Raise presser foot by lifting presser foot lever located on back of machine. Press down on lever behind shank to release foot; lift foot off. Place new foot at base of shank. Press down on leyer and push - Pfaff 645F | Owner's Manual - Page 11
MACHINE (REAR VIEW OF MACHiNE) for less to extend amount of thread. Winding Bobbin Evenly If bobbin guide by winds unevenly, adjust thread loosening screw at base of guide: • if more bobbin, thread winds at shift thread guide top of slightly • downward. if more thread winds bobbin, shift - Pfaff 645F | Owner's Manual - Page 12
THREADING UPPER THREAD Raise presser foot and needle to its highest posit ion by turning hand wheel toward you. Place thread on Spool pin, and pass thread through according )fl to the numbers shown in the illust ration. as n le d. - Pfaff 645F | Owner's Manual - Page 13
highest position by turning hand wheel toward you. Pull out slide plate. Lift open hinged latch of bobbin case and pull case straight out of machine. Bobbin will remain in case as long as latch is open. To remove bobbin, hold bobbin case down, close latch, and bobbin will fall out - Pfaff 645F | Owner's Manual - Page 14
highest position, catching bobbin thread and bringing it up through hole in needle plate. To prevent thread from slipping out of needle when you begin sewing, pull both threads out about 15 cm and place under presser foot toward rear of - Pfaff 645F | Owner's Manual - Page 15
' k9 D Y Ill HI 0 On the front of the machine, select the different stitches. you You will find the can produce set the stitch width lever according to the desired width of the stitch. NOTE: When sewing decorative stitches, the stitch width lever can be set at any position. The setting at - Pfaff 645F | Owner's Manual - Page 16
max), the length of stitch will be maximum. When you have a buttonhole sewing, the stitch length dial should be set near by the buttonhole symbol. REVERSE . Fabric will immediately start feeding backwards. Release button and machine will resume normal forward stitching. Very useful for fastening ends - Pfaff 645F | Owner's Manual - Page 17
easily adjusted by turning dial on front of the tension discs. Your machine, has been set at the factory for even thread tension at 6 setting. However, you may have to adjust the tension when using different threads or sewing on fabrics of dif ferent thicknesses. Loosen tension somewhat when zig-zag - Pfaff 645F | Owner's Manual - Page 18
. If stitch is satisfactory but the seam is puckered, it may be necessary to loosen tension on both top and bottom threads. For sewing on For a lighter buttons weight fabrics For darning For cmbroiderin For a heavy fabrics 0 1 2 PRESSURE With setting the lever at o position, the amount of - Pfaff 645F | Owner's Manual - Page 19
on buttons, depress plate ( )down to lower the fabric feed so fabric can be thoved freely b' hand. TO START SEWING Your machine has a main switch on the right side of the machine. Before operation, first turn the main switch on by pushing it. And after operation, turn the main switch off by pushing - Pfaff 645F | Owner's Manual - Page 20
OF STITCHES Straight stitching Zig-zag stitching ree Adjust as needed çç Full zig-zag stitching Super zig-zag stitching Buttonhole sewing 3 42 1 ii:i Double needle sewing Em broide ring and darning NOTE: Before selecting one of the super zigzag stitches (underlined in Yellow on stitch - Pfaff 645F | Owner's Manual - Page 21
pulling it with your hand, as this may bend the needle and cause it to become blunt or break. Just guide the fabric gently by hand in the direction you want to sew. TO REMOVE THE WORK Stop stitching. Turn the hand wheel (23) toward you by hand to raise the take - Pfaff 645F | Owner's Manual - Page 22
thumb screw, inserting the thumb screw into a hole in the bed of the machine. Adjust the cloth guide to the required distance from the needle and tighten thumb screw. USING THE QUILTING ATTACHMENT This attachment helps you to sew parallel lines on padded fabric with out marking the fabric. Take the - Pfaff 645F | Owner's Manual - Page 23
STRAIGHT STITCHING Machine Setting - 1 Presser foot Stitch pattern STRAIGHT STITCH Umit lever ] Stitch length Fabric threads. Begin 10mm from fabric edge and stitch in reverse to edge, then sew forward to end of seam, then back stitch again about 10mm. Reinforce point of dart in same manner. 19 - Pfaff 645F | Owner's Manual - Page 24
--s-- Basting Machine basting is very useful for join ing seams for trial fittings, marking construction guidelines, and basting pleats and hems. Use longest stitch possible, setting stitch - Pfaff 645F | Owner's Manual - Page 25
foot. You can make any number of combi nations by adjusting zig-zag width and stitch length. Both knobs can be turned while machine is running. How ever if machine is not running, turn hand wheel toward you to raise needle to its highest position before adjusting stitch pattern knob. Tension on - Pfaff 645F | Owner's Manual - Page 26
Bartacks Use to reinforce points of strain such as corners of pockets, belt loops, zipper openings, and lingerie straps. Set limit lever at double I stitches are closely spaced. If too close to 0, machine will not feed but will continue sewing in one spot. Loosen tension of top thread. The wider - Pfaff 645F | Owner's Manual - Page 27
for topstitching when you want a heavier row out using buttonhole of stitching twist. with Guide fabric gently allowing to make the back-and-forth that give stretch to the seam. machine stitches 3-STEP STRETCH ZIG-ZAG STITCH - Presser foot Stitch pattern Limit lever Stitch length Fabric - Pfaff 645F | Owner's Manual - Page 28
elastic over fabric and pin together at the markings.. Take a few stitches to anchor elastic to fabric, then stretch elastic between pins as you sew. Mend tears and patches on knits and lightweight fabrics with stretch zig-zag rather than regular zig-zag. (See page 38). RICKRACK STITCH - Rickrack - Pfaff 645F | Owner's Manual - Page 29
For a tailored look, use regular straight stitch, sewing with buttonhole twist for added emphasis. Or use for special effects. FEATHER STITCH Machine Setting - Presser foot Stitch pattern clothes. Turn under raw edges of fabric and press. Guide the two fabric edges 3mm apart under the center of the - Pfaff 645F | Owner's Manual - Page 30
zig-zag stitch patterns. The adjuster is located on the top of machine body plate and can be turned with a screwdriver. If both sides of the stitching are not even, stitch slowly and move the ad juster as you sew: • if reverse stitches are too widely spread, turn adjuster slightly clock wise. - Pfaff 645F | Owner's Manual - Page 31
alone or in combination with other decorative -stitches. Try varying needle position and zig-zag width to obtain special effects. (See page 30 for machine sett ing). If stitching on very soft fabric, use a backing of tissue paper or interfacing to eliminate puckering and to prevent bobbin thread - Pfaff 645F | Owner's Manual - Page 32
• turn fabric feed to ( ) • press down on Outer ring of pressure regulator to release pressure com pletely Place hoop under needle. Run machine at medium speed, guiding hoop care fully so needle moves along pattern lines. Use straight stitch for outlining and zig-zag stitch for filling in design - Pfaff 645F | Owner's Manual - Page 33
in a garment can be done by your machine - over casting seams, hemming, making buttonholes, sewing on buttons, and inserting zippers. SEAM EDGES Seam easily, lightweight fabrics, and knits which roll. OVERLOCK STITCH Machine Setting - Presser foot Stitch pattern Limit lever Stitch length Fabric - Pfaff 645F | Owner's Manual - Page 34
excess st for weight feed ig-zag raight D very itches s falls Machine Setting - SLANT OVERLOCK STITCH Presser fool Stitch pattcrn Limit lever Stitch and Overcasting Overlock and slant overlock stitches can be used to sew narrow seams in garments, replacing both straight stitch ing and - Pfaff 645F | Owner's Manual - Page 35
made quickly and easily with no hand sewing by using the blindstitch. BLJNDSTITCH Machine Setting- Presser foot Stitch pattern Limit zag stitch just catches one thread of the folded edge. Guide fabric evenly while stitching or use cloth guide as an aid. For better control, use low speed setting - Pfaff 645F | Owner's Manual - Page 36
on coats and jackets should have a thread shank to make them stand away from the fabric. Place a straight pin or sewing machine needle on top of button between the holes, and sew over the pin or needle. Pull thread to back of button and wind around stitches to form a firm shank. Tie thread - Pfaff 645F | Owner's Manual - Page 37
I Bu Buttonhole Markings Buttonhole Stitching Your machine has a built-in button holer - buttonhole stitching. • Loosen upper tension. • When sewing buttonholes on knits or loosely woven fabrics, use so buttonhole will retain its shape. • Guide fabric carefully so lines of stitching will be - Pfaff 645F | Owner's Manual - Page 38
position. STEP 4- Turn stitch pattern knob to #4. Make 5 or 6 stitches for = second bartack to complete buttonhole. Set stitch length knob to 0 so machine does not feed, and turn stitch pattern knob to straight stitch symbol. Make 2 or 3 stitches to securely fasten stitches. Draw upper thread - Pfaff 645F | Owner's Manual - Page 39
Machine Setting - ZIPPERS Left side of needle Right side of needle Zipper foot For right side of needle, slide foot to the right. Zipper package will contain easy to follow instructions for stitching. Corded Seam Cording gives a professional finish to slipcovers, pillows, children's clothes and - Pfaff 645F | Owner's Manual - Page 40
dle passes .e of foot. ;ure it will ten thumb de foot to n easy to ing. finish to 's clothes ring cord hing close am using Machine Setting MENDING AND DARNING MENDING or Presser foot Stitch pattern Zig-zag foot Stretch stitch foot K ) Limit lever Stitch length Fabric feed /W\ Tears and - Pfaff 645F | Owner's Manual - Page 41
Fabric feed Worn spots on clothing and household linens can be darned easily with your machine. Completely release pressure on fabric by turning fabric feed knob to ( E!), and by spaced rows of stitching. Then turn fabric and sew another layer of stitching across first layer of stitching. 39 - - - Pfaff 645F | Owner's Manual - Page 42
pin fits into notch. Lock retaining ring by turning levers back into position. Replace bobbin and case. bric n to Shuttle Cleaner iced This machine is fitted with a shuttle bric A cleaner which removes accumulated ling lint and thread from the shuttle race to help keep it clean and - Pfaff 645F | Owner's Manual - Page 43
has not been used for a period of time, oil before you start sewing. Place a drop of best quality sewing machine oil at each of the points shown in the pictures: Inside of Machine Body Plate and Bed cover Remove the machine body plate by loosing six screws and bed cover by loosing two screws - Pfaff 645F | Owner's Manual - Page 44
points iot gi•ve ich will fabric. w rows alto be • Also top of rication s been PROBLEMS - and PROBABLE CAUSES In most cases, poor sewing results are due to a damaged needle. Always examine needle first before checking other items. 1. SKIPPING STITCHES • bent or blunt needle • wrong size needle - Pfaff 645F | Owner's Manual - Page 45
in machine • soft (use tissue paper underlay) 7. MACHINE DOES NOT FEED FABRIC • stitch guide not properly adjusted • bobbin spindle not positioned correctly • bobbin winder stop not positioned correctly 10. MACHINE machine needs oiling • stop motion knob not tightened 11. MACHINE WILL NOT SEW
-
 1
1 -
 2
2 -
 3
3 -
 4
4 -
 5
5 -
 6
6 -
 7
7 -
8
-
9
-
10
-
11
-
12
-
13
-
14
-
15
-
16
-
17
-
18
-
19
-
20
-
21
-
22
-
23
-
24
-
25
-
26
-
27
-
28
-
29
-
30
-
31
-
32
-
33
-
34
-
35
-
36
-
37
-
38
-
39
-
40
-
41
-
42
-
43
-
44
-
45
 |
 |
MODEL
-1
I
p
It
*
-
--
*0
—
-
:-
4
4aç
C
t
-t
:
INSTRUCTIONS
for
the
use
and
maintenance
of
your
sewing
machine
SZA-645F
C
S.
I
I
1
/
I