Pfaff 76 Owner's Manual - Page 32
Rill..
 |
View all Pfaff 76 manuals
Add to My Manuals
Save this manual to your list of manuals |
Page 32 highlights
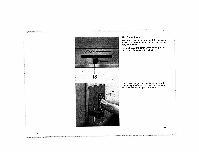
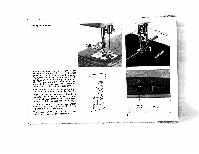
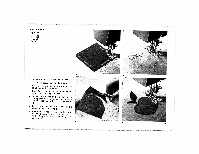
Sewing Buttonholes I 1 2 Attach buttonhole foot No. 847616 to the machine and set the slide on the buttonhole gauge to the buttonhole The number indicating the length desired. buttonhole length should be in line with the right edge of the slide. The buttonhole is the right length when the beginning of the first seam reaches the red end of the slide indicator (see arrow). Flick the needle to its left position and put the stitch width control in notch R 1 (see ill). When using No. 50 embroidery thread, set the stitch length control so that both dots are opposite each other (see ill.). For heavier threads, slightly increase the stitch length. To obtain more prominent buttonholes, place a filler cord of medium size in the left groove of the sewing foot. All-purpose sewing foot No. 91-100 179-00 may also be used for this operation. 3 30
-
 1
1 -
2
-
3
-
4
-
5
-
6
-
7
-
8
-
9
-
10
-
11
-
12
-
13
-
14
-
15
-
16
-
17
-
18
-
19
-
20
-
21
-
22
-
23
-
24
-
25
-
26
-
 27
27 -
 28
28 -
 29
29 -
 30
30 -
 31
31 -
 32
32 -
 33
33 -
 34
34 -
 35
35 -
 36
36 -
 37
37 -
38
-
39
-
40
-
41
-
42
-
43
 |
 |
