Pfaff 90 Owner's Manual
Pfaff 90 Manual
 |
View all Pfaff 90 manuals
Add to My Manuals
Save this manual to your list of manuals |
Pfaff 90 manual content summary:
- Pfaff 90 | Owner's Manual - Page 1
- Pfaff 90 | Owner's Manual - Page 2
this book a valuable guide to easy sewing. Follow sewing these simple instructions and familiarize exciting on your easy-to-operate Pfaff 90. yourself with the exclusive features of your machine. You will find If you hove any sewing problems, please contact your Pfaff dealer. He will - Pfaff 90 | Owner's Manual - Page 3
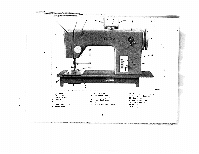
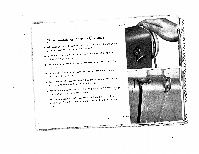
4 Spool pins 5 Stitch width dial 6 Needle position lever 7 Bobbin winder 8 Balance wheel 9 Stop motion knob 10 Stitch length control 11 Reverse feed control 12 Bed slide 13 PFAFF rotary sewing hook 2 GR 022 14 Dual-purpose needle plate 15 Sewing foot thumb screw 16 Light switch 17 Needle thread - Pfaff 90 | Owner's Manual - Page 4
before you begin sewing. • Never run a threaded machine unless you have fabric under the sewing foat. • Place both threads back under the sewing foot before you put fabric into the machine. • The machine will matically. All you feed have the material under the sewing to do is guide the work - Pfaff 90 | Owner's Manual - Page 5
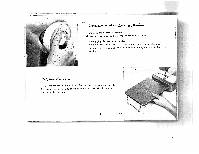
Mechanism Hold balance wheel and turn stop motion knob counter-clockwise (toward you). The sewing mechanism is then disengaged for bobbin winding. I cj'taEe cxtensicn To enlarge the sewing orea of portable machines, an extension may I be attached to the left side of the bedplafe. This extension - Pfaff 90 | Owner's Manual - Page 6
Mecanismo pam despegue del motor En su mOquina, a Ia derecha, par debajo del volante de maniobro, se encuentro una palanca, que debe de girarse hacia abojo, sobre to marco de punto. En tot formo, viene a colocarse el motor en posiciOn de servtcio. En casos de no usor to mâquina por tiempos - Pfaff 90 | Owner's Manual - Page 7
MANnodehHoerniraebrnhaMecbhaesvuconhtrienrnkehztiuisitndgreecr hPisunuknitmerardkeemdrHehaennd.roDdodemurchHebbe:findanetgesbicrhacdhetr, den Sie vor dem Motor in Arbeits stellung. BboueeifsignleadrnOegtsetsreietcerhn'UdManntoensrcbhirnienceRhuuonhuegcshtelhmllruietnrgF.Nufâ - Pfaff 90 | Owner's Manual - Page 8
on face cover. Before you remove the belt from the stand wheel, pulling it to belt. drop the To switch on the machine right. L 14? 4 Foot Place foot. Control the foot Rest the ricgohnttrfoolotunodnerthtehecocnatbroinl ept ewdaitlhinandeaspyresrse.acThheofhayroduerr you press, the faster the - Pfaff 90 | Owner's Manual - Page 9
GR 018 4 For straight-stitch sewing set: Dial A 0 - Lever B - Center Control 6 regulates the stitch refer to page 18. To backtack length. For the end of detailed a seam, instructions please simply depress the finger-tip control. 6 GROO9A - Pfaff 90 | Owner's Manual - Page 10
GR 052 i 9 p4 $ivinj If you want to switch from straight (A on ,,O") to zigzag stitching, turn dial A to desired stitch width (indicated by numbers 1 to 4). Lever B changes the position of the needle in the needle plate slot. Thus the stitching can be moved from the center to the left or right of - Pfaff 90 | Owner's Manual - Page 11
GR 014 7?.euIooinfJ the 73c66iui Ca.ce The needle has to clear the needle-plate. Lift front end of bed slrde and pull. Lift latch k with the thumb of your left hand and pull out bobbin case with bobbin. When you release the latch, the bobbin drops out. GROI3 8 - Pfaff 90 | Owner's Manual - Page 12
turns, break off end of thread. Bobbin winder will stop automatically when bobbin is full. - Thread retainer with four holes: Lead thread as shown by design below. Before you drop the machine into the cabinet or place it in the carrying case (portable machines) the spool pins should be swung forward - Pfaff 90 | Owner's Manual - Page 13
in t6 ' Ca.c As shown in illustration 1, hold bobbin in left hand toward you, and insert bobbin into bobbin case. so that the thread end falls from the top down - Hold the bobbin firmly in the bobbin case and pull the thread into the case slot. Pull the thread under about three inches - Pfaff 90 | Owner's Manual - Page 14
to its highest point and lift the latch with the thumb and forefinger of your right hond. Turn bobbin case until slot points up (see arrow). Place bobbin case on center stud s of hook. In replacing the bobbin case, it is •best to hold the loose end of thread so that it will not get jammed - Pfaff 90 | Owner's Manual - Page 15
such as lightweight 50 wooiens, madras, muslin, to B&C twist 90 brocades, heavy silks 70 and rayon, gabardine. Heavy Fabrics such the bdbbin. Some experienced seamstresses prefer a somewhat thinner bobbin thread. How ever, the bobbin thread never should be thicker than the needle thread. - Pfaff 90 | Owner's Manual - Page 16
£Juicttwt 9acLc a6,t4t /?tc On Pfaff 90 sewing machines, System 130 R, flotshank needles are usd for oil ordinary sewing ond embroidery work. The last column in the chart on page 12 gives you the needle size required for the ii material in hand. Genuine Pfaff needles, System 130 R, are available - Pfaff 90 | Owner's Manual - Page 17
high as it will go and pass thread from right to left through the hale at its end and into slot at left of thread guide 5. Then thread needle, front to back. For thread retainer with four holes see page 9. 14 - Pfaff 90 | Owner's Manual - Page 18
- Pfaff 90 | Owner's Manual - Page 19
needle moves once down and up again. Lightly pull needle thread to draw bobbin thread up through the needle hole. Place both threads back under the sewing foot. Ci,e 'Zeniu,n 7 9 u(aac cn Balanced tensions ore essential for sewing. If your tension is correct, you will have perfect seams as sketched - Pfaff 90 | Owner's Manual - Page 20
tension has been set for a medium grade and need not be adjusted for all ordinary sewing operations. If a special sewing operation should require a looser or tighter tension, turn the small knurled screw on the bobbin case with the tip of your thumb as fol lov,s: Turn it left --E - for looser - Pfaff 90 | Owner's Manual - Page 21
until the desired number is fully visible at the L top of the slot (see arrow). To sew in reverse, simply press the fingertip control down. When the control is released, the machine resumes forward sewing. This feature is ideal for backtocking the beginning or end of a seam and for darning rips - Pfaff 90 | Owner's Manual - Page 22
ChanfJmn7 th Lift both needle and presser bar to their highest positions and turn sewing foot thumb screw b to the left. Tilt the foot sideways and pull it down - -- Reverse procedure to slip on new foot and tighten screw b securely GR 043 19 1 - Pfaff 90 | Owner's Manual - Page 23
eraIn, /tt,tl 1 41ahine A Remove the sewing foot and the bed slide. Lift front end of needle plate and tilt out. Turn needle plate half a turn so that raised portion is at - Pfaff 90 | Owner's Manual - Page 24
c so that ii is behind the needle set screw, and tighten screw b. If your sewing machine has a presser bar lifter with only position II, use darning foot No. 93-100154-91 (which facilitates winding the bobbin and removing the work from the machine). Some machines have a presser bar lifter with - Pfaff 90 | Owner's Manual - Page 25
are dependent on regular and proper Use oils. Pfaff sewing machine oil only. Never lubricate machine with animal or vegetable All moving and rotating If you hove a portable underside of the machine ports require regular lubrication. machine, tilt it back, loosen the base, and remove - Pfaff 90 | Owner's Manual - Page 26
)m.anzodiTgfhzetathshgeee Do not lubricate the bobbin winder. The raceway Put one drop lop right). in of the sewing hook is oil into the raceway each day important oiling point. you sew (see picture at vpf(ieracoecidmnkietwydtiitomlhifnetat.hteosToafsktteiemwberion, - Pfaff 90 | Owner's Manual - Page 27
push the bulb into its socket, turn left, and pull out. When inserting sew light bulb, be sure to slide bulb pins into socket slots. Press bulb in turn right. V 7iicoIn tk ac Cco To change the light bulb or oil the parts at the needle-bar end, remove the face cover by pulling it upwards. 7et1tacinf1 - Pfaff 90 | Owner's Manual - Page 28
incorrectly inserted. Wrong needle. Needle bent. Machine threaded improperly. Needle too fine or too correct needle from chart on page 12. (For ordinary sewing, use System 130 R needles.) Insert new needle. Check and correct threading as instructed on pages 14 and 15. Use correct needle and thread - Pfaff 90 | Owner's Manual - Page 29
to prevent further damage. Use correct needle and thread sizes. Don't force the feeding motion. Guide the material lightly. Push bobbin case until you hear it snap into place. Remedy: Adjust tensions as instructed. Use only first-rate thread - the correct size for the needle and fabric. Dont run - Pfaff 90 | Owner's Manual - Page 30
oil. Bobbin winder working while sewing. Remedy: Clean and oil hook raceway. Use only Pfaff sewing machine oil - never salad oil or glycerine. Stop bobbin winder. machine should be handled improperly. hook, jerk the balance wheel back and forth to be avoided, however, by following the instructions - Pfaff 90 | Owner's Manual - Page 31
to left edge of zipper, stitch across end and up the other side in one continuous operation. Use right edge of foot as a guide. V Edge Stitching Machine Setting: A- 0 to 4.B-.i Sew parallel rows of straight or zigzag stitches at various distan ces from the fabric edge by using adjustable seam - Pfaff 90 | Owner's Manual - Page 32
GR 048 847 56 Flat Felled Seams Machine Setting: A -0 or 2 B - Flat felled seams ore used to durobly join two pieces of fobric. They ore mode in two operotions. Flat felled seoms usually are - Pfaff 90 | Owner's Manual - Page 33
847 551 Hemming Machine Setting: A-O or 2 to 3 fiioYTsnafhobsieuernfiracthbciloiearnwminnecimllihwyneeotinmrotuhofttoawhtohrbeieettehhiulsefessomfitintlrndmagdeei.egiddsrhgCptelfetiowpnooosircftaoebfzctftihuegaertnzlh.aidefhgFeycmteohsoeuetmdrintecwrefrhaaroewbfsnoor,tifocedttd. - Pfaff 90 | Owner's Manual - Page 34
long wide zigzag stitch and sew edge with the needle taking one stitch into the fabric and the other over its edge (normal tension setting). You may overcast edges after fabric is cut and before the pieces are joined. GR 037 Butt Seaming 838 954 Machine Setting: A3 -- or 4 B- . Two similar - Pfaff 90 | Owner's Manual - Page 35
of the fabric. Place the patch over the damaged area. Sew it down with a wide zigzag stitch of medium length. For additional strength stitch over corners twice. Turn over and trim close to seams. I I 838 954 "Attaching Lace Machine Setting: A-2 B- . u You can attach lace edging in one simple - Pfaff 90 | Owner's Manual - Page 36
GR 033 u838 954 Machine Setting Applique Work A__11J to 2 . 8-4. Applique is easy and narrow zigzag stitch-and the motive will appear on right side. Trim excess material close to the seam and sew over edges of applique with a mediumwide satin stitch. If you want to give the design a plastic - Pfaff 90 | Owner's Manual - Page 37
Machine Setting: A-C Stitch Length: 2-4 .4 Insert twin hemstitching needle, System 130 Zwi-Ho, as instructed and so forth, can be obtained with Pfaff's System 130 twin needle. The harder mark seamline or trace seamline on fabric. Sew first row. Guide fabric so that wing needle stitches along traced - Pfaff 90 | Owner's Manual - Page 38
847 608 Button Sewing GR 036 ttaomsswehDPhneerieFeiatowwdthAchwnineifhF'nnrhtrteiFuoag.gnee. etoariehanaoinwnedgirtsirshelsaelimfhrsideoisinatrconectfcglpdots.eohsotatNiTohrpnttuwhrgioeoinoree.irdeg8trnttoheir4ouew7lnisstyosy6eshoooef0weouaosus8nfntrer,r Machine Setting: A-0 B- - Pfaff 90 | Owner's Manual - Page 39
the procedure on the opposite page, the bartacks at each end of your buttonhole will be twice as wide as a buttorhole seam. Sewing Buttonholes Machine Setting: A - 11/2 (2) (first notch) . B - Stitch Length (far buttonhole seam): Almost 0 Use only embroidery and darning thread No. 50. If you prefer - Pfaff 90 | Owner's Manual - Page 40
(1/ic") from end of first row. 5 Turn dial A to second notch position (or "4"). Make second tack, as instructed above (under 3). 6 Turn dial A to "0" and make 3 or 4 fastening stitches. 7 Trim both the sewing and filler threads. Open the buttonhole with your seam ripper. Be careful not to injure the - Pfaff 90 | Owner's Manual - Page 41
GR £11 Darning GR 056 GR 057 Machine setting A- 0 B-+ Prepare your machine for darning as instructed on pages be set at position I. Place hands. Long rips may normal sewing be darned foot and with the without hoops. Set needle plate in its normal, or sewing, position and use forward- - Pfaff 90 | Owner's Manual - Page 42
beginning of your design and draw bobbin thread up through the fabric. Hold both thread ends and sew over outline, moving hoops slowly and so that feed dog feeds the material. Attach zigzag sewing foot No. 838 954 and set machine for satin stitch. Sew outlines of mono gram, making sure that seams do - Pfaff 90 | Owner's Manual - Page 43
Cording Machine Setting: A-fl B-i To cord on your Pfaff 90, use a cording foot and o twin needle. - Twin needles ore available for needle are supplied on special request and at extra cost. Changing the Needle and the Sewing Foot Bring take-up lever to highest point, loosen needle set screw a, - Pfaff 90 | Owner's Manual - Page 44
if you want to slip on a cording foot with the guide attached. Pin tucks and narrow and on the bobbin. cording are made with a No. 50 embroidery thread, wider cording with sewing silk in the needle Set the machine for a medium stitch length (about 4). Upper Threading - Pfaff 90 | Owner's Manual - Page 45
and use it as a guide. For a larger spacing between tucks, use the adjustable guide (see ill on page 41) which is part of every cording foot. (up to needle eye only), lift foot, turn fabric, lower foot, and continue sewing. To stitch an acute angle, turn fabric halfway, let needle make one stitch, - Pfaff 90 | Owner's Manual - Page 46
by hand. This will be easy after you have hod sufficient pratice. Some of the designs you can make are illustrated below. For ornamental sewing, use zigzag sewing foot No. 838954. V Interesting two-needle effects can be obtained by using a 1.6-mm twin needle (see page 40) and different color thread - Pfaff 90 | Owner's Manual - Page 47
Foreword Essential Parts Fundamentals of Machine Operation Operation of Your Sewing Machine Bedplate Extension Power and Foot Drive Straight Stitching Zigzag Sewing Removing the Bobbin Case Winding the Bobbin Inserting a Full Bobbin into Bobbin Case Inserting the Bobbin Case Recommended - Pfaff 90 | Owner's Manual - Page 48
some high quality standords as are incorporated in the long-valued Pfaff sewing machines. Rigid floor model Yor Plaff dealer will be glad to give you a free demonstration of these new ironers, without any obligation an your part. You may choose between a rigid floor model and a folding roll-away - Pfaff 90 | Owner's Manual - Page 49
z 0 0 0 U, '2 0' I'.) '0 'II TI -o it 0 3a '2
-
 1
1 -
 2
2 -
 3
3 -
 4
4 -
 5
5 -
 6
6 -
 7
7 -
8
-
9
-
10
-
11
-
12
-
13
-
14
-
15
-
16
-
17
-
18
-
19
-
20
-
21
-
22
-
23
-
24
-
25
-
26
-
27
-
28
-
29
-
30
-
31
-
32
-
33
-
34
-
35
-
36
-
37
-
38
-
39
-
40
-
41
-
42
-
43
-
44
-
45
-
46
-
47
-
48
-
49
 |
 |