Pfaff creative 2144 Owner's Manual - Page 88
Programmed, length, Stitch, Creator
 |
View all Pfaff creative 2144 manuals
Add to My Manuals
Save this manual to your list of manuals |
Page 88 highlights
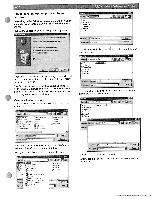
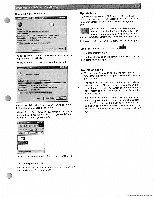
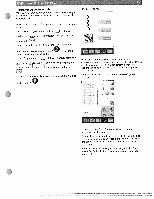
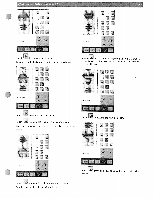
Programmed seam length With this function, you can program a specific seam length for joining together several pieces of fabric of equal length. See pagel-12. The way the program follows. is operated has been changed as If you wish to program a seam without tie off at the start and the end, you activate the program and close the window with You determine the length of the seam b test sewing and pressing the reverse sewing button" completed without being tied off. . The seam is To tie off a programmed seam at the start and/or at the end, open the tie-program after activating the program , turn on ' and/or and close the window with The length of the seam is also determined with the 'reverse 0. sewing button' Stitch Creator 'I' With Stitch Creator you can customize your own stitches.You can add, erase, move and combine the stitches directly on screen. Create a stitch pattern of individually designed stitches, or by using the 9 mm stitches, patterns and alphabets. Note: When sewing a stitch pattern the feed dogs are engaged. ) 4* '_% - When you open Stitch Creator you have an empty workspace on the screen. The workspace is for a 9 mm stitch width. In the middle of the workspace there is a vertical purple line that indicates the center of the stitch pattern with 4.5 mm stitch width on each side. For more exact positioning activate the grid in the Context menu. For further instructions on turning on the grid see page 9-28.
-
 1
1 -
2
-
3
-
4
-
5
-
6
-
7
-
8
-
9
-
10
-
11
-
12
-
13
-
14
-
15
-
16
-
17
-
18
-
19
-
20
-
21
-
22
-
23
-
24
-
25
-
26
-
27
-
28
-
29
-
30
-
31
-
32
-
33
-
34
-
35
-
36
-
37
-
38
-
39
-
40
-
41
-
42
-
43
-
44
-
45
-
46
-
47
-
48
-
49
-
50
-
51
-
52
-
53
-
54
-
55
-
56
-
57
-
58
-
59
-
60
-
61
-
62
-
63
-
64
-
65
-
66
-
67
-
68
-
69
-
70
-
71
-
72
-
73
-
74
-
75
-
76
-
77
-
78
-
79
-
80
-
81
-
82
-
 83
83 -
 84
84 -
 85
85 -
 86
86 -
 87
87 -
 88
88 -
 89
89 -
 90
90 -
 91
91 -
 92
92 -
 93
93 -
94
-
95
-
96
-
97
-
98
-
99
-
100
-
101
-
102
-
103
-
104
-
105
-
106
-
107
-
108
-
109
-
110
-
111
-
112
-
113
-
114
-
115
-
116
-
117
-
118
-
119
-
120
-
121
-
122
-
123
-
124
-
125
-
126
-
127
-
128
-
129
-
130
-
131
-
132
-
133
-
134
-
135
-
136
-
137
-
138
-
139
-
140
-
141
-
142
-
143
-
144
-
145
-
146
-
147
-
148
-
149
-
150
-
151
-
152
-
153
-
154
-
155
-
156
 |
 |
