Pfaff creative designer Owner's Manual
Pfaff creative designer Manual
 |
View all Pfaff creative designer manuals
Add to My Manuals
Save this manual to your list of manuals |
Pfaff creative designer manual content summary:
- Pfaff creative designer | Owner's Manual - Page 1
© ©© C =0 0 D © 0 0 - Pfaff creative designer | Owner's Manual - Page 2
I - Pfaff creative designer | Owner's Manual - Page 3
of the Pfaff Creative 1473 CD. This appliance is used for entering motifs of your own design in the P memories of the sewing machine com puter. They can be recalled for sewing whenever required. The motifs are drawn and the stitch points marked out in the matrix of a programming card. • There are - Pfaff creative designer | Owner's Manual - Page 4
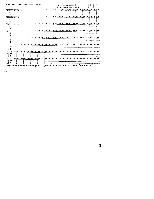
49 50 SporNrj76 77 78]78180 [8i4_J3J.8 I49 5 8 si 88189 PFA$F' Programming card Hoja de prograrnaciOn Programeringsskjema• Forritunarbla The programming card Patterns of your own design are drawn in the matrix on the programming card. The length data are read off scale "L" from 00 to 198, and - Pfaff creative designer | Owner's Manual - Page 5
3 11-WZ w. .-.W w, 6Z r 3 W3 0 3 3 3 3 3 I 3 3 3 - C) 3 : . 11 :3 : !: +-t I;: -- - w C C - Pfaff creative designer | Owner's Manual - Page 6
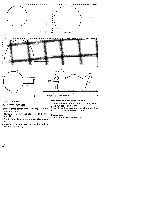
40 44 48 52 56 60 64 68 72 76 80 64 L-00 040812102024283230404444525860646872744004 48 24 2 tftiILijiH 3 4 Arrow = Sewing direction 4a -1ow to draw jour own design rhere are three possibilities of drawing a pattern n the matrix area: I Hon2ontally continuous pattern or single pat tern, Fig - Pfaff creative designer | Owner's Manual - Page 7
- Pfaff creative designer | Owner's Manual - Page 8
between 4 and 7 squares for the length and width. Only on curves should the points be drawn more densely, at a distance of roughly 2 to 5 squares, (Fig. 3). Sewing of patterns with zigzag stitch requires a shorter length. In each case the length should be equal to one square (Fig. 4). - Pfaff creative designer | Owner's Manual - Page 9
- Pfaff creative designer | Owner's Manual - Page 10
83.848588878889J9O ii I -91E92 93 9495 9497 II F - 9898 iso: - PFAFF Programming card Hoja de programaciOn• Programeringsskjema• Forritunarbla5 1 :.0004 08 2 16 3fl '4 28 of numbering the stitch points is that they specify the sewing path of the needle and can thus be retraced. This - Pfaff creative designer | Owner's Manual - Page 11
register ed by the sewing machine compu ter as basic position B00/L00. For this reason, whenever you select a P-memory between 0 and 15 be sure the wire-cross magnifier is at the correct basic position 00, i.e. the far left bottom position. • Always keep the Creative Designer in a dry place and - Pfaff creative designer | Owner's Manual - Page 12
4 Cl) Cl) D -4 CD CD DC -1 CD DC ' 0 CD D DC CD D 3CD D oC_oC) Cl) D 0 0 CD D C) CD 0 DC - CD ø-.o CL: -.9.o DC CDQ = - CD - Pfaff creative designer | Owner's Manual - Page 13
4 --4 0 00 cr h p-CD C) 0 (I, CD a- J 'D(D 3 Cr, B 0 -U C CD 0 CD 3 N (DCfl CD 03 C - Pfaff creative designer | Owner's Manual - Page 14
(aDCD 7Z5 CD CO CD CD CD > CD CO - D aCD _ CD - D(O t CD -, C 0 O D(D a C 0 2.: D CD 0 (DCO CO CD V -' Cl) C Cz 3 - Pfaff creative designer | Owner's Manual - Page 15
Adjusting the programming card: Magnifier slide 5 is moved up or down and slide 4 from side to side with knob B. Move slide 4 fully to the left and slide 5 fully to the bottom. 13 - Pfaff creative designer | Owner's Manual - Page 16
Now position the programming card so that the datum point 00 is exactly alig ned with the red cross of magnifier 6 (Fig. 1), then clamp the card in this position by pushing clip slide 12 to the back (Fig. 2). - Pfaff creative designer | Owner's Manual - Page 17
3a) 0= cL t. -c - 0 0 3 - Pfaff creative designer | Owner's Manual - Page 18
Move the programming card to align datum line 00 with the horizontal red line of the magnifier, then push slide clip 7 back to clamp the card in place. - Pfaff creative designer | Owner's Manual - Page 19
6 1 L___ p___..J PFAFF I N Checking Push the magnifier back to the bottom left datum point 00 and check that the red horizontal line of magnifier 6 is in line with datum line 00 (adjust, if necessary). With the magnifier fully to the left. press 'rn em -" key 47 of the sewing machine. 17 - Pfaff creative designer | Owner's Manual - Page 20
program card are numbered consecuti vely according to the sewing path from 1 to 18 (Fig. 1). • Move magnifier 6 to stitch point 1 (Fig. 1) and • enter it by pressing "mem+" key 11 of the Creative Designer the sewing machine (Fig. 3). • Pull the plug of the Creative Designer out of the sewing machine - Pfaff creative designer | Owner's Manual - Page 21
QO c) - - Pfaff creative designer | Owner's Manual - Page 22
i. e. its basic position. /\ Press "mem-' key 47 (BL) of the sewing machine computer. A flashing 1" appears at the right in the display, i. e. the basic position of the Designer. Place the sample programming card at the side of the Designer. Read off the data of the first stitch in the num ber - Pfaff creative designer | Owner's Manual - Page 23
inputting the needle entry points press S "Single pattern" key 27 of the sewing machine computer. First workstep Sew the pattern until the machine stops (Fig. 2 a). Second workstep S Press "pattern mirror" key of the sewing machine (This moves the needle to the other side). • Shift the workpiece - Pfaff creative designer | Owner's Manual - Page 24
your pattern over both of them. After drawing and marking the points, establish sewing beginning point 'A". After that, split the matrix again. You now have two key 27 of the sewing machine First workstep • Select the first P-memory • Sew the pattern until the machine stops. Second workstep • - Pfaff creative designer | Owner's Manual - Page 25
= .3 - Pfaff creative designer | Owner's Manual - Page 26
177), you must transfer the cor responding P-memory to an M-memory. Example: Fig. 1 consists of the following programs: 2x46 P6(LaIe) 2x46 • Select a free M-memory • Press program entry key 48 • Select program 46 • Press program entry key twice • Press "memory" key 30 • Select the P-memory • Press - Pfaff creative designer | Owner's Manual - Page 27
- Pfaff creative designer | Owner's Manual - Page 28
•• -OO O) •+ CD CD- CD CDOCT? CD,O ..-' fl) :ci,c', o_•ø - z' ( (CD VDO _(D 5: C (0 • 3_ ø: o (Cm DC _.D r fl• - Pfaff creative designer | Owner's Manual - Page 29
FIg. 2 a). Input the stitch points in the sewing machine. For continuous sewing in different pattern widths (Figs. 1 and 2) put the P-memory into an M memory. Example: • Select a free M-memory • Push "mem+" key48 • Select the P-memory with the programmed motif • Push "mem+' key • Push pattern - Pfaff creative designer | Owner's Manual - Page 30
\, 2 3 5 6 Dhange of pattern with stitch length The programmed pattern can also be varied by hortening or lengthening the stitches with keys 7 )f the sewing machine (Figs. 1 2 and 3). Dhange of pattern with stitch width nd stitch length \s the illustrations show, the shape of the pattern an be - Pfaff creative designer | Owner's Manual - Page 31
Thange of pattern y use of litferent spacings ie shape of the pattern can also be changed by tering the number of intermediate stitches. then the pattern is drawn in the matrix the diffe nt spacings have to be accommodated. If fewer :itches are included ill be superimposed during (a), if - Pfaff creative designer | Owner's Manual - Page 32
(v) H / 2 Adapting freely programmed patterns with the balance key Depending on the fabric type, a pattern may finish distorted. With balance keys 5 of the sewing machine, the pattern can be corrected. • If the pattern is not closed (Fig. 1) it must be corrected with balance keys 5, be tween + 1 and - Pfaff creative designer | Owner's Manual - Page 33
stops. • Alter the stitch width to a pattern width of 3.5 mm with keys 8. • Sew the modified pattern until the machine stops (Fig. 2). If you wish to sew your entered program consecu tively with only one stitch width, select the requi red stitch width. The "single pattern" key does not have to - Pfaff creative designer | Owner's Manual - Page 34
proceed as follows: The Designer should not be connected. I Push'mem-'key47(BL). On the right in the sewing machine display the next higher stitch data of this stitch can now be checked with the motif drawing on the programming card. • Push key 5- again The next lower stitch appears and can also - Pfaff creative designer | Owner's Manual - Page 35
44 46 52 58 5 04 86 72 Boo 18 a 1O]öj5O4O6pJj4 2 orrection: / Connect the Creative Designer to the sewing machine. Insert the programming card with the motif for correction (Fig. 1 a) into the Creative Designer and adjust it. Set the magnifier over the marked stitch with the wrong data (Fig - Pfaff creative designer | Owner's Manual - Page 36
stitch is now stitch 11. All further stitches move up by the number of stitches you insert. Adding on: • Connect the Creative Designer. • Push "mem-" key 47 BL on the sewing machine. The data of the last entered stitch appears in the display. The flashing point at the right in the display before the - Pfaff creative designer | Owner's Manual - Page 37
gill 2 II -8 8 - f+fH±LLEI±I4i±HHHi - - Il - I II I .-i - - Hl- I [1 8 4: 2 2 8 8 2 8 lIE tt4: : - Pfaff creative designer | Owner's Manual - Page 38
- Pfaff creative designer | Owner's Manual - Page 39
IIi 9 Lt •i: - Pfaff creative designer | Owner's Manual - Page 40
no 94 60 14 16 60 04 48 92 96 1001041081121161201241261921361401441461S2156660]641681/2116100184168192198 Ml Ii - fHH1 ::r_ 4049042'S 20 24 26 32 36 40 44 48 62 56 60 64 66 64 ¶56 ¶69764 ¶68 ¶72 176 760 784 ¶88 ¶02166 - Pfaff creative designer | Owner's Manual - Page 41
:i - -- 0 cD CO 0 - g. cø, - D CO CD CD =0. • - Pfaff creative designer | Owner's Manual - Page 42
- Pfaff creative designer | Owner's Manual - Page 43
on the programming card 4 Patterns, vertical 21 Programming card 2, 3 Programming card, adjusting in Designer 1317 Programming card, inserting in Designer 12 Spacing , inserting and adding on 34 Storing according to card data in number chart 20 Switching on the Creative 1473 CD 11 - Pfaff creative designer | Owner's Manual - Page 44
PFAFF-HANDELSG ESELLSCHAFT für HaushaItnähmasch nen m.b.H. 7500 Karlsruhe 41 West Germany Subject to alterations in design. Printed in West Germany Hr. 30110 engl. HR 988 - Pfaff creative designer | Owner's Manual - Page 45
PFAF$ Creative design PFAFF creative designer I0 nstructI bQQk - Pfaff creative designer | Owner's Manual - Page 46
I For easier understanding of this instruction manual please fold this page open when reading it. I I I I I I I I I I I I I I I I I I Contents on pages 3+4 1 I - Pfaff creative designer | Owner's Manual - Page 47
Safety instructions I The Creative Designer must be used in connection with PFAFF sewing machine models for its intended purpose in house hold use only. The sewing machine must be switched off when connecting the Creative Designer. If the Creative Designer is used for purposes other than the ones - Pfaff creative designer | Owner's Manual - Page 48
of the Creative Designer 1 Connection lead with plug 2 Cover 3 Lead retainer 4 Adjustable slide 5 Sliding scanner with cross-wire magnifier 6 Cross-wire magnifier 7 Clip slide, right 8 Insertion slot for programming sheet 9 Programming area 1 0 "Call stitch" key (memory) 11 "Program input" key - Pfaff creative designer | Owner's Manual - Page 49
- Pfaff creative designer | Owner's Manual - Page 50
I I I I I I I Congratulations! i A very "creative" and pleasant sewing experience awaits you I with the PFAFF "creative designer": This sophisticated additional appliance will open up the world of embroidery for you. It is impossible to think of anything more individual since from I - Pfaff creative designer | Owner's Manual - Page 51
Instruction book Adjusting the programming sheet Appending a stitch Balance Changing the pattern length Changing the pattern width Changing width/length of a pattern Clearing the p-memory Connecting the Creative Designer Creative card Creative designer Deleting a pattern Deleting a p-pattern - Pfaff creative designer | Owner's Manual - Page 52
Instruction book Technical section Tracing a pattern with "mem" Transferring the p-memory to another p-memory (RAM) 1 I 5-11 43 52-53 I I I I I I I I I I I I I I I I I - Pfaff creative designer | Owner's Manual - Page 53
CD (DO aiD I (71 Drawing and programming - Pfaff creative designer | Owner's Manual - Page 54
I 9 I I I I I I I I I I I I I I I I I I I I - Pfaff creative designer | Owner's Manual - Page 55
I I C Contents I Creative Designer Parts of the Creative Designer Connecting the Creative Designer Page 9 Page 1 0 Page 11 I I - Pfaff creative designer | Owner's Manual - Page 56
b - -- - Pfaff creative designer | Owner's Manual - Page 57
': I PFAFF creative designer btrdbcTsDTdhmeeyhihheehtseeieaeespesnsnnsiietoeigndieCtgt'tsinwee. tnrewreaowasstrorngiteghiietagawedncrenrbatsihaiahfdClmtniimenahegyrosrsgraeomfdvm yaswuo9eotiterfiniiuaftlvqmgcleuthmboiep. Ready-to-sew pattern templates from your PFAFF dealer. are available - Pfaff creative designer | Owner's Manual - Page 58
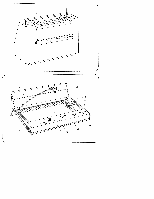
12 Clip slide, left I 4 Adjustable slide 5 Sliding scanner with cross-wire magnifier 6 Cross-wire magnifier I 7 Clip slide, right 8 Insertion slot for programming sheet 9 Programming area The illustration below shows you how the Creative Designer is stored in the carry case. I I I I PFAF - Pfaff creative designer | Owner's Manual - Page 59
I PAF 7570 -- - C Important! When connecting the Creative Desinger to the sewing machine, the machine must be switched off! To open the unit, fold cover 2 upwards. I I Take the connection plug out of the retainer 3 and insert it into socket 46 of the machine. I 11 - Pfaff creative designer | Owner's Manual - Page 60
I I I I I I I I I I I I L I I L I I I 12 - Pfaff creative designer | Owner's Manual - Page 61
c.) Editing motifs cc -' CD 0 C- A) o p4 Co a) z 0 Co 3 3 5. CO Drawing and programming a motif - Pfaff creative designer | Owner's Manual - Page 62
I I I I I I I I I I I I I I I I I I I I I - Pfaff creative designer | Owner's Manual - Page 63
.. E E Contents Programming sheet Page 16 a Drawing a motif Page 17 Placing the stitch points Page 18 Pattern combinations Pages 19/20/28-30 Inserting and adjusting the programming sheet Pages 21-22 Selecting a p-memory Pages 23-24 Programming a motif Page 25 Editing a pattern Page - Pfaff creative designer | Owner's Manual - Page 64
pelqiaawwciaoid auo,ZnwuerOojd p epaqoS uoqeuiweiSord op alirnad . oa000sarwwwpwâ I I I The programming sheet The Creative Designer is provided with a pad of programming sheets. The self-created motifs are drawn on the grid of the programming sheet The width of the drawing area is marked with - Pfaff creative designer | Owner's Manual - Page 65
64 68 72 76 80 84 20 16 rii 12 12 j j_J_ IL 08 f04 There are three ways of drawing a pattern into the grid: Example of a simple tree 1. Vertically as a continuous pattern Single pattern: max. height 9 mm max. width 33 mm 2. Horizontally as a single pattern: max. height 33 mm max - Pfaff creative designer | Owner's Manual - Page 66
1 L-00 04 08 12 16 20 24 28 32 36 40 44 48 525660 64 6872 76 80 84 88 92 96 1001O4108112li6120124128132136101414815216160l641I III 1 Boo 1 2 3 4 5 21 22 23 24 Placing the stitch points (stitches) 27dopssBr-faeesay5mtntqwthdeisuenenrtqaragtuarwpmietmatoisihoorni.eneerng.eOtsssE.insdtntali( - Pfaff creative designer | Owner's Manual - Page 67
combinations (mirroring) The pattern is sewn in two phases. Draw one half of the pattern on the programming sheet and enter it into the p-memory. 4N\ f\ iI I 1\\ '1 /// / / // \/ / \/ Sew the pattern half with the "single pattern key" (16). Now press the "pattern nirror" key (17) and - Pfaff creative designer | Owner's Manual - Page 68
r.) C c)CD (D D0 -I. U) C) ,+ co P1. 0 3m .1. 90 N 0 (D 0. - N 0 0. 0, :- . 0 CD o- •0 m 0 S. 0 C 0 D CD CD CD CD3 ct'o.) 0 . CD Cl) -- -------- - Pfaff creative designer | Owner's Manual - Page 69
the Creative Designer Slide the clip slides 7 and 12 forwards on both sides. Insert the pattern programming sheet in slot 8. Take care not to fold or twist the sheet. Slide it upwards until the top edge of the paper slides under the top cutout edge of the pro gramming area 9. Ti tI S C b PFAFF - Pfaff creative designer | Owner's Manual - Page 70
I I I I I I Now position the programming sheet so that the Then clamp the sheet into position by pushing red cross-hairs of the magnifier 6 are exaxtly aligned with the cross at point 00. clip slide 12 to the rear. I I I I I I I PFAFF creative designer I r :: I I I Set the cross - Pfaff creative designer | Owner's Manual - Page 71
lye 7570 o Gemny -> 1 2 3 4 :5 6 7 B 9 0 esc Selecting a p-memory To transfer the design to your sewing machine press key"m" Two messages appear on the display: 1 = Memory for self-programmed patterns (p-memory) 2 = Memory for pattern sequences (rn-memory) For free programming select 1 for the - Pfaff creative designer | Owner's Manual - Page 72
move the cross on the display with the adjustable slide of the Creative Designer. -' r iio I,4 I I I 1 I I I I I 1 234567890 I r I Pressing the "mem +" key on the designer the firsi time will change the programming screen while the first stitch is saved in the memory. I I 1 24 - Pfaff creative designer | Owner's Manual - Page 73
/N Programming a motif (ptkcgSIhooenreeeanntlepmefd"ircimrrmantmugeiptcnhmotstigeotnoi+ tsnsstce"thshhicetekuicnepethstyioeaviwwponemo,intitniohlnbtogthytigtsfehciscwoeotDaifuitlalcerltdshhssaejieegulqpsnsoumootefiaeronbtbn.httelicMefebesyoatmscinkltpioaecdrtchrheeshreseueidasnrsni.pee)ndr.gtoo - - Pfaff creative designer | Owner's Manual - Page 74
I ;:"' I, ' - - - - - - --- I -- - - - - Pfaff creative designer | Owner's Manual - Page 75
L 7 l 8 S 2 l 4 l 2 00O4 ° O 086 12162 B B O 9 24283 ° 2 4 2O 36404 h 4 6 l 4 S 8525° 660 l 6468 44 1 ±H - 1-.t - H-tt :. I] 32 tt 28 I t1i T1-t4 }- IHri -- J t Changing the pattern width BgmpcTIcfrOhahhiuydtaOaetos,nen.utnrigg.nuneiwen. - Pfaff creative designer | Owner's Manual - Page 76
-rmemomsigyienargomrgaunkmorsawrhmdyeiepidesfnaeoittggrstrenpts(rhihnanoeetntseoemttutra.hnorrestteif"xgb.AaryTi"mdauf.pposelirentgw4)o Ensure that the in one direction bottom). sewing (in our machine only example from has top to to - Pfaff creative designer | Owner's Manual - Page 77
£ 41t- __ A LP I!; f_ :t f-H :::::4: -f E -- - m1-H-44-f irl-L44 * 4-444- I:!4-4-i tffl U C 4-fl i] Il-i [Li_i r i _1 I [[Li it -Lu- T4-tl1 Separate the programming sheets so that you have 4 pattern sections. Enter each section in a separate p-memory. Start at point "A" of the right - Pfaff creative designer | Owner's Manual - Page 78
with the single pattern key 15. Make sure that the needle enters the fabric at pattern start point "A" of the previously sewn pattern half. Whether sewing a blouse, a shirt, bed linen or whatever you desire, the Creative Designer allows you to realize all of your embroidery ideas. I 30 - Pfaff creative designer | Owner's Manual - Page 79
k 4 h Edfting motifs (I Application example - Pfaff creative designer | Owner's Manual - Page 80
1fIflfl t%) I (1 1 - - - - - - - - - - - - - - - - - - - - - - Pfaff creative designer | Owner's Manual - Page 81
w Editing motifs C0D r+ -a CA) 9. - Pfaff creative designer | Owner's Manual - Page 82
C.) - Pfaff creative designer | Owner's Manual - Page 83
two patterns Symbol "m -" Clearing the p-memory Functions "mem" / "No" Function "nurn" Changing the pattern length Changing the pattern width Sewing a pattern Balance "Creative card" ROM RAM Programming a p-pattern into an rn-memory Page 36 Page 37 Page 37 Page 38 Page 39 Page 40 Pages 41-42 Pages - Pfaff creative designer | Owner's Manual - Page 84
1 I -> 1 rn÷.4.. 4-4 p •• 1 1 1 234567890 esc 1 Fading in/out stitch points By pressing key "8" the stitch points of a pattern will be faded in or out. Fading in the stitch points makes corrections much easier. r I I I I I I 1 I I I I I I I 36 I - Pfaff creative designer | Owner's Manual - Page 85
. m + Appending a stitch By moving the adjustable slide and pressing the "mem +" key on the Designer you can add one or several stitches at the end of a pattern. 1 2 3. 4 5 6 stich to be inserted. Press the "memory" key on the Designer. The stitch number will be displayed on the screen. Move the - Pfaff creative designer | Owner's Manual - Page 86
nur = = < 1 2 3 4 5 6 7 8 9 0 esc info mnii m + ±±. Moving a stitch Select a stitch with the cross and press the "memory" key on the Designer. The stitch number will be displayed on the screen. By moving the adjustable slide the selected stitch will be moved to a new position while - Pfaff creative designer | Owner's Manual - Page 87
part of your pattern at a time, select the left edge point of the desired block using the cross. By pressing the "memory" key on the Designer, the stitch number and the block will be displayed on the screen and can be moved to the left and right. Pressing the "mem +" key - Pfaff creative designer | Owner's Manual - Page 88
L_ I •Il riEWe rr m 1 234567890 esc - info menu r r ok. I nq I cir Spacing between two patterns In order to sew a pattern sequence with a freely programmed pattern, we recommend to append a spacing after the pattern, To this end add a few stitches after the stitch point last entered. In - Pfaff creative designer | Owner's Manual - Page 89
Symbol "rn-" By selecting the "rn-" symbol with key "3' the menue on the right-hand side of the screen will change. With these functions stitches or patterns can be deleted. The individual functions can be selected with the "0" key underneath and will be highlighted at the same time. rn- Deleting a - Pfaff creative designer | Owner's Manual - Page 90
within a pattern Press key 0 to highlight symbol Select the stitch to be deleted with the cross and press the "memory" key on the Designer. The message "OK?" appears on the display. Press the "o.k." key to delete the stitch. enu / 0-9 ; I I I I I ri+ rier I I riur'L J 4. I I 1 23 - Pfaff creative designer | Owner's Manual - Page 91
Tracing a pattern with "mem" To check the individual stitches of a pattern and their sewing direction you can trace the stitches using the "mem" function. Press key "2" below " ." activates the Creative Designer. Choose a stitch with the cross and press the "memory" key on the Designer. The number - Pfaff creative designer | Owner's Manual - Page 92
of the Creative Designer are located. This helps you to position the next stitch to be entered. o.L card 1. I I I I I I I 1 I II - = 15 I 8116.0117.5 li9 5 II 1115 1118 II 23 II 28 II + L I I 1 234 5 6 7 8 9 0 I 1. I o.k. II Changing the pattern length A freely programmed pattern can - Pfaff creative designer | Owner's Manual - Page 93
L fl 1 2 3 4 5 j6 j,e :4 Changing the pattern width A freely programmed pattern can be made wider or narrower after being saved in the memory without any problem at all. To this end press numeric key 6. The sewing screen appears. Above numeric key 2 the width of the pattern is indicated. By - Pfaff creative designer | Owner's Manual - Page 94
balance On varying types of fabric, a freely programmed pattern can change unexpectedly. In order to correct correction must be made with cursor key"-'" within a range of +1 to +7 i.e. the machine sews longer backwards stitches and the pattern is closed. If the pattern overlaps, the correction must - Pfaff creative designer | Owner's Manual - Page 95
to file all the patterns you have designed with the Designer on the "Creative card' This ensures that the patterns you have number must be assigned to each new Creative card. This number must be entered since the machine recognizes the card by its number (see Instruction Book 7570, page 95). 47 - Pfaff creative designer | Owner's Manual - Page 96
56 890 esc I I- I Saving a pattern on the Creative card Insert the Creative card in slot (47) on the machine. If the message "wrong card or no card, o.k.?" After selecting an occupied p-memory the sewing appears, you must check whether the card has I screen appears and the selected pattern - Pfaff creative designer | Owner's Manual - Page 97
display appears and the pattern can be sewn. 1 r [2 [3 [7 8 9 0 r6 ,- Th Deleting a pattern from the "Creative card" If you wish to delete a pattern from the Creative card, press key"card"(14) on the sewing machine. The p-patterns appear on the screen or the menu is displayed in case not only - Pfaff creative designer | Owner's Manual - Page 98
selection by transferring it to a p-mem ory and changing it with the connected Creative Designer. Press keys "m" and 1 for the p-memory. Select a free p-memory with the numeric keys and the programming display appears. By pressing key "4" for the rom function, the pattern selection message - Pfaff creative designer | Owner's Manual - Page 99
LL Enter the number of the pattern you wish to edit and confirm with "o.k.' - Pfaff creative designer | Owner's Manual - Page 100
into another p-memory. p-memory selection appears on the screen. You need this function if, for example, you wish Select a free p-memory with the numeric keys. to edit a pattern with the Designer or add to it without losing the original pattern, Press key "5" for "ram". The p-memory directory - Pfaff creative designer | Owner's Manual - Page 101
a I I J I Using the numeric keys, select the memory con taining the pattern you wish to transfer to the free memory. On the screen the pattern that has been copied to the free memory appears in the pro gramming display. L± 1 234567 890 Now you can edit the pattern with any of the functions - Pfaff creative designer | Owner's Manual - Page 102
programmed patterns with the programs from the machine, you must program the corresponding p-memory into an empty m-memory. Select an empty m-memory and enter the pattern (e.g. 194). A-z / card the "o.k." key the p-pattern will be saved in the m-memory. ive 7570 -> M1e < 1 2 3 4 5 ,6 7 8 9 0 - Pfaff creative designer | Owner's Manual - Page 103
C.,, (1, - Pfaff creative designer | Owner's Manual - Page 104
(3' 0) r I - - - - - -- r- - p.- p.- p.- F- P- p.- I- - Pfaff creative designer | Owner's Manual - Page 105
- Pfaff creative designer | Owner's Manual - Page 106
PAF G. M. PFAFF AktiengeseIscft Werk Karisruhe-Durlach Gritznerstrae ii 76227 Karlsruhe Printed in Germany by DH-e6id9e2l1b4erEgeprpeRiheepirmogrSapeheisetrAa.ieGr7o2sch GmbH SNuo,bj2e9c-t6to29te9ch9n5i-c0a8l /m00od0ifiHcaRtio8n/s95
-
 1
1 -
 2
2 -
 3
3 -
 4
4 -
 5
5 -
 6
6 -
 7
7 -
8
-
9
-
10
-
11
-
12
-
13
-
14
-
15
-
16
-
17
-
18
-
19
-
20
-
21
-
22
-
23
-
24
-
25
-
26
-
27
-
28
-
29
-
30
-
31
-
32
-
33
-
34
-
35
-
36
-
37
-
38
-
39
-
40
-
41
-
42
-
43
-
44
-
45
-
46
-
47
-
48
-
49
-
50
-
51
-
52
-
53
-
54
-
55
-
56
-
57
-
58
-
59
-
60
-
61
-
62
-
63
-
64
-
65
-
66
-
67
-
68
-
69
-
70
-
71
-
72
-
73
-
74
-
75
-
76
-
77
-
78
-
79
-
80
-
81
-
82
-
83
-
84
-
85
-
86
-
87
-
88
-
89
-
90
-
91
-
92
-
93
-
94
-
95
-
96
-
97
-
98
-
99
-
100
-
101
-
102
-
103
-
104
-
105
-
106
 |
 |
C
0
D
0
0
©
=0
©
©
©