Pfaff expression 2034 Owner's Manual - Page 81
Manual, change/Irregular, pattern, Automatic, tapering
 |
View all Pfaff expression 2034 manuals
Add to My Manuals
Save this manual to your list of manuals |
Page 81 highlights
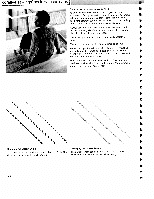
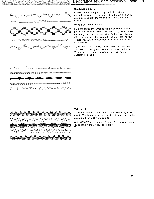
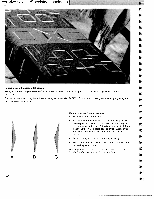
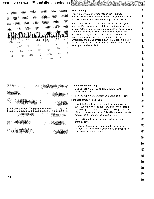
Manual change/Irregular pattern • Place stabilizer under fabric. • Set needle thread tension to 3. Select zigzag stitch 11/2046, 12/2034 for motifs with a right or left needle position or zigzag stitch 3 for motifs with a center needle I position. ,d Set stitch length to 0.2 - 0.3 mm. I • Using -1+ button A increase and reduce the width while 4) 1' sewing. (1 A B ci 1 Note: If you have selected the right or left needle position, the stitch width only changes in one direction. Try creating flowers and leaves with this technique. These larger embroideries are perfect for home decorating projects like placemats, cushions and valances. C 9 Automatic tapering You can use both stitch No. 3 and stitch No. 11/2046, 12/ 2034 for automatic tapering, If you would like to embroider the corners of a border, select z 9 zai g stitch No. 11/2046, 12/2034. Press the tie-off button (36) three times. A dense zigzag stitch appears in the Expression window and beside it the word 'tapering' with an arrow pointing to the taper of the corner on the left. Start sewing the point. Continue to sew to the length you desire, then press the reverse sewing button (33) while sewing. The taper will be sewn automatically at an angle of 45°. The machine stops at the taper and the needle remains in the fabric so that you can turn the fabric 90°. 89
-
 1
1 -
2
-
3
-
4
-
5
-
6
-
7
-
8
-
9
-
10
-
11
-
12
-
13
-
14
-
15
-
16
-
17
-
18
-
19
-
20
-
21
-
22
-
23
-
24
-
25
-
26
-
27
-
28
-
29
-
30
-
31
-
32
-
33
-
34
-
35
-
36
-
37
-
38
-
39
-
40
-
41
-
42
-
43
-
44
-
45
-
46
-
47
-
48
-
49
-
50
-
51
-
52
-
53
-
54
-
55
-
56
-
57
-
58
-
59
-
60
-
61
-
62
-
63
-
64
-
65
-
66
-
67
-
68
-
69
-
70
-
71
-
72
-
73
-
74
-
75
-
 76
76 -
 77
77 -
 78
78 -
 79
79 -
 80
80 -
 81
81 -
 82
82 -
 83
83 -
 84
84 -
 85
85 -
 86
86 -
87
-
88
-
89
-
90
-
91
-
92
-
93
-
94
-
95
-
96
-
97
-
98
-
99
-
100
-
101
-
102
-
103
-
104
-
105
-
106
-
107
-
108
-
109
-
110
 |
 |
