Pfaff expression 3.0 Owner's Manual - Page 34
Tapering program 4.0 and 3.0, Speed control 4.0 and 3.0
 |
View all Pfaff expression 3.0 manuals
Add to My Manuals
Save this manual to your list of manuals |
Page 34 highlights
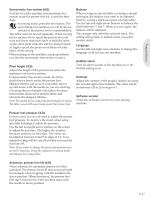
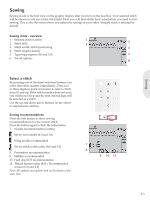
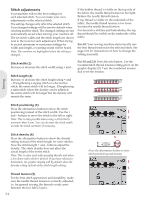
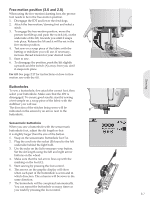
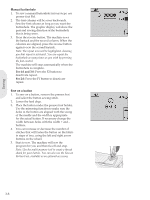
Sewing Tapering program (4.0 and 3.0) Tapering increases or decreases the width of the stitch during sewing to create symmetrical or asymmetrical tapers. A 1. Open the tapering program view by pressing the F1 button. 2. Use the left and right arrow buttons on the wheel to select beginning or end tapering. Press OK to turn the setting on or off. 3. Long press OK to open a view with different angle choices for either beginning or end tapering. Select the angle you want for your taper by using the arrow buttons, and press OK to select. 4. Press the F1 button again to close the tapering program view. There are mini icons (A) on the graphic display that will show you if beginning or end tapering are activated. 5. When tapering is activated at both the beginning and at the end and you start to sew, the stitch width will start at 0 mm. It becomes wider until the selected stitch width is reached. Sew your desired length and press the reverse button. The width is reduced until the width is 0 mm. Note: Almost all stitches can be tapered. When you try to open the tapering program view for a stitch that cannot be tapered, a warning sound will be heard. Speed control (4.0 and 3.0) 1. Long press the speed button to open a popup where you can use the left and right arrow buttons on the wheel to change the sewing speed. Note: You cannot select a higher speed than the default speed. 2. Press the speed button again to close the popup. 3. Press the info button. An icon on the graphic display will indicate the speed your machine is set to sew (B). 4. To deactivate the speed control, press the speed button. Press the speed button again to sew with the speed you previously selected. B 3:4
-
 1
1 -
2
-
3
-
4
-
5
-
6
-
7
-
8
-
9
-
10
-
11
-
12
-
13
-
14
-
15
-
16
-
17
-
18
-
19
-
20
-
21
-
22
-
23
-
24
-
25
-
26
-
27
-
28
-
 29
29 -
 30
30 -
 31
31 -
 32
32 -
 33
33 -
 34
34 -
 35
35 -
 36
36 -
 37
37 -
 38
38 -
 39
39 -
40
-
41
-
42
-
43
-
44
-
45
-
46
-
47
-
48
-
49
-
50
-
51
-
52
 |
 |
