Pfaff hobbylock 4752 Owner's Manual
Pfaff hobbylock 4752 Manual
 |
View all Pfaff hobbylock 4752 manuals
Add to My Manuals
Save this manual to your list of manuals |
Pfaff hobbylock 4752 manual content summary:
- Pfaff hobbylock 4752 | Owner's Manual - Page 1
hobbylock 4752 Instruction Manual - Pfaff hobbylock 4752 | Owner's Manual - Page 2
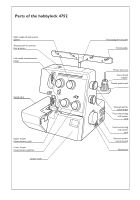
Parts of the hobbylock 4752 Right needle thread tension (green) Setting screw for presser foot pressure Left needle thread tension (blue) Swivel plate Upper looper thread tension (red) Lower looper thread tension (yellow) Looper cover Telescoping thread guide Thread guides Thread spool pin Cone - Pfaff hobbylock 4752 | Owner's Manual - Page 3
- Pfaff hobbylock 4752 | Owner's Manual - Page 4
2 - Pfaff hobbylock 4752 | Owner's Manual - Page 5
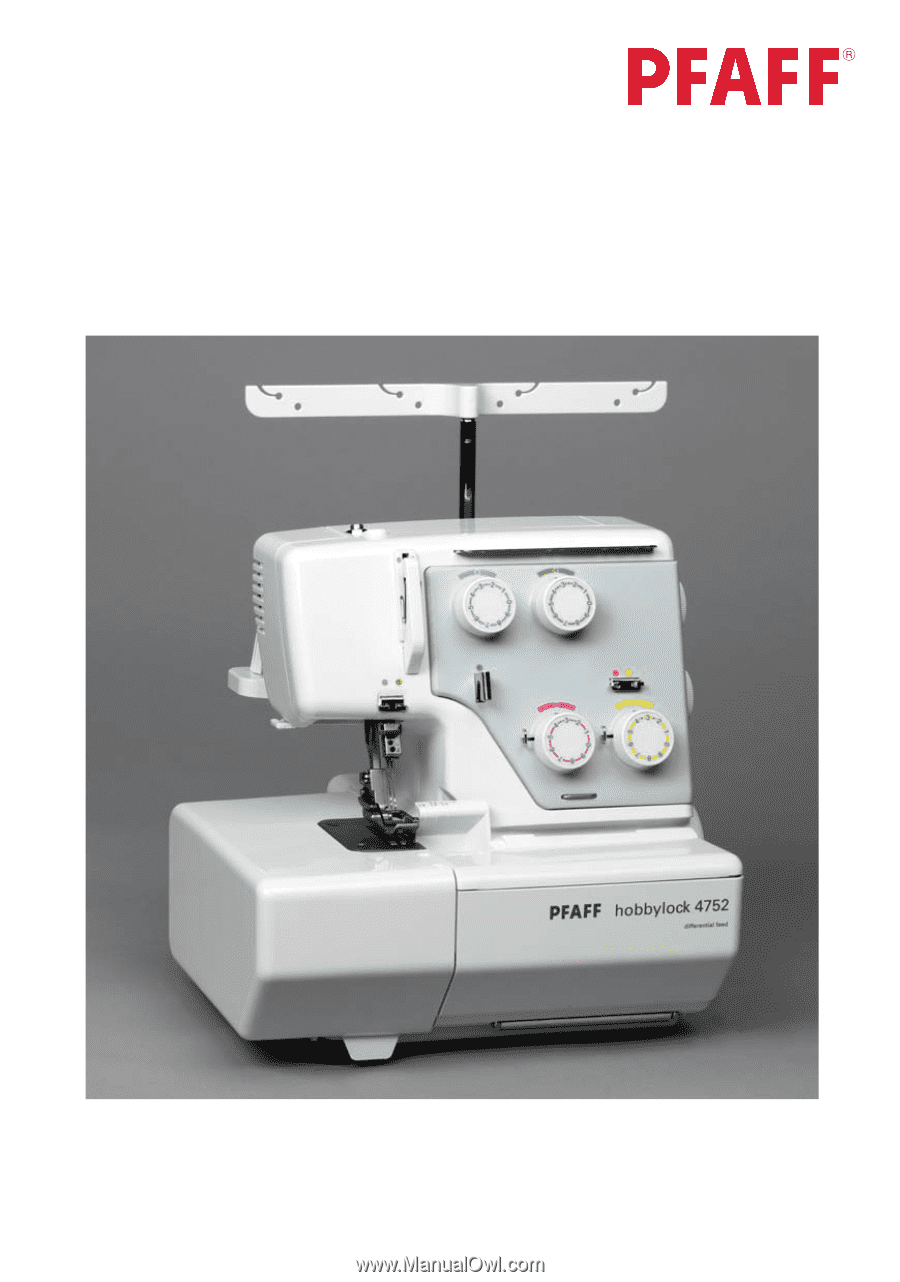
that provides unique advantages. Your new hobbylock 4752 can take any material in its stride and will sew through thick and thin for you. Your PFAFF hobbylock features the very latest in design and technology, and it is just as simple to operate as this instruction manual is to follow. Before you - Pfaff hobbylock 4752 | Owner's Manual - Page 6
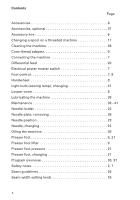
Page Accessories 6 Accessories, optional 37 Accessory box 6 Changing a spool on a threaded machine 11 Cleaning the machine 38 Cone thread adapter 9 Connecting the machine 7 Differential feed 20 Electrical power master switch 7 Foot control 7, 8 Handwheel 8 Light bulb (sewing lamp - Pfaff hobbylock 4752 | Owner's Manual - Page 7
guide 9 Thread chain cutter 26 Thread net 9 Thread tensions, setting 29 Thread unreeling disc 9 Threading aid for looper thread 13, 15 Threading aid for needle thread 16, 18 Threading paths/overview 0 Threading the lower overedge looper (yellow 14, 15 Threading the machine 10 Threading - Pfaff hobbylock 4752 | Owner's Manual - Page 8
the waste container Guide the lug into the groove on the looper cover. screw driver tweezers thread nets needle system thread unreeling discs wrench accessory box waste container Storing the accessory box Place the accessory box in the waste container. 6 looper threading aid machine oil - Pfaff hobbylock 4752 | Owner's Manual - Page 9
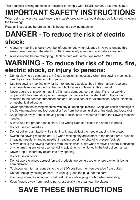
OFF. Plug the foot control plug into the connection socket on the machine. Plug the lead cord/plug into the wall socket. Switch the (230 V)/YC-551 (240 V) has to be used with this overlock machine. For the USA and Canada This sewing machine has a polarized plug (one blade wider than the other). To - Pfaff hobbylock 4752 | Owner's Manual - Page 10
speed is regulated by activating the foot control. The further you press the foot control down, the faster the machine will sew. Direction of rotation of the handwheel Always turn the handwheel towards you, as shown in the illustration (i.e. counterclockwise). swivel plate looper cover Opening - Pfaff hobbylock 4752 | Owner's Manual - Page 11
thread guide upward to its highest position. The two upper telescopes must be rotated slowly until their locking balls are heard to lock into place. Presser foot lifter The presser foot can be raised and lowered using the presser foot lifter. The presser foot must always be lowered when the machine - Pfaff hobbylock 4752 | Owner's Manual - Page 12
Threading the machine left needle thread right needle thread thread guide plate upper looper thread thread guides lower looper thread 10 - Pfaff hobbylock 4752 | Owner's Manual - Page 13
machine. Threads that are threaded incorrectly will lead to irregular (skipped) stitches, broken needles and uneven thread tension. Therefore always make sure that all the threads are perfectly threaded before beginning to sew. In order to replace spools, cut the threads between the thread guides - Pfaff hobbylock 4752 | Owner's Manual - Page 14
diagrams are located behind the looper cover to help you with the threading. thread guides guide plate guide (3) for the upper looper thread Guide the thread from the rear through the second thread guide from the right. Guide the thread through the fourth and the third hole from the right on - Pfaff hobbylock 4752 | Owner's Manual - Page 15
thread into the guide (8) of the upper looper. Feed the looper threading aid through the eye in the upper looper. Then hook the thread end into the looper threading aid and pull the latter with the thread through the eye. Remove the thread from the looper threading aid and pull on the free thread - Pfaff hobbylock 4752 | Owner's Manual - Page 16
the looper cover to help you with the threading. thread guide (1) guide plate (2) guide (3) for the lower looper thread Guide the thread from the rear through the right thread guide (1). Guide the thread through both the right holes on the thread guide plate (2), as shown in the illustration - Pfaff hobbylock 4752 | Owner's Manual - Page 17
(10) for the lower looper. Then hook the thread end into the looper threading aid and pull the latter with the thread through the eye of the guide (10). Remove the thread from the looper threading aid and using the tweezers pull on the free thread end until at least 10 cm (4") is showing beyond - Pfaff hobbylock 4752 | Owner's Manual - Page 18
from the left to the right into the thread guide (6). Feed the needle threading aid through the needle eye from the rear. Then hook the thread end into the needle threading aid and pull the needle threading aid with the thread through the needle eye. Pull on the free thread end until at least 10 cm - Pfaff hobbylock 4752 | Owner's Manual - Page 19
the second thread guide (1) from the left. Guide the thread through the fourth and the third hole from the left on the thread guide plate (2). cover of the take-up lever (5) thread tension (3) of the right needle thread guide for the right needle thread (4) Guide the thread from the right - Pfaff hobbylock 4752 | Owner's Manual - Page 20
from the left to the right into the thread guide (7). Feed the needle threading aid through the needle eye from the rear. Then hook the thread end into the needle threading aid and pull the needle threading aid with the thread through the needle eye. Pull on the free thread end until at least 10 cm - Pfaff hobbylock 4752 | Owner's Manual - Page 21
(A) the right seam (B) width Setting the seam width Set the seam width as follows: 1. Switch the main switch to OFF and pull out the lead cord/plug. 2. Open the looper cover and the swivel plate. 3. Move the upper blade to its lower position (see Page 24). 4. Adjust the setting knob until the - Pfaff hobbylock 4752 | Owner's Manual - Page 22
between 1 and 5 mm. The setting R is used for sewing rolled hems. setting mark setting knob for differential feed stretched contracted Setting setting knob is set to a value between 3.3 and 5.0, the differential feed ratio is automatically adjusted to a value between 2.0 and 1.3. Setting: - - Pfaff hobbylock 4752 | Owner's Manual - Page 23
the adjusting screw to the left Adjust the adjusting screw for normal sewing work in such a way that its upper edge protrudes 2 mm out from the top side of the machine (see illustration). presser foot lifter lever needle presser foot holder lever clamp pin Removing the presser foot Turn the - Pfaff hobbylock 4752 | Owner's Manual - Page 24
(130/705 H-PS) is required for this machine. Do not use bent or blunt needles. needle fastening screw edge of the needle bar stop pin the flat side points towards the rear needle holder edge of the needle bar Inserting the right needle Insert the new needle in such a way that the flat side - Pfaff hobbylock 4752 | Owner's Manual - Page 25
) Turn the machine off. Remove the right needle and the right needle thread. Tighten the right needle fastening screw again slightly so it does not fall out. Changing the needle when sewing with three threads Undo both needle fastening screws and remove the old needle. Insert the new needle as far - Pfaff hobbylock 4752 | Owner's Manual - Page 26
lowering the upper blade blocking pin Disengaging the upper blade Turn the machine off. - Open the looper cover and the swivel plate. - Push the ridged knob for lowering the upper blade to the right and turn it towards you. Guide the upper blade over the blocking pin so that the upper blade - Pfaff hobbylock 4752 | Owner's Manual - Page 27
the bed slide for the stitch width latch to position S. The stitch width latch will be pushed forward. This setting allows you to sew all types of standard overlock seams. Set the bed slide for the stitch width latch to position R. The stitch width latch will be pushed backward. This setting allows - Pfaff hobbylock 4752 | Owner's Manual - Page 28
the thread chain. Start sewing slowly. The sewing material is fed automatically. Guide the sewing needles. These guidelines should help you to properly position your fabric when sewing. Finishing sewing When you have completed your seam, allow the machine to continue to sew slowly until the thread - Pfaff hobbylock 4752 | Owner's Manual - Page 29
a needle with a large eye and pull the thread chain into the overlock stitches of the sewing fabric. C C Stitching the beginning of the seam 1. Before inserting fabric under the presser foot, serge a thread chain of approx. 5 cm (2") in length. 2. Insert the sewing fabric into the machine and sew - Pfaff hobbylock 4752 | Owner's Manual - Page 30
the fabric around so it is positioned under the presser foot and in front of the needles. Make sure the fabric is not positioned in the path of the upper blade. 5. Lower the presser foot, sew approx. 2.5 cm (1") over the seam and pull the fabric away to the side at an angle - Pfaff hobbylock 4752 | Owner's Manual - Page 31
the tension by turning the tensioning wheel until the dot marker is at the desired setting. The settings for adjusting thread tension are recommendations. Fabric type, thread quality and needle gauge will influence seam results. Always sew off a test seam onto a piece of scrap fabric and check the - Pfaff hobbylock 4752 | Owner's Manual - Page 32
overedge, narrow Serging light (easily frayed) fabrics. Needle position L = left R = right R Program 02 3-thread Serging tightly woven overedge, (easily frayed) fabrics. wide L Program 03 3-thread Serging medium-heavy flatlock, fabrics. As a flatlock seam, narrow for joining stretch - Pfaff hobbylock 4752 | Owner's Manual - Page 33
Thread tension: The values refer to medium-heavy fabrics and normal polyester thread blue green red yellow Stitch length Position of stitch width latch 3 3 3 3 S 3 3 3 3 S 0 2 3 3 S 0 2 3 3 S 4 3 3 R R 4 3 8 - 9 R R 3 3 3 3 3 S 31 - Pfaff hobbylock 4752 | Owner's Manual - Page 34
are correctly set, the loops of both looper threads are directly on the edge of the fabric. The left needle thread (blue) is too loose. Set the blue thread tension to a higher value. Top side Top side Underside Underside The upper looper thread (red) appears on the underside of the fabric - Pfaff hobbylock 4752 | Owner's Manual - Page 35
progr. 01, 02) blue green red yellow wide 3 3 3 The needle thread is too loose. Set the relevant needle thread tension to a higher value. blue green red yellow narrow 3 3 3 Top side Top side Underside Underside The upper looper thread (red) appears on the underside of the fabric. Set - Pfaff hobbylock 4752 | Owner's Manual - Page 36
(progr. 03, 04) blue green red yellow wide 0 2 3 The needle thread is too tight. Set the relevant needle thread tension to a lower value. blue green red yellow narrow 0 2 3 Top side Top side Underside Underside The upper looper thread (red) appears on the underside of the fabric. Set - Pfaff hobbylock 4752 | Owner's Manual - Page 37
3 The right needle thread (green) is too loose. Set the green thread tension to a higher value. Top side Top side Underside Underside The upper looper thread (red) appears on the underside of the fabric. Set the red thread tension to a higher value and/or the yellow thread tension to a lower - Pfaff hobbylock 4752 | Owner's Manual - Page 38
9 The right needle thread (green) is too loose. Set the green thread tension to a higher value. Top side Top side Underside Underside The upper looper thread (red) only partly loops around the fabric edge. Set the red thread tension to a lower value and/or the yellow thread tension to a higher - Pfaff hobbylock 4752 | Owner's Manual - Page 39
two pieces of fabric simultaneously. 98-200 284-10/900 9 Elastic tape attachment For sewing on elastic. 98-200 285-10 98-200 286-10/100 10 Edge guide For guiding the fabric edge and measuring cut widths and seam widths simultaneously. 11 Needle threader For easy threading of the needle. 37 - Pfaff hobbylock 4752 | Owner's Manual - Page 40
maintenance Cleaning the machine Switch the main switch to OFF. Open the looper cover and swivel plate. Use the cleaning brush provided to remove any waste thread. In order to clean the upper blade and the feed dog, you may also use a vacuum cleaner. fastening screw of the needle plate Cleaning - Pfaff hobbylock 4752 | Owner's Manual - Page 41
Switch the main switch to OFF. Open the swivel plate. Apply a few drops of high-quality machine oil to the points marked with arrows. Oil the machine once a week for normal operation or every ten hours for continuous operation. Open the looper cover and oil the marked points. Oil the marked point - Pfaff hobbylock 4752 | Owner's Manual - Page 42
blocking pin Changing the upper blade Switch the main switch to OFF. lower blade hexagonhead screw upper blade Open the looper cover and the swivel plate. Move the upper blade to its lower position (see Page 24). Undo the hexagon-head screw of the upper blade and remove the upper blade. Insert - Pfaff hobbylock 4752 | Owner's Manual - Page 43
bulb Bayonet holder: press the lamp in and turn to the right. Replace the sewing lamp cover and tighten the fastening screw. Safety notes Only use bulbs with a hands. Transporting the machine Position your fingers in the cutout on the rear side of the machine, as shown in the illustration. 41 - Pfaff hobbylock 4752 | Owner's Manual - Page 44
the instructions. Problem Cause Needle breakage The needle was bent or the point damaged. The needle was not fully inserted. The fabric was pulled too firmly. Solution Insert new needle (see Page 22). Insert needle fully (see Page 22). Do not pull on the fabric when sewing. Thread breaks - Pfaff hobbylock 4752 | Owner's Manual - Page 45
foot pressure too high for lightweight fabrics. Waste thread in the feed dog. Increase stitch length (see Page 20). Increase sewing foot pressure (see Page 21). Reduce sewing foot pressure (see Page 21). Clean the feed dog. Machine will not operate The lead cord/plug is not seated properly in - Pfaff hobbylock 4752 | Owner's Manual - Page 46
Maximum sewing speed Seam width Stitch length Presser foot Lubrication Presser foot height Overedge stroke Needle system Needle size Number of threads Dimensions (width x height x depth) Weight Packing contents 1 machine 1 foot control 1 instruction manual/guarantee card 1 machine cover 1 accessory - Pfaff hobbylock 4752 | Owner's Manual - Page 47
Notes 45 - Pfaff hobbylock 4752 | Owner's Manual - Page 48
Notes 46 - Pfaff hobbylock 4752 | Owner's Manual - Page 49
Notes 47 - Pfaff hobbylock 4752 | Owner's Manual - Page 50
- Pfaff hobbylock 4752 | Owner's Manual - Page 51
Parts of the hobbylock 4752 Movable upper blade Upper overedge looper (red) Lower overedge looper (yellow) Fixed lower blade Thread chain cutter Presser foot lifter Needle plate Ridged knob for lowering the upper blade Setting knob for seam width Standard presser foot Bed slide for stitch width - Pfaff hobbylock 4752 | Owner's Manual - Page 52
VSM Group AB • SE-561 84 Huskvarna • SWEDEN www.pfaff.com 412 86 03-26D • English • Inhouse • © 2004-2008 VSM Group AB • Printed in Sweden on environmental-friendly paper
-
 1
1 -
 2
2 -
 3
3 -
 4
4 -
 5
5 -
 6
6 -
 7
7 -
8
-
9
-
10
-
11
-
12
-
13
-
14
-
15
-
16
-
17
-
18
-
19
-
20
-
21
-
22
-
23
-
24
-
25
-
26
-
27
-
28
-
29
-
30
-
31
-
32
-
33
-
34
-
35
-
36
-
37
-
38
-
39
-
40
-
41
-
42
-
43
-
44
-
45
-
46
-
47
-
48
-
49
-
50
-
51
-
52
 |
 |
hobbylock
4752
Instruction Manual