Philips 40PFL5705DV User manual
Philips 40PFL5705DV Manual
 |
UPC - 609585195080
View all Philips 40PFL5705DV manuals
Add to My Manuals
Save this manual to your list of manuals |
Philips 40PFL5705DV manual content summary:
- Philips 40PFL5705DV | User manual - Page 1
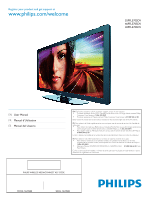
Register your product and get support at www.philips.com/welcome 55PFL5705DV 46PFL5705DV 40PFL5705DV EN User Manual FR Manuel d'Utilisation ES Manual del Usuario EN: For further assistance, call the customer support service in your country. • To obtain assistance in the U.S.A., Canada, Puerto - Philips 40PFL5705DV | User manual - Page 2
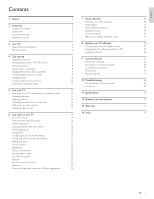
12 Adjusting volume 13 12 Network service disclaimer 43 Watching channels from a set-top box 13 Watching connected devices 13 13 Warranty 44 Watching a Blu-ray disc 13 14 Index 45 6 Use more of your TV 14 Access TV menus 14 Philips Wireless MediaConnect 14 Netflix operations - Philips 40PFL5705DV | User manual - Page 3
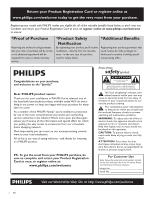
PHILIPS "family," you're entitled to protection by one of the most comprehensive warranties and outstanding service operating and maintenance problems. WARNING: To model and serial numbers located on the back and right side of the TV cabinet. Retain this information for future reference. Model - Philips 40PFL5705DV | User manual - Page 4
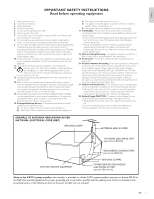
Install in accordance with the manufacturer's instructions. 8. Do not install near 14. Refer all servicing to qualified service personnel. Servicing is required when the fall from the top of the set and cause product damage and/or personal the mats and supporting structure grounding of - Philips 40PFL5705DV | User manual - Page 5
problems as a result of the content in this document. Errors reported to Philips will be adapted and published on the Philips support website as soon as possible. Pixel characteristics This LCD PHILIPS Responsible Party : P&F USA, Inc. Model : 55PFL5705DV Notice: This TV has been set to maximize - Philips 40PFL5705DV | User manual - Page 6
assistance For further assistance, call the customer support service in your country. • To obtain assistance in the U.S.A., Canada, Puerto Rico, or the U.S.Virgin Islands, contact Philips Customer Care Center at 1-866-309-0841 Product information This TV consumes minimal energy in standby mode to - Philips 40PFL5705DV | User manual - Page 7
! To fully benefit from the support that Philips offers, register your product at a www.philips.com/welcome s b Side controls and indicators r c q d e e p f d g h c a o i b j a Standby indicator / Remote control sensor n b . POWER Switches the TV on or puts it in standby - Philips 40PFL5705DV | User manual - Page 8
off completely unless it is physically unplugged. b FAV Displays a list of all channels marked as favorite. (Includes subchannels) c SLEEP Sets a delay after which the TV switches to standby. d Color buttons (red / green / yellow / blue) Selects tasks or options. e SOURCE Selects connected devices - Philips 40PFL5705DV | User manual - Page 9
for 40" and 46" only) • AC Power cord • Cable management tie • USB wireless LAN adapter (PH2010A) • User Manual • Quick Start Guide • Box-inserts Note Wireless LAN Adapter for Philips models : 55PFL5705DV, 46PFL5705DV, 40PFL5705DV • This wireless device can only be used with a limited number of - Philips 40PFL5705DV | User manual - Page 10
English Connecting the antenna or cable If you connect a set-top box through RF IN / OUT If the TV is connected to a cable box or satellite set-top box via a coaxial connection, set the TV to channel 3 or 4, or to the channel specified by the service provider. Cable OUT IN RF CABLE If you connect - Philips 40PFL5705DV | User manual - Page 11
connector varies according to TV model. 2 Insert the AC power cord fully into the power connector. 3 Connect the AC power cord plug to the power outlet. Ensure that the cord is tightly secured at both ends. 2 Pass cables through the cable management tie to avoid tangles. AC IN SERVICE ONLY PC-IN - Philips 40PFL5705DV | User manual - Page 12
on the TV. After you read a welcome screen, follow the on-screen instructions to select your language and complete your TV setup. OK. Store your preferences. Cancel Store Press OK to finish [Settings assistant]. The TV has learned your preferences. Exit Press Í/Æ to select [Finish], then - Philips 40PFL5705DV | User manual - Page 13
contributes to air and water pollution. When the AC power cord is plugged in, your TV consumes energy.Your TV has very low standby power consumption. Press CHANNEL + / − on the side of the TV. • Press CH + / − or enter a number on the remote control. For digital channels, press a number (1 to - Philips 40PFL5705DV | User manual - Page 14
English Adjusting volume Watching channels from a set-top box To watch channels from a set-top box 1 Switch on the set-top box. » The picture from your set-top box might appear automatically on the TV screen. 2 Use the remote control of your set-top box to select channels. If the picture does not - Philips 40PFL5705DV | User manual - Page 15
PIN. (See 'Setting your PIN' on page 26.) • Once you have set PIN, PIN input Manual or back of your TV. 3 Click the 'Download now' button to download the free Philips Wireless MediaConnect software. 4 Once downloaded, start the file 'Philips Wireless MediaConnect_ setup.exe'. Follow the instructions - Philips 40PFL5705DV | User manual - Page 16
ix.com/Philips, follow the following procedure before activating the connection to Netflix. 1 Connect this unit to the internet. (See 'Connecting the TV to the internet using an Ethernet cable' or 'Connecting the TV to the internet using a USB wireless LAN adapter' on page 40.) 2 Set up the necessary - Philips 40PFL5705DV | User manual - Page 17
TV to the internet using a USB wireless LAN adapter' on page 40. For the network setup, see 'Network' on page 30. Internet radio playback After you set audio format is displayed as MP3 or WMA. • Internet radio service may not be fully available with narrowband internet connection. (e.g. 56k modem - Philips 40PFL5705DV | User manual - Page 18
the current station 6 Color buttons (red / green / yellow / blue) guide 7 Station / folder list 8 Station icon 9 Playback status 10 Folder icon create your vTuner account. • Follow the instructions given on the PC screen. 4 Add stations by following the instructions given on the PC screen. • The - Philips 40PFL5705DV | User manual - Page 19
. Note • You can deactivate the connection to VUDU by setting [Deactivation] to [Yes]. (Refer to page 32.) • For questions regarding VUDU service, please contact VUDU customer care at 1-888-554-VUDU (8838) or visit www.vudu.com/support Guide to VUDU menu screen App Home Screen App Home Screen is - Philips 40PFL5705DV | User manual - Page 20
title will appear. 5 Use Î / ï to select [Rent] or [Buy], then press OK. • Checkout screen will appear. 6 Use Î / rented or purchasedVUDU movies/TV episodes 1 Follow steps 1 to 2 in 'Renting or purchasing VUDU movies /TV episodes' on page 19 2 Follow the instructions on screen of the selected application. - Philips 40PFL5705DV | User manual - Page 21
TV to the internet using an Ethernet cable' or 'Connecting the TV to the internet using a USB wireless LAN adapter' on page 40.) 2 Set up the necessary network connection settings questions regarding Twitter, please visit www.twitter.com Guide to Twitter menu screen Twitter Home Screen Twitter Home - Philips 40PFL5705DV | User manual - Page 22
less than 1 minute 5 List View Viewing Trends on Twitter Trends show topics trending in your area. 1 Follow steps 1 to 2 in 'Viewing tweets on the TV' on page 20. 2 Use Î / ï to select [Trends], then press OK. • Press Color buttons (green) to switch between the [Area] and [Trends]. • If you display - Philips 40PFL5705DV | User manual - Page 23
enhancement On 22 EN Description Use [Settings assistant] to guide you through the best picture and sound settings. Adjusts the intensity of bright areas, Mode selection HDTV Turns off image enhancement features which makes the TV to act purely as a monitor. Enables image enhancement features to - Philips 40PFL5705DV | User manual - Page 24
English Changing picture format 1 Press FORMAT on the remote control. 2 Use Î / ï to select a picture format and press OK to confirm your choice. Summary of picture formats Display modes can be selected when the broadcasting station is sending 16:9 or 4:3 video signal. And 3 types of display modes - Philips 40PFL5705DV | User manual - Page 25
Use a VGA connector to connect a PC to your TV. For sound, add an audio cable with a stereo mini jack. Caution • Before you connect your PC, set the PC monitor refresh rate to 60Hz. Supported screen resolutions The following screen resolutions are supported in PC mode : Resolution 640×480 800×600 - Philips 40PFL5705DV | User manual - Page 26
OK to confirm your choice. 6 Press MENU to exit. Setting the time manually 1 Press MENU on the remote control and then use to select TV listings with service marks such as [CC]. Display captions 1 Press MENU on the remote control and then use to select [Setup] > [Features] > [Caption settings - Philips 40PFL5705DV | User manual - Page 27
subscription television provider, you should : • consult any consumer information and manuals / guides on closed captions for DTV programming provided by your subscription television provider; • ensure that the captioning function on your set-top box, if applicable, is turned on; and, • ensure that - Philips 40PFL5705DV | User manual - Page 28
Setup] > [Features] > [Child lock]. 2 Enter your PIN. (See 'Setting your PIN' on page 26.) 3 Use Î / ï to select [TV ratings lock], then press OK. 4 Use and then press OK repeatedly to originated programming ∙ News ∙ Political ∙ Public Service Announcements ∙ Religious ∙ Sports ∙ Weather. EN 27 - Philips 40PFL5705DV | User manual - Page 29
in [Movie ratings lock]. Caption settings Sleeptimer Child lock Change PIN Demo Lock after P All Channel Lock P NR TV ratings lock P G Movie ratings lock others)∙ Locally originated programming ∙ News ∙ Political ∙ Public Service Announcements ∙ Religious ∙ Sports ∙ Weather. Use the region - Philips 40PFL5705DV | User manual - Page 30
instructions to enjoy the demo. 4 Press MENU to exit. Use Philips EasyLink Your TV supports Philips EasyLink setting and then press OK to select the setting. 3 Adjust the following items. [Master EasyLink] Set the EasyLink [On] or [Off]. The following additional settings will disappear when you set - Philips 40PFL5705DV | User manual - Page 31
use a USB wireless LAN adapter to connect to the internet by wireless connection. Connection test Perform the following steps to test your internet connection after you have connected an Ethernet cable or entered network settings such as IP address, DNS settings, etc. manually. 1 Press MENU on the - Philips 40PFL5705DV | User manual - Page 32
, select [Do Not Use]. • If you need to change the proxy setting as instructed by your internet service provider to set the designated proxy address and port, select [Use]. Setting items Description Proxy setting Do not Use Use Proxy address * Proxy port * Not use the proxy server. Uses - Philips 40PFL5705DV | User manual - Page 33
Number) to get any services from Netflix. VUDU connection Displays the deactivation setting for VUDU. 1 Press supported, nor will Philips accept any liability for damage or loss of stored data. • The USB storage device is not supplied with the TV. Connect a USB storage device 1 Turn on the TV - Philips 40PFL5705DV | User manual - Page 34
use Î / ï to select the desired item. Setting items Off Repeat On Off Shuffle On Off TV speakers On Speakers EasyLink Description Sets repeat playback to off. Sets repeat playback for all MP3 files in the current folder. Sets shuffle playback to off. Sets shuffle playback for all MP3 files in - Philips 40PFL5705DV | User manual - Page 35
set up your TV, you are prompted to select a menu language and to install TV and digital radio channels (if available).This chapter provides instructions digital channel is being broadcast, please contact your local service provider. Installing digital channels using [Weak channel installation] - Philips 40PFL5705DV | User manual - Page 36
philips.com using the model number of your TV (e.g. 55PFL5705DV that supports the instructions and confirm that you want to continue with the installation. Software update is in progress. Please wait. Do not remove the USB storage device or turn the TV off while upgrade is in progress. Update your TV - Philips 40PFL5705DV | User manual - Page 37
internet, you must connect the unit to the internet and set up necessary settings. • For the network connection, refer to 'Connecting the TV to the internet using an Ethernet cable' or 'Connecting the TV to the internet using a USB wireless LAN adapter' on page 40. • For the network setup, refer to - Philips 40PFL5705DV | User manual - Page 38
supplements examples provided in the Quick Start Guide. Connection overview a SERVICE ONLY PC-IN RGB b c d AC IN SERVICE ONLY PC-IN RGB e f g USB wireless LAN adapter in to this unit directly. • Different types of connectors may be used to connect a device to your TV, depending on - Philips 40PFL5705DV | User manual - Page 39
and to enable Philips EasyLink. Note • Philips HDMI supports HDCP (High-bandwidth Supports high-definition signals but gives lower picture quality than HDMI. Component cables combine a red / green / blue video cable with a red / white audio L/R cable. Match the cable colors when you connect to the TV - Philips 40PFL5705DV | User manual - Page 40
• When you connect cables, match the cable colors to the connectors on the TV. Connecting a set-top box, DVD recorder via composite connectors and analog audio AUDIO L/R + VIDEO OUT IN IN DVD recorder RF IN RF OUT OUT Set-top box RF IN Cable Do not place your recorder too close to the - Philips 40PFL5705DV | User manual - Page 41
After connecting a USB wireless LAN adapter, set up necessary network settings. (For the network setup, refer to 'Network' on page 30.) • This unit is compatible with the supplied USB wireless LAN Adapter only. (Commercially available USB wireless LAN adapters are not supported.) • Do not insert the - Philips 40PFL5705DV | User manual - Page 42
to each connector. This allows you to easily identify devices connected to your TV. 1 Press MENU on the remote control and then use to select [Add assigned to connectors. Remove devices If a device is no longer connected to the TV, remove it from the home menu. 1 Press MENU on the remote control. - Philips 40PFL5705DV | User manual - Page 43
picture format must be set in the accessory service provider to troubleshoot model. 5 Under Product support, click "User manuals". Contact us If you cannot resolve your problem, refer to the FAQ for this TV at www.philips.com/support If the problem remains unresolved, contact the Customer Support - Philips 40PFL5705DV | User manual - Page 44
Dolby Digital and PCM USB : 1 Supporting wireless standards : IEEE 802.11 b/g/n (2.4GHz) Ethernet port : 1 Power Power requirements : 120V~ AC +/− 10%, 60Hz +/− 0.5% 12 Network service disclaimer Content and services made available through this product are transmitted by third parties - Philips 40PFL5705DV | User manual - Page 45
the terms as set forth below. WHO been manufactured from new, or serviceable used parts and is at refund the original purchase price of the product. product that requires modification or adaptation to enable it to operate in Failure to operate per Owner's Manual. TO OBTAIN ASSISTANCE... Contact the - Philips 40PFL5705DV | User manual - Page 46
Network P PC Philips Wireless MediaConnect Picture format Picture settings R Ratings Remote control insert batteries overview Retail store mode RC key forwarding S Settings assistant Signal quality Sleeptimer Software update version Speakers EasyLink Specifications Standby T Troubleshooting TV as PC - Philips 40PFL5705DV | User manual - Page 47
México C.P. 52787 TELEVISOR A COLOR DE CRISTAL LIQUIDO (LCD) MODELO 55PFL5705DV/ F7 46PFL5705DV/ F7 40PFL5705DV/ F7 LCD 55"(139,70cm) 46"(116,84cm) 40"(101,60cm) IMAGEN DE USAR SU APARATO. Philips and Philips Shield are used under license of Koninklijke Philips Electronics N.V. Printed in USA
-
 1
1 -
 2
2 -
 3
3 -
 4
4 -
 5
5 -
 6
6 -
 7
7 -
8
-
9
-
10
-
11
-
12
-
13
-
14
-
15
-
16
-
17
-
18
-
19
-
20
-
21
-
22
-
23
-
24
-
25
-
26
-
27
-
28
-
29
-
30
-
31
-
32
-
33
-
34
-
35
-
36
-
37
-
38
-
39
-
40
-
41
-
42
-
43
-
44
-
45
-
46
-
47
 |
 |

MODEL NUMBER
SERIAL NUMBER
PHILIPS WIRELESS MEDIACONNECT KEY CODE
55PFL5705DV
46PFL5705DV
40PFL5705DV
Register your product and get support at
www.philips.com/welcome
EN
User Manual
FR
Manuel d’Utilisation
ES
Manual del Usuario
EN:
For further assistance, call the customer support service in your country.
•
To obtain assistance in the U.S.A., Canada, Puerto Rico, or the U.S.Virgin Islands, contact Philips
Customer Care Center at
1-866-309-0841
•
To obtain assistance in Mexico, contact Philips Customer Care Center at
01 800 504 62 00
Enter below the model and serial numbers located on the back and right side of the TV cabinet.
FR:
Pour obtenir de l’aide supplémentaire, communiquez avec le centre de service à la clientèle de
votre pays.
•
Pour obtenir de l’aide aux États-Unis, au Canada, à Puerto Rico ou aux Îles Vierges américaines,
communiquez avec le centre de service à la clientèle Philips au :
1-866-309-0841
•
Pour obtenir l’aide au Mexique, entrez en contact avec le centre de soin de client de Philips à
01 800 504 62 00
Entrer ci dessous le modèle et le numéro de série situés dérrière à droite sur le dos du téléviseur.
ES:
Para obtener más información, llame al servicio de soporte al cliente de su país.
•
Para obtener asistencia en los Estados Unidos, en Canadá, Puerto Rico o en las Islas
Vírgenes de los Estados Unidos, comuníquese con Centro de atención al cliente de Philips al
1-866-309-0841
•
Solo para Mexico CENTRO DE ATENCIÓN A CLIENTES LADA.
01 800 504 62 00
Solo
Para México.
Escriba a continuación el modelo y número de serie que estan localizados en lado derecho y parte
posterior de el gabinete de el televisor.