Philips CDC735BK User manual - Page 6
Hooking Up Your Compact Disc Changer
 |
View all Philips CDC735BK manuals
Add to My Manuals
Save this manual to your list of manuals |
Page 6 highlights
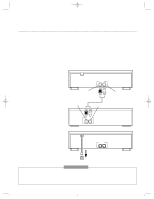
CDC735comb 4/9/99 5:39 PM Page 6 6 Hooking Up Your Compact Disc Changer The Compact Disc Changer connection - an audio system to Compact Disc Changer - is shown below. 1 Select a location for your Compact Disc Changer that is near your receiver/amplifier and a standard AC outlet. 2 Plug one end of the supplied audio cable into the Compact Disc Changer's R(ight) and L(eft) OUTPUT jacks, match- ing the red plug to the red R(ight) jack and the white plug to the white L(eft) jack. 3 Plug the other end of the cable into the receiver/amplifier's corresponding left and right CD, AUX, or TAPE INPUT jacks. 4 Plug the Compact Disc Changer's power cord into a standard AC outlet. Back of Compact Disc Changer OUTPUT R L R(ight) OUTPUT Jack RL L(eft) OUTPUT Jack R(ight) Input Jack L(eft) Input Jack RL CD R L Back of the Receiver/Amplifier Wall Outlet OUTPUT R L Back of Compact Disc Changer NOTES • Do not place the Compact Disc Changer on top of the receiver/amplifier or on any component that emits heat. • If you place the Compact Disc Changer near other audio components or their wires, you might hear a hum when you play a disc. Move the components or their wires to eliminate the noise. • Do not use the receiver/amplifier's PHONO inputs. This could damage the receiver/amplifier. • To prevent electric shock, do not use this polarized plug with an extension cord, receptacle, or other outlet unless the blades can be fully inserted to prevent blade exposure.
-
 1
1 -
 2
2 -
 3
3 -
 4
4 -
 5
5 -
 6
6 -
 7
7 -
 8
8 -
 9
9 -
 10
10 -
 11
11 -
 12
12 -
13
-
14
-
15
-
16
-
17
-
18
-
19
-
20
 |
 |
