Philips DVDR985A Quick start guide - Page 1
Philips DVDR985A Manual
 |
UPC - 037849922774
View all Philips DVDR985A manuals
Add to My Manuals
Save this manual to your list of manuals |
Page 1 highlights
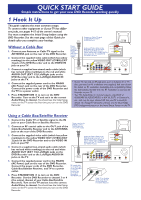
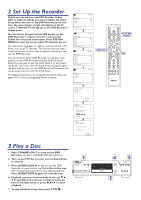
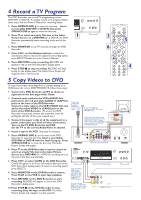
QUICK START GUIDE Simple instructions to get your new DVD Recorder working quickly 1 Hook It Up This guide explains the most common setups. To connect other equipment or if your TV has differ- ent jacks, see pages 9-15 of the owner's manual. You must complete the Initial Setup before using the DVD Recorder. See the next page of this Guide for Antenna or Cable TV signal to the DVD Recorder's details after you complete your hookup. ANTENNA jack RIGHT AUDIO IN LEFT AUDIO IN VIDEO IN Without a Cable Box 1. Connect your Antenna or Cable TV signal to the ANTENNA jack on the rear of the DVD Recorder. 2. Connect the supplied video cable (which has yellow markings) to the yellow VIDEO OUT (CVBS) (EXT 2) jack of the DVD Recorder and to the VIDEO IN jack on your TV. 3. Connect a supplied two-strand audio cable (which has red and white markings) to the red and white AUDIO OUT (EXT 1/2) Left/Right jacks on the DVD Recorder and to the Left/Right AUDIO IN jacks on the TV. 4. Connect the supplied power cord to the MAINS (AC Power) jack on the rear of the DVD Recorder. Connect the power cords of the DVD Recorder and the TV to a power outlet. 5. Press STANDBY-ON y to turn on the DVD Recorder. Turn on the TV and set it to the correct Audio/Video In channel. You should see the Initial Setup menu on the TV screen the first time you turn on the DVD Recorder. Power cord to the DVD Recorder's MAINS jack and to a power outlet Audio and Video cables to the DVD Recorder's red and white AUDIO OUT (EXT 1/2) and yellow VIDEO OUT (CVBS) (EXT2) jacks and to the TV's AUDIO IN and VIDEO IN jacks RIGHT AUDIO IN LEFT AUDIO IN VIDEO IN EXT 3 COMPONENT VIDEO Y Y PB PB PROG SCAN Y L PB EXT 3 L L PR PR PR R R R IN RC 6 EXT 2 EXT 1 EXT 1/2 • If your TV has only an RF-style jack, such as Antenna In or 75 ohm, you need an RF modulator (not supplied). Ask your dealer for details on RF modulator availability and compatibility. Follow the instructions provided with the RF modulator to connect the Recorder to your TV. • Your TV's Audio/Video In channel may be called AUX or AUXILIARY IN, AUDIO/VIDEO or A/V IN, EXT1 or External In, etc., and may be near channel 00. See your TV manual for details. Or, change TV channels until you see the blue Philips DVD background picture or the Initial Setup Screen on the TV. Using a Cable Box/Satellite Receiver 1. Connect the Cable TV or Satellite signal to the IN jack on your Cable Box or Satellite Receiver. Power cord to the DVD Recorder's 2. Connect an RF coaxial cable to the OUT jack of the MAINS jack and Cable Box/Satellite Receiver and to the ANTENNA to a power outlet RIGHT AUDIO IN LEFT AUDIO IN VIDEO IN jack on the rear of the DVD Recorder. 3. Connect the supplied video cable (which has yellow markings) to the yellow VIDEO OUT (CVBS) (EXT 2) jack on the DVD Recorder and to the VIDEO IN jack on your TV. Audio and Video cables to the DVD Recorder's red and white AUDIO OUT (EXT 1/2) and yellow VIDEO OUT (CVBS) (EXT2) jacks and to the TV's AUDIO IN and VIDEO IN jacks RIGHT AUDIO IN LEFT AUDIO IN VIDEO IN 4. Connect a supplied two-strand audio cable (which has red and white markings) to the red and white AUDIO OUT (EXT 1/2) Left/Right jacks on the EXT 3 COMPONENT VIDEO PROG SCAN EXT 3 DVD Recorder and to the Left/Right AUDIO IN jacks on the TV. 5. Connect the supplied power cord to the MAINS Y Y PB PB Y L L PB L PR PR PR R R R IN RC 6 EXT 2 EXT 1 EXT 1/2 (AC Power) jack on the rear of the DVD Recorder. Connect the power cords of the DVD Recorder, Cable Box/Satellite Receiver, and TV to a power outlet. 6. Press STANDBY-ON y to turn on the DVD Recorder. Set the DVD Recorder to channel 3 or 4 (the output channel of your Cable Box/Satellite Receiver). Turn on the TV and set it to the correct RF coaxial cable to the OUT jack of the Cable Box or Satellite Receiver and to the DVD Recorder's ANTENNA jack OUT IN Cable TV or Satellite signal to the IN jack on the Cable Box or Satellite Receiver Audio/Video In channel. You should see the Initial Setup menu on the TV screen the first time you turn on the DVD Recorder.
-
 1
1 -
 2
2 -
 3
3 -
 4
4
 |
 |