Philips DVDR985A Quick start guide - Page 3
Copy Videos to DVD, Record a TV Program - dvdr985 manual
 |
UPC - 037849922774
View all Philips DVDR985A manuals
Add to My Manuals
Save this manual to your list of manuals |
Page 3 highlights
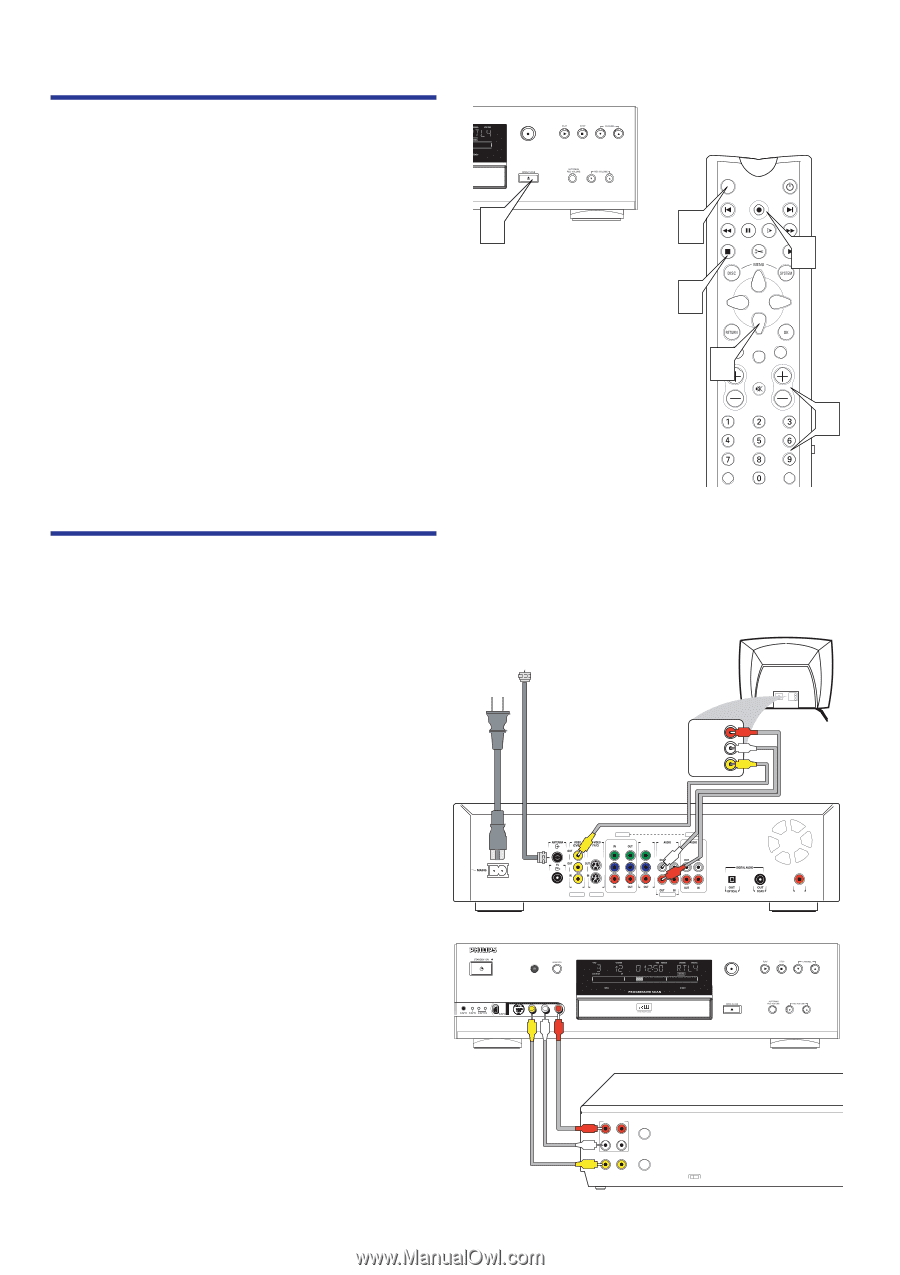
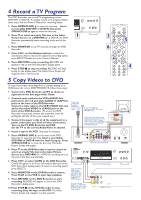
4 Record a TV Program The DVD Recorder can record TV programming onto a DVDR985 DVD+RW or DVD+R. To quickly record a TV program, follow these steps. See the Owner's Manual for recording details. 1. Press OPEN/CLOSE A to open the disc tray. Insert a recordable DVD+RW or DVD+R, then press OPEN/CLOSE A again to close the disc tray. 2. Press 9 to select an empty Title box in the Index Picture Screen on a DVD+RW. On a DVD+R, the DVD Recorder automatically starts recording at the end of the Disc. 3. Press MONITOR to see TV channels through the DVD Recorder. 4. Press CH+/- or the Number buttons to select the channel you wish to record. (To adjust the recording speed, press SELECT. Details are in the Owner's Manual.) 5. Press REC/OTR to start recording. RECORD will appear in red on the DVD Recorder's display panel. 6. Press STOP C to stop recording. RECORD will flash briefly on the display panel.The Index Picture Screen will reappear after a few seconds. RECORD 1 MONITOR ON/OFF 3 PREVIOUS REC/OTR NEXT REVERSE PAUSE SLOW FORWARD STOP FSS 5PLAY 6 CLEAR TIMER SELECT 2VOL CH MUTE 4 T/C A/CH 5 Copy Videos to DVD To copy home video recordings from a cassette playing on a VCR/camcorder onto a DVD+RW/DVD+R, follow these steps. 1. Connect the DVD Recorder and TV as shown at right and on the first page of this Guide. 2. Connect audio cables to the VCR's AUDIO Out jacks and to the red and white AUDIO In (CAM1/2) jacks on the front of the DVD Recorder. Connect a video cable to the VCR's VIDEO Out jack and to the yellow VIDEO In (CAM2) jack on the front of the DVD Recorder. (To access the DVD Recorder's front jacks, remove the protective cover by pulling the left side of the cover toward you.) 3. Connect the power cords of all the equipment to a power outlet after you finish all other connections. Turn on the TV, DVD Recorder, and VCR. Set the TV to the correct Audio/Video In channel. 4. Insert a tape in the VCR. Stop play if necessary. 5. Press OPEN/CLOSE A on the front of the DVD Recorder to open the disc tray. Insert a recordable DVD+RW or DVD+R with the label facing up. Press OPEN/CLOSE A to close the disc tray. The Index Picture Screen will appear. 6. Press 9 on the DVD Recorder's remote control to select an empty Title box in the Index Picture Screen on a DVD+RW. On a DVD+R, recording starts at the end of the Disc automatically. 7. Press CH+/- to select CAM2 at the DVD Recorder. CAM2 will appear in the Tuner Information Box and on the DVD Recorder's display panel. (To select a recording speed, press SELECT.) 8. Press MONITOR on the DVD Recorder's remote. Press PLAY on the VCR to start tape playback. 9. Press RECORD on the DVD Recorder to start recording. RECORD will appear in red on the DVD Recorder's display panel. 10.Press STOP C on the DVD Recorder to stop recording. Stop the tape on the VCR. The Index Picture Screen will reappear in a few seconds. Power cord to the DVD Recorder's MAINS jack and to a power outlet Antenna or Cable TV signal to the DVD Recorder's ANTENNA jack RIGHT AUDIO IN Audio and Video cables to the DVD Recorder's red and white AUDIO OUT (EXT 1/2) and yellow VIDEO OUT (CVBS) (EXT2) jacks and to the TV's AUDIO and VIDEO IN jacks LEFT AUDIO IN VIDEO IN EXT 2 EXT 3 COMPONENT VIDEO Y Y PB PB PR PR EXT 1 PROG SCAN Y L PB EXT 3 L L PR R R R EXT 1/2 REAR OF DVD RECORDER DVDR985 DVD RECORDER RECORD S-VIDEO VIDEO L AUDIO R DV Audio and Video cables to the VCR's AUDIO and VIDEO OUT jacks and to the DVD Recorder's AUDIO and VIDEO IN jacks (You can use the AUDIO and VIDEO IN jacks on the rear of the DVD Recorder instead if you prefer.) FRONT OF DVD RECORDER AUDIO R OUT IN L VIDEO OUT IN ANT IN OUT CH3 CH4 REAR OF VCR RIGHT AUDIO IN LEFT AUDIO IN VIDEO IN REAR OF TV IN RC 6
-
 1
1 -
 2
2 -
 3
3 -
 4
4
 |
 |