Philips FW-C579 User manual - Page 14
Step 5, Connecting to game, woofer, Step 6, Connecting the AC, power cord, Step 7, Inserting
 |
View all Philips FW-C579 manuals
Add to My Manuals
Save this manual to your list of manuals |
Page 14 highlights
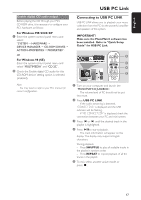
English Connections Step 5: Connecting to game woofer Use the supplied game woofer cable to connect the SUBWOOFER OUT terminal to the SIGNAL INPUT on the game woofer. Setting the game woofer Step 7: Inserting batteries into the remote control 3 1 2 1 Open the battery compartment cover. 1 2 Insert two batteries type R06 or AA, following the indications (+-) inside the compartment. 3 Close the cover. 2 1 After connecting the game woofer's AC power cable to the wall socket, press POWER ON • OFF to activate the game woofer. 2 Adjust the VOLUME CONTROL to increase or decrease the game woofer volume level. 3 Play sound through the game woofer and adjust the PHASE SELECT button at the rear of the game woofer to the position (IN or OUT) at which the lowest frequency is heard best. ➜ Phase is closely related to the distance from the listening position to the front speakers and game woofer. 4 To switch off the game woofer, press POWER ON•OFF again. Using the remote control to operate the system 1 Aim the remote control directly at the remote sensor (iR) on the main unit. 2 Select the source you wish to control by pressing one of the source select keys on the remote control (for example CD,TUNER). 3 Then select the desired function (for example CAUTION! - Remove batteries if they are exhausted or will not be used for a long time. - Do not use old and new or different types of batteries in combination. - Batteries contain chemical substances, so they should be disposed of properly. Step 6: Connecting the AC power cord "AUTO INSTALL - PRESS PLAY" may appear on the display panel when the AC power cord is plugged into the power outlet for the first time. Press ÉÅ on the main unit to store all available radio stations (page 3 - P3) or press Ç to exit (refer to "Tuner Operations"). 14
-
 1
1 -
2
-
3
-
4
-
5
-
6
-
7
-
8
-
 9
9 -
 10
10 -
 11
11 -
 12
12 -
 13
13 -
 14
14 -
 15
15 -
 16
16 -
 17
17 -
 18
18 -
 19
19 -
20
-
21
-
22
-
23
-
24
-
25
-
26
-
27
-
28
 |
 |
