Philips HF3445 User manual (English) - Page 5
Setting Up Your Daybreak, Button Layout
 |
View all Philips HF3445 manuals
Add to My Manuals
Save this manual to your list of manuals |
Page 5 highlights
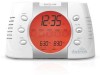
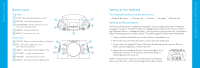
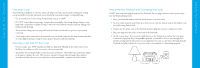
Button Layout Button Layout Top view 1 LAMP : Manual lamp brightness control 2 DISPLAY : Sets display brightness 3 SNOOZE/NAP : Delays alarm/sunrise for 9 minutes or begins a nap 4 AM/FM : Switches radio band 5 RADIO : Turns radio on or off 1 LAMP DISPLAY 2 5 RADIO AM / FM 4 3 Front view 6 SUNSET : Begins a sunset simulation at bedtime 6 7 SET : Sets clock, wake times, and sunrise/sunset durations 7 8 WAKE 1 : Sets wake mode for Wake 1 time 9 VOLUME + : Increases radio volume 8 10 VOLUME - : Decreases radio volume 11 WAKE 2 : Sets wake mode for Wake 2 time SUNSET SET WAKE 1 SNOOZE / NAP VOLUME WAKE 2 9 10 11 8 Setting Up Your Daybreak Your Daybreak package includes these items: • Daybreak Duo device • AC power cord • 9V battery • User guide • Warranty card Installing the Backup Battery A 9V battery provides power to enable your Daybreak to retain its settings and continue to keep time during power outages or if the device needs to be unplugged and moved to another location. However, your Daybreak's features-including the display-will not operate on battery power only. A fresh battery will provide backup power for at least 24 hours. To install the supplied 9V battery into the Daybreak: 1 Using a screwdriver, loosen the screw on the rear battery compartment cover. 2 Remove the cover and retrieve the battery connector from the compartment. 3 Firmly connect the supplied 9V battery. The battery should snap into the connector. Place the battery into the compartment, connector side first. 4 Replace the cover and tighten the screw. Do not over-tighten. If you find that the cover does not fit properly, check that the battery is firmly snapped into the connector. NOTE: To ensure proper operation, you should replace the 9V backup battery every three years, or after a power outage of more than 24 hours. 9 Setting Up Your Daybreak
-
 1
1 -
 2
2 -
 3
3 -
 4
4 -
 5
5 -
 6
6 -
 7
7 -
 8
8 -
 9
9 -
 10
10 -
 11
11 -
12
-
13
-
14
 |
 |
