Philips MX5500D User manual
Philips MX5500D Manual
 |
View all Philips MX5500D manuals
Add to My Manuals
Save this manual to your list of manuals |
Philips MX5500D manual content summary:
- Philips MX5500D | User manual - Page 1
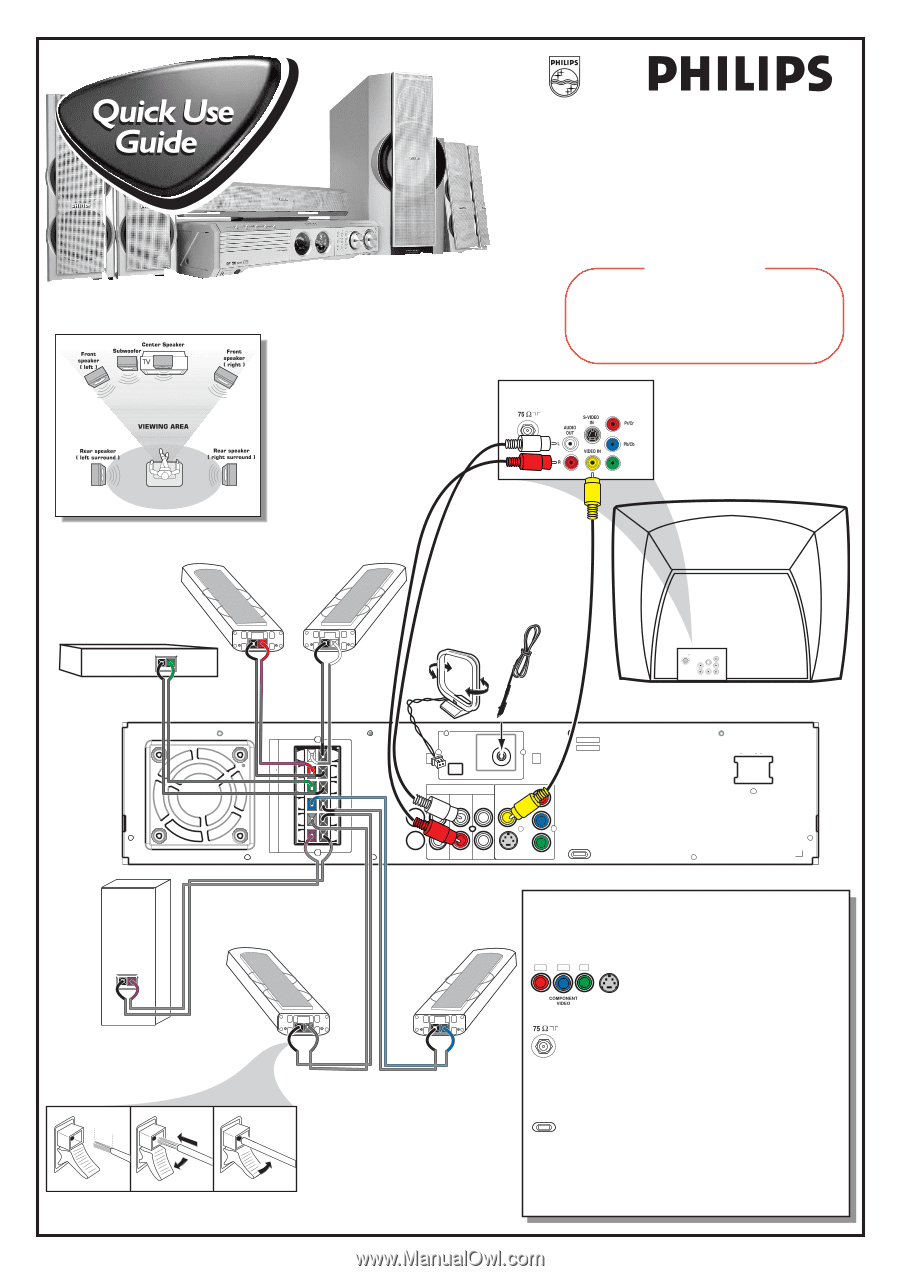
your Home Cinema experience! IMPORTANT! Attach the front speakers and the rear (surround) speakers to the mini speaker stands before making the connections to the DVD system. Refer to owner's manual for detailed set up instructions. Rear of TV (example only) Y Front Speaker (Right) Center Speaker - Philips MX5500D | User manual - Page 2
Video In channel. Or, your TV remote control may have a button or switch that chooses different video modes. Do not use channel 3 or 4 on the TV unless you are using an RF modulator. See your TV manual for more details. 3 Press OPEN•CLOSE 0 on the front of the DVD system and load a disc, then press - Philips MX5500D | User manual - Page 3
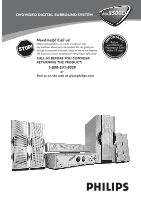
5500D DVDVIDEO DIGITAL SURROUND SYSTEM MX T! S Need help? Call us! Philips representatives are ready to help you with any questions about your new product.We can guide you through Connections, First-time Setup, or any of the Features. We want you to start enjoying your new product right away! CALL - Philips MX5500D | User manual - Page 4
AVOID DIRECT EXPOSURE TO BEAM. CAUTION Use of controls or adjustments or performance of procedures other than Corporation, and is intended for home and other limited viewing uses only All rights reserved. Manufactured under license from Digital Theater Systems, inc. US Pat. No. 5,451,942 and - Philips MX5500D | User manual - Page 5
• PAUSE STOP SEATING SOURCE SEARCH SURROUND PROG TUNING CLOCK•TIMER DVD VIDEO DIGITAL SURROUND SYSTEM VOLUME TREBLE BASS EJECT $ # ^ ( ) @ ¡ DISC/ TV/AV MEDIA TUNER AUX/DI 1 2 3 4 5 6 7 8 9 SURR. 0 VOL SOUND SYSTEM MENU DISC MENU SEATING ZOOM PREV NEXT OK STOP PLAY - Philips MX5500D | User manual - Page 6
terms and conditions of your Philips warranty. Owner Confirmation Your COVER (OR BACK). NO USER-SERVICEABLE PARTS INSIDE. REFER SERVICING TO QUALIFIED SERVICE PERSONNEL. For Customer Use Enter literature closely to prevent operating and maintenance problems. WARNING: TO PREVENT FIRE OR SHOCK - Philips MX5500D | User manual - Page 7
today.And we'll do everything in our power to keep you happy with your purchase for many years to come. As a member of the Philips "family," you're entitled to protection by one of the most comprehensive warranties and outstanding service networks in the industry. What's more, your purchase - Philips MX5500D | User manual - Page 8
block any ventilation openings. Install in accordance with the manufacturer´s instructions. 8. Do not install near any heat sources such as Refer all servicing to qualified service personnel. Servicing is required when the apparatus has been damaged in any way, such as power-supply cord system 6 - Philips MX5500D | User manual - Page 9
company. Please observe the local regulations regarding the disposal of packaging materials, exhausted batteries and old equipment. This system complies with the FCC rules, Part 15 and with 21 CFR 1040.10. Operation is subject to the following two conditions: - This device may not cause harmful - Philips MX5500D | User manual - Page 10
batteries into the remote control 20 Using the remote control to operate the system 20 Step 2: Setting the clock 20 Step 3: Setting the TV 21 Changing the NTSC/PAL setting via the remote control 21 Selecting the color system that corresponds to your TV 21 Step 4: Selecting speaker layout 22 - Philips MX5500D | User manual - Page 11
to active mode 42 Switching to Eco Power standby mode ...... 42 Switching to standby mode (view clock) ... 42 Dimming system's display screen 42 Recording to an external device 42 Using the remote to operate your television ... 42 Specifications 43 Troubleshooting 44-45 Glossary 46-47 Limited - Philips MX5500D | User manual - Page 12
Remote Control and two AA batteries DISC/ TV/AV MEDIA TUNER AUX/DI 1 2 3 4 5 6 7 8 9 SURR. 0 VOL SOUND SYSTEM MENU DISC MENU SEATING ZOOM PREV NEXT OK STOP PLAY/PAUSE DISC SKIP REPEAT REPEAT PROGRAM A-B VOICE MUTE DIM SLEEP SUB TV VOL AC power cable Mini speaker stands - Philips MX5500D | User manual - Page 13
at an angle of approximately 45 degrees from the listening position. 2 Place the center speaker above the TV or the DVD system so that the center channel's sound is localized. 3 Place the surround speakers at normal listening ear level facing each other or mounted on the wall. 4 Place the subwoofer - Philips MX5500D | User manual - Page 14
. IMPORTANT! - If both S-Video and Component (Pr Pb Y) Video connections are used to connect to your TV, the video signal will automatically switch to S-Video when you power up the DVD system. To set the VIDEO OUT(put) to 'Pr Pb Y,' see page 32. - The progressive scan video quality is only possible - Philips MX5500D | User manual - Page 15
on the TV. See your electronics retailer or contact Philips for details on RF modulator availability and operations. Using an accessory RF modulator 1 Use the composite video cable (yellow) to connect the DVD system's CVBS jack to the video input jack on the RF modulator. 2 Use the RF coaxial - Philips MX5500D | User manual - Page 16
Improper connections may damage the system due to short-circuit. - Do not connect more than one speaker to any one pair of +/- speaker jacks. - Do not connect speakers with an impedance lower than the speakers supplied. Please refer to the SPECIFICATIONS section of this manual. AM FM ANTENNA Notes - Philips MX5500D | User manual - Page 17
. Never make or change any connections with the power switched on. On the DVD system, "AUTO INSTALL - PRESS PLAY" may appear on the display panel. Press ÉÅ on the front panel to store all available radio stations or press Ç to exit (see page 37 "Tuner Operations".) PLAY • PAUSE AUTO INSTALL - PRESS - Philips MX5500D | User manual - Page 18
/Satellite Box ~ AC MAINS SPEAKER SYSTEMS SUBWOOFER SURROUND CENTER FRONT L AM R 3 FM ANTENNA C AUDIO VIDEO DIGITAL AUX TV LINE OUT Pr SL OUT playback 1 Connect the VCR or Cable/Satellite Box to the TV as shown. 2 Connect the DVD system's AUX IN (R/L) jacks to the AUDIO OUT jacks on - Philips MX5500D | User manual - Page 19
starting operation, press AUX/DI on the remote to select "DI" in order to activate the input source. Recording (digital) 2 Connect the DVD system's DIGITAL OUT jack to the DIGITAL IN jack on a digital recording device (DTS-Digital Theater System compatible, with a Dolby Digital decoder, for example - Philips MX5500D | User manual - Page 20
on page 3) Main unit and remote control 1 STANDBY ON - Switches to Eco Power standby mode or turns on the system. (see page 42) - * from the slot. 7 Speaker display panel 8 System display panel 9 TUNING - Switches between frequency tuning and preset tuning mode. (see pages 37-38) 0 PROG ( - Philips MX5500D | User manual - Page 21
speakers output will be cancelled. Control buttons available on the remote only ( SYSTEM MENU (DVD mode only) - Enters or exits system TV VOL +- Adjusts TV volume (Philips TV only.) (see page 42) º REPEAT A-B - Repeats a specific section on a disc. (see page 26) ⁄ ZOOM - Enlarges a picture on the TV - Philips MX5500D | User manual - Page 22
remote control to operate the system 1 Aim the remote control directly at the remote sensor (iR) on the front panel. 2 Select the source you wish to control by pressing one of the source select buttons on the remote control (for example TV DVD system is disconnected from the power supply, it will - Philips MX5500D | User manual - Page 23
. (See pages 12-13 "Connecting TV".) 1 Adjust SOURCE control until "DISC X" appears on the display panel (or press DISC/MEDIA on the remote.) 2 Turn on the TV and set to the correct video-in channel. You should see the blue Philips DVD background screen on the TV. ➜ Usually this channel is between - Philips MX5500D | User manual - Page 24
select 'Multi-channel.' 2 Press SEATING. ➜ The seating control diagram which represents your current speaker layout appears on the TV screen. To change the speaker layout, see "Selecting speaker layout." 3 Use the joystick (1 2 3 4) on the remote (or VOLUME control on the front panel) to select your - Philips MX5500D | User manual - Page 25
, press SYSTEM MENU. 3 Select icon and press 4. 4 Use the joystick (1 2 3 4) on the remote to navigate in the menu. Move to and press 2. Move to 'Speakers' and press instead. Except the DVD system's menu language, it will remain once selected. SETUP MENU ➠ Parental Control Password Menu Language - Philips MX5500D | User manual - Page 26
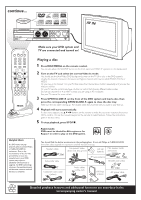
Playing discs 1 Adjust SOURCE control until "DISC X" appears on the display panel (or press DISC/MEDIA on the remote.) 2 Turn on the TV power and set to the correct Video In channel. (See page 21 "Setting the TV".) ➜ You should see the blue Philips DVD background screen on the TV. 3 Press one of the - Philips MX5500D | User manual - Page 27
power-saving feature, the system will automatically switch to Eco standby mode if you do not press any buttons within 30 minutes after a disc has stopped playing. buttons on front panel DVD system menu G Press DISC MENU on the remote. For VCD with Playback Control (PBC) feature (version 2.0 only) - Philips MX5500D | User manual - Page 28
cancel the repeat mode. Notes: - Repeat play might not work correctly with some DVDs. - For VCD, if the PBC mode is switched on, repeat play is can be stored. 4, 5 DISC/ TV/AV MEDIA TUNER AUX/DI 1 2 3 4 5 6 7 8 9 SURR. 0 VOL SOUND SYSTEM MENU DISC MENU SEATING ZOOM 6 PREV NEXT - Philips MX5500D | User manual - Page 29
Note: - If the DVD system is disconnected from the power supply, the program will be erased. Disc Operations Using the menu bar to program IMPORTANT! You have to turn on your TV and set to the correct Video In channel. (See page 21 "Setting the TV".) 1 2, 3 4 SYSTEM - Philips MX5500D | User manual - Page 30
on your TV and set to the correct Video In channel. (See page 21 "Setting the TV".) 1 Load , you can; G Use the joystick (1 2 3 4) on the remote to move within the menu and press OK to select the desired file , then press SYSTEM MENU. ➜ The menu bar will appear across the top of the TV screen. 2 - Philips MX5500D | User manual - Page 31
storage systems with format. Supported memory control until "MEDIA SLOT" appears on the display panel (or press DISC/MEDIA twice on the remote.) 4 Turn on the TV power and set to the correct Video In channel. (See page 21 "Setting the TV DVD playback, the picture/ sound from the disc may freeze/ - Philips MX5500D | User manual - Page 32
1 In disc mode, press SYSTEM MENU. ➜ The menu bar will appear across the top of the TV screen. 2 Use the joystick (1 2 3 4) on the remote to navigate in the menu. a slow playback speed. The volume will be muted. To resume normal playback, press ÉÅ. DVD : SF x2, SF x4, SF x8, SR x2, SR x4, SR x8. VCD - Philips MX5500D | User manual - Page 33
. Follow the steps of "Using the Setup Menu" and select : > TV Shape TV Shape TV System Video Output Screen saver 4:3 panscan 4:3 letterbox 16:9 Set TV shape mode 4:3 panscan Select this if you have a conventional TV and your DVD is not formatted for wide screen viewing. A wide picture will - Philips MX5500D | User manual - Page 34
DVD system to your TV using the S-Video jack. Scart / Pr Pb Y Select this if you have connected the DVD system to your TV DVD home cinema system's playback capability. This function can also be accessed via the SURR. button on the remote control only the two front speakers and subwoofer. 3D Sound Select - Philips MX5500D | User manual - Page 35
Code Modulation) output only after you have set the system's Digital Output to 'PCM only.' (See "Setting the digital output".) Follow the steps of "Using the Setup Menu" and select : > PCM Output Digital Output Night mode Analog Output Speakers Speaker Layout PCM Output 48 kHz 96 kHz Set PCM - Philips MX5500D | User manual - Page 36
DVD Menu Options Night mode - turning on/off Follow the steps of "Using the Setup Menu" and select : > Night Mode Digital Output Night mode Off Analog Output On Speakers Speaker Parental Control Password Menu Language Defaults Reset Load factory settings Reset Pressing 2 on the remote will - Philips MX5500D | User manual - Page 37
the password." 5 Select a rating level and press OK. ➜ DVDs that are rated above the level you selected will not play remote to navigate in the menu. Move to and press 2. Move to 'Parental Control' and press 2. Parental Control Password Menu Language Defaults Set Parental control 6 Press SYSTEM - Philips MX5500D | User manual - Page 38
➠ English DVD Menu Options Changing the password You can change the four-digit password used for Parental Control. The default password is '1234.' SETUP MENU 4, 5, 6 1, 7 2, 3 DISC/ TV/AV MEDIA TUNER AUX/DI 1 2 3 4 5 6 7 8 9 SURR. 0 VOL SOUND SYSTEM MENU DISC MENU SEATING ZOOM - Philips MX5500D | User manual - Page 39
the remote (or adjust SOURCE control on front panel) to select "FM TUNER" or "AM TUNER." 2 Press and hold S / T on the remote until the DVD VIDEO DIGITAL SURROUND SYSTEM VOLUME TREBL BASS EJECT 1 Connect the system to the power supply, "AUTO INSTALL - PRESS PLAY" appears. OR In Eco Power . 37 - Philips MX5500D | User manual - Page 40
SYSTEM MENU DISC MENU DVD system's display panel 1 FM TUNER P01 2 FM 98:00 SEATING ZOOM PREV NEXT OK STOP PLAY/PAUSE DISC SKIP REPEAT REPEAT PROGRAM A-B 3 VOICE MUTE DIM SLEEP SUBW TV VOL AUTO PROGRAM 1 Press TUNER on the remote (or adjust SOURCE control overridden. Manual presetting - Philips MX5500D | User manual - Page 41
to switch on the DVD system. 2 Press and hold CLOCK•TIMER until "SELECT CLOCK OR TIMER" appears. 3 Press T (if necessary) to change the display to "TIMER," then press CLOCK•TIMER again to confirm. 4 Adjust SOURCE (or press DISC/MEDIA or TUNER on the remote to Eco Power standby - Philips MX5500D | User manual - Page 42
English Timer Operations Setting the Sleep timer The sleep timer enables the system to switch to Eco Power standby mode automatically at a preset time. G Press SLEEP on the remote repeatedly until it reaches the desired preset turn-off time. ➜ The selections are as follows (time in minutes): 15 ™ - Philips MX5500D | User manual - Page 43
speakers operate only when the DVD home cinema system is set to Multi-channel mode. ➜ The available output modes for Multi-channel include: Dolby Digital, DTS (Digital Theater Systems , CLASSIC or JAZZ. Volume control G Adjust VOLUME control (or press VOL +/-on the remote) to increase or decrease the - Philips MX5500D | User manual - Page 44
: - All the sound control features are available for selection. - Refer to the owner's manual of the connected equipment for details. Using the remote to operate your television 1 2 DISC/ TV/AV MEDIA TUNER AUX/DI 1 2 3 4 5 6 7 8 9 SURR. 0 VOL SOUND SYSTEM MENU DISC MENU SEATING - Philips MX5500D | User manual - Page 45
MAIN UNIT Power Supply Rating Power Consumption Dimensions (w x h x d) Weight 120 V / 60 Hz 155 W 435 mm x 100 mm x 360 mm 17.13 x 3.94 x 14.17 (inch) 7.15 kg / 15.73 pounds SPEAKERS Front speakers / Rear (surround) speaker System triple driver Impedance 8 Ω Speaker drivers 2 x 3" woofer - Philips MX5500D | User manual - Page 46
connected. - Press the STANDBY ON on the front of the DVD system to turn on the power. - Refer to your TV's manual for correct Video In channel selection. Change the TV channel until you see the DVD screen. (see page 21) - Press DISC on the remote. - Switch the P-SCAN at the back panel to "OFF - Philips MX5500D | User manual - Page 47
Troubleshooting Problem The DVD player does not start playback. Cannot activate some features, such as Angles, Subtitles, or multi-language Audio. There is no sound from the center and surround speakers. Radio reception is poor. The remote control distance between the system and your TV or VCR. - - Philips MX5500D | User manual - Page 48
DVD System that send high-quality video to a TV that controlling reproduction. By using menu screens recorded on a Video CD or SVCD that supports PBC, you can enjoy interactive-type software as well as software having a search function. Plug and Play: After power up, the system will prompt the user - Philips MX5500D | User manual - Page 49
the room, providing maximum flexibility and real total immersion because the user can choose their preferred seat. Surround: A system for creating realistic three-dimensional sound fields full of realism by arranging multiple speakers around the listener. Title: The longest section of a picture or - Philips MX5500D | User manual - Page 50
and/or part replacement because of misuse, accident, unauthorized repair or other cause not within the control of Philips. • reception problems caused by signal conditions or cable or antenna systems outside the unit. • a product that requires modification or adaptation to enable it to operate in
-
 1
1 -
 2
2 -
 3
3 -
 4
4 -
 5
5 -
 6
6 -
 7
7 -
8
-
9
-
10
-
11
-
12
-
13
-
14
-
15
-
16
-
17
-
18
-
19
-
20
-
21
-
22
-
23
-
24
-
25
-
26
-
27
-
28
-
29
-
30
-
31
-
32
-
33
-
34
-
35
-
36
-
37
-
38
-
39
-
40
-
41
-
42
-
43
-
44
-
45
-
46
-
47
-
48
-
49
-
50
 |
 |
P-SCAN
ON
OFF
Pb
DIGITAL
OUT
DIGITAL
IN
AUX
IN
TV
IN
LINE
OUT
AUDIO
VIDEO
OUT
CVBS
S-VIDEO
FM ANTENNA
AM
L
R
~ AC MAINS
SPEAKER SYSTEMS (8
Ω
)
SUB-
WOOFER SURROUND CENTER
FRONT
L
R
SL
SUB
SR
C
Pr
Y
Front Speaker
(Right)
Center Speaker
Front Speaker
(Left)
Rear Speaker
(Surround Left)
.047"
(12mm)
PUSH IN
PUSH
DOWN
Subwoofer
a
b
c
Rear Speaker
(Surround Right)
FM Antenna
AM Antenna
Rear of TV
(example only)
75
V
Y
MX5500D
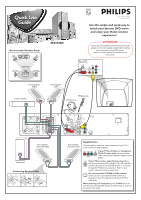
Use this simple and quick way to
watch your favorite DVD movie
and enjoy your Home Cinema
experience!
Connecting Speaker Cable
Recommended Speaker Setup
Helpful Hints
You only need to make one video connection to your TV in
order to view the DVD playback.
If your TV has S-Video or Component
(Pr Pb Y) video jacks
, use one of these
video connections instead for higher picture
quality.
If your TV has only a single Antenna In jack
, you
will need an accessory RF modulator.
The RF modulator
converts the video from the DVD system so it can play
through the TV’s Antenna connector.
Refer to your
owner’s manual for proper connection.
Do not switch the
P-SCAN
to ‘ON’ position
,
unless you have connected the DVD system to a
Progressive Scan TV using the Component (Pr Pb Y)
video jacks.
When listening to TV programs
, press
TV/AV
button on
the remote to set the DVD system to TV/AV mode in order for
the sound to be heard.
Pr/Cr
Pb/Cb
Y
S-VIDEO
IN
ANTENNA IN
P-SCAN
ON
OFF
12nc: 3139 115 22081
Printed in China
IMPORTANT!
Attach the front speakers and the rear (surround)
speakers to the mini speaker stands before making
the connections to the DVD system.
Refer to owner’s manual for detailed set up
instructions.