Philips REM250 User manual - Page 2
Setting Up Your Remote Control, About Batteries - manual
 |
View all Philips REM250 manuals
Add to My Manuals
Save this manual to your list of manuals |
Page 2 highlights
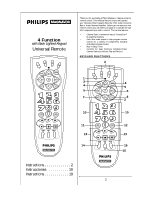
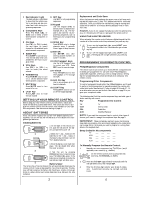
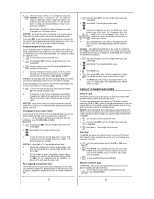
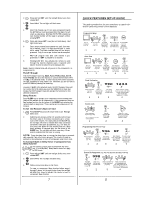
1 Red Indicator Light The Red Indicator Light blinks to show that the remote control is working and also provides feed back during programming sequences. 2 Component Keys Press TV, VCR, CBL or AUD once to select a home entertainment component to control. 3 CH Keys Use CH+ (or CH-) to select the next higher (or lower) channel for the selected home entertainment component. 4 SLEEP Key Press SLEEP to activate your TV's internal sleep timer (not available for all TVs) or to program timer. 5 VOL Keys Use VOL+ (or VOL-) to raise (or lower) the sound volume. 6 POWER Key Press POWER once to turn on or off the selected home entertainment component. 7 MUTE Key Press MUTE once to turn sound off or on. 8 LAST Key Press LAST once to recall the last channel. 9 SET Key Use SET for all programming sequences. 10 Keypad Use the keypad (0-9) to directly enter in channels (for example, 09 or 31). The keypad is also used for all programming sequences, such as entering in your programming codes. 11 SCAN Key Press SCAN once to change channels every 3 seconds. Press it again to stop the scan. 12 ENTER Use ENTER once after entering channel numbers on some TV models. 13 VCR Transport Keys Use the VCR Transport Keys to control your VCR. Press REC twice to record a tape. 14 TV/VCR Press TV/VCR once to view VCR playback or TV through the VCR. 15 FAV CH Key Use to pre-program up to 10 favorite channels. 16 LIGHT Key Press LIGHT once to turn on or off the keypad backlight. SETTING UP YOUR REMOTE CONTROL Before using your new remote control, you will need to obtain and install new batteries, as described below. Then you'll also need to program the remote control with the correct code numbers for your specific components. See instructions starting on page 4. ABOUT BATTERIES Note: The remote requires two (2) new "AA" alkaline batteries (not supplied). Do not mix old and new batteries or mix alkaline with manganese-type batteries. Installing Batteries 1. On the back of the remote control, push the tab and lift the battery compartment cover off. 1 2. Match the + and - marks on the batteries to the + and - marks in the battery case and insert two (2) "AA" alkaline batteries. 3. Press the battery cover back into place. The tab should click when the cover is locked. 2 4. Test the unit by pressing POWER and any Component key (e.g., TV, VCR, CBL, etc.). If the batteries are inserted correctly the red indicator light will blink once. 3 Battery Saver The remote has a Time Out feature that will automatically deactivate the remote control if a key is depressed for more than 30 seconds. This fea- ture will help conserve the battery life should your remote control get stuck in a place where keys remain depressed (e.g., between the sofa cushions). 3 Replacement and Code Saver When the batteries need replacing the remote control will stop working and will require two (2) new "AA" alkaline batteries for continued operation. Once you remove the old batteries, program settings and codes will be saved for 10 minutes, allowing adequate time to insert new ones. However, if you do not replace the batteries within the allotted time (e.g., 10 minutes), you will have to reprogram the remote control. USING THE LIGHTED KEYPAD When activated, the remote control features a lighted keypad that illuminates all of the remote control keys whenever you press any key. 1. To turn on the keypad back light, press LIGHT once. The keypad will remain lit for 5 seconds after you release any key. 2. To turn off the keypad back light, press LIGHT once again. (The keypad will not light whenever you press any key.) PROGRAMMING YOUR REMOTE CONTROL Philips/Magnavox Components The remote control can control up to three different components and is already pre-programmed for use with newer Philips/Magnavox audio/video equipment. Unless you want to change a factory setting, skip the programming instructions and simply start using your new remote control. Programming Other Components To control component brands other than Philips/Magnavox, you'll need to perform the following steps to manually program the remote with codes listed under Manufacturer's Codes on pages 28 through 37. Or as an alternative, you can use the Auto Scan feature, on page 5, to program your component codes. The following chart lists the remote component keys and what type of device each key will control: Key Programmed to Control TV VCR CBL AUD TV VCR or DVD Cable Box Amplifier/Receiver NOTE: If you want the component keys to control other types of devices, you'll need to reassign the component keys. See page 5. IMPORTANT: Please completely read and review the following steps before proceeding. We recommend highlighting the codes (starting on page 28), for the brands you wish to program or writing them down in the supplied chart. Setup Codes for My components TV VCR CBL AUD To Manually Program the Remote Control: 1. Manually turn on a component (e.g.,TV,VCR, etc.) and, if applicable, insert media (e. g., cassette). 2. On the remote control, press a component key once (e.g., TV,VCR,CBL, or AUD). 3. Press and hold SET (approximately 5 seconds) until the red light blinks twice, then release SET. 4. Enter the first four-digit code for your brand of compo- nent. If performed correctly, the red light will blink twice. 4
-
 1
1 -
 2
2 -
 3
3 -
 4
4 -
 5
5 -
 6
6 -
 7
7 -
 8
8 -
9
-
10
 |
 |