Pioneer CNDV-40R Operation Manual - Page 86
Using the high pass filter, Adjusting source levels
 |
View all Pioneer CNDV-40R manuals
Add to My Manuals
Save this manual to your list of manuals |
Page 86 highlights
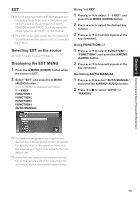
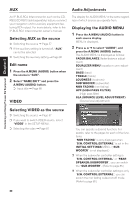
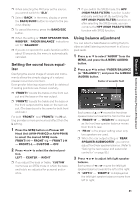
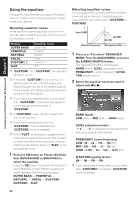
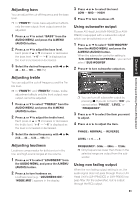
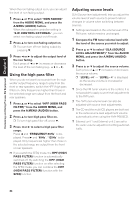
Combining and Using Pioneer AV Equipment Chapter 5 When the non fading output is on, you can adjust the level of non fading output. 1 Press 5 or ∞ to select "NON FADING" from the AUDIO MENU, and press the A.MENU (AUDIO) button. When the subwoofer controller setting is "S.W. CONTROL:EXTERNAL", you can select non fading output on/off mode. 2 Press 5 to turn non fading output on. ❒ You can turn off non fading output by pressing ∞. 3 Press 2 or 3 to adjust the output level of the non fading. Each press of 2 or 3 increases or decreases the level of the non fading (e.g., + 6 to - 6). Using the high pass filter When you do not want low sounds from the subwoofer output frequency range to play from the front or rear speakers, switch the HPF (high pass filter) on. Only frequencies higher than those in the selected range are output from the front and rear speakers. 1 Press 5 or ∞ to select "HPF (HIGH PASS FILTER)" from the AUDIO MENU, and press the A.MENU (AUDIO) button. 2 Press 5 to turn high pass filter on. ❒ To turn high pass filter off, press ∞. 3 Press 2 or 3 to select a high pass filter range. Press 2 and "FREQUENCY:50Hz" is displayed. Press 3 and "80Hz", "125Hz" is displayed. Only frequencies higher than those in the selected range are output from the front or rear speakers. ❒ If you switch the SFEQ mode, the HPF (HIGH PASS FILTER) function is automatically switched off. By switching the HPF (HIGH PASS FILTER) function on after selecting the SFEQ mode, you can combine the HPF (HIGH PASS FILTER) function with the SFEQ function. Adjusting source levels SLA (Source level adjustment) lets you adjust the volume level of each source to prevent radical changes in volume when switching between sources. ❒ Settings are based on the volume level of the FM tuner, which remains unchanged. 1 Compare the FM tuner volume level with the level of the source you wish to adjust. 2 Press 5 or ∞ to select "SLA (SOURCE LEVEL ADJUSTMENT)" from the AUDIO MENU, and press the A.MENU (AUDIO) button. 3 Press 5 or ∞ to adjust the source volume. Each press of 5 or ∞ increases or decreases the source volume. ❒ "LEVEL:+4" - "LEVEL:- 4" is displayed as the source volume is increased or decreased. ❒ Since the FM tuner volume is the control, it is not possible to apply source level adjustments to the FM tuner. ❒ The AM tuner volume level can also be adjusted with source level adjustments. ❒ The CD and the multi-CD players are both set to the same source level adjustment volume automatically when using the AVH-P6400CD. ❒ External unit 1 and External unit 2 are set to the same volume adjustment setting automatically. 84
-
 1
1 -
2
-
3
-
4
-
5
-
6
-
7
-
8
-
9
-
10
-
11
-
12
-
13
-
14
-
15
-
16
-
17
-
18
-
19
-
20
-
21
-
22
-
23
-
24
-
25
-
26
-
27
-
28
-
29
-
30
-
31
-
32
-
33
-
34
-
35
-
36
-
37
-
38
-
39
-
40
-
41
-
42
-
43
-
44
-
45
-
46
-
47
-
48
-
49
-
50
-
51
-
52
-
53
-
54
-
55
-
56
-
57
-
58
-
59
-
60
-
61
-
62
-
63
-
64
-
65
-
66
-
67
-
68
-
69
-
70
-
71
-
72
-
73
-
74
-
75
-
76
-
77
-
78
-
79
-
80
-
 81
81 -
 82
82 -
 83
83 -
 84
84 -
 85
85 -
 86
86 -
 87
87 -
 88
88 -
 89
89 -
 90
90 -
 91
91 -
92
-
93
-
94
-
95
-
96
-
97
-
98
-
99
-
100
-
101
-
102
-
103
-
104
-
105
-
106
-
107
-
108
-
109
-
110
-
111
-
112
-
113
-
114
-
115
-
116
-
117
-
118
-
119
-
120
 |
 |
