Pioneer D814-K Installation Manual - Page 24
Connecting up, Connecting additional amplifiers
 |
UPC - 012562675862
View all Pioneer D814-K manuals
Add to My Manuals
Save this manual to your list of manuals |
Page 24 highlights
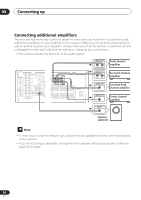
04 Connecting up Connecting additional amplifiers This receiver has more than sufficient power for any home use, however it is possible to add additional amplifiers to every channel on this receiver. Make the connections shown below to add amplifiers to power your speakers. Always make sure that the receiver is switched off and unplugged from the wall outlet before making or changing any connections. • The arrows indicate the direction of the audio signal. IN DIGITAL OUT OPT IN AUX FM UNBAL AM SIGNABLE / LD) IN ¥ L L SURROUND BACK CD 75 Ω LOOP ANTENNA MONITOR OUT OUT OPT 2 OUT DVR/ VCR (DVR/VCR) IN OPT 1 ASSIGNABLE DIGITAL IN (TV / SA T ) IN COAX 2 (CD) IN COAX 1 (DVD OUT /LD) IN TV / SA T IN DVD /LD FRONT D V D 5.1CH REC INPUT CD-R IN / TAPE / MD IN PLAY R AUDIO L VIDEO CONTROL IN OUT PB PR OSUATT) IN ø R R FRONT SURROUND CENTER PREOUT DVCRVRRR/OUND BACK L R SURROUND L IN R FRONT L MONITOR TV/ OUT SAT SINI N G L E SEE INSTRUCTION B SUB MANUAL WOOFER DVD PREOUT / LD IN S-VIDEO AC OUTLET ANALOG IN L R ANALOG IN L R ANALOG IN Front channel amplifier Surround channel amplifier Surround back channel amplifier ANALOG IN Center channel amplifier INPUT Powered subwoofer • To hear sound only from the pre-outs, disconnect any speakers that are connected directly to the receiver. • If you're not using a subwoofer, change the front speaker setting (see Speaker setting on page 43) to large. 24 En
-
 1
1 -
2
-
3
-
4
-
5
-
6
-
7
-
8
-
9
-
10
-
11
-
12
-
13
-
14
-
15
-
16
-
17
-
18
-
 19
19 -
 20
20 -
 21
21 -
 22
22 -
 23
23 -
 24
24 -
 25
25 -
 26
26 -
 27
27 -
 28
28 -
 29
29 -
30
-
31
-
32
-
33
-
34
-
35
-
36
-
37
-
38
-
39
-
40
-
41
-
42
-
43
-
44
-
45
-
46
-
47
-
48
-
49
-
50
-
51
-
52
-
53
-
54
-
55
-
56
-
57
-
58
-
59
-
60
-
61
-
62
-
63
-
64
-
65
-
66
-
67
-
68
-
69
-
70
-
71
 |
 |
