Pioneer DEH-1200MP Owner's Manual
Pioneer DEH-1200MP Manual
 |
UPC - 012562971131
View all Pioneer DEH-1200MP manuals
Add to My Manuals
Save this manual to your list of manuals |
Pioneer DEH-1200MP manual content summary:
- Pioneer DEH-1200MP | Owner's Manual - Page 1
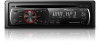
English Français Español CD RECEIVER AUTORADIO CD RADIO CD DEH-1200MP Owner's Manual Mode d'emploi Manual de instrucciones - Pioneer DEH-1200MP | Owner's Manual - Page 2
accept any interference received, including interference that may cause undesired operation. Information to User Alteration or modifications record this number on the enclosed warranty card. About this unit The tuner frequencies on this unit are allocated for use in North America. Use in other - Pioneer DEH-1200MP | Owner's Manual - Page 3
loss or theft. ! Access owner's manuals, spare parts information, service information, and much more. U.S.A. Pioneer Electronics (USA) Inc. CUSTOMER SUPPORT DIVISION P.O. Box 1760 Long Beach, CA 90801-1760 800-421-1404 CANADA Pioneer Electronics of Canada, Inc. CUSTOMER SATISFACTION DEPARTMENT 300 - Pioneer DEH-1200MP | Owner's Manual - Page 4
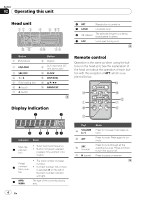
Detach 9 AUX input jack (3.5 mm stereo jack) a CLOCK b DISP/SCRL c a/b/c/d d BAND/ESC Display indication 1 2 3 4 5 67 Indicator State Main dis1 play sec- tion ! Tuner: band and frequency ! Built-in CD player: elapsed playback time the head unit. See the explanation of the head unit about the - Pioneer DEH-1200MP | Owner's Manual - Page 5
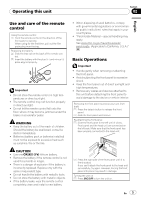
or vehicle interior. Removing the front panel to protect your unit from theft 1 Press the detach button to release the front panel. 2 Grab the front install a new battery. 2 Press the right side of the front panel until it is firmly seated. If you can't attach the front panel to the head unit - Pioneer DEH-1200MP | Owner's Manual - Page 6
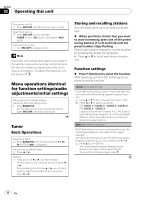
between: TUNER (tuner)-CD (built-in CD player)-AUX (AUX) Adjusting the volume 1 Turn SRC/OFF to adjust volume. Note When this unit's blue/white lead Larger setting number is higher level. The highest level setting allows reception of only the strongest stations, while lower settings let you receive - Pioneer DEH-1200MP | Owner's Manual - Page 7
Operating this unit Section 02 English CD Basic Operations Playing a CD/CD-R/CD-RW 1 Insert the disc, label side up, into the disc loading slot. 1 If a disc has already been inserted, press SRC/ OFF to select the built-in CD player. Ejecting a CD/CD-R/CD-RW 1 Press h. Selecting a folder 1 Press a - Pioneer DEH-1200MP | Owner's Manual - Page 8
(audio) to select the audio function. After selecting, perform the following procedures to set the audio function. FAD (fader/balance adjustment) You can change the fader/balance setting. 1 Press a or b to adjust front/rear speaker balance. Adjustment range (front/rear): FAD F15 to FAD R15 FAD 0 is - Pioneer DEH-1200MP | Owner's Manual - Page 9
using auxiliary device connected to this unit. 1 Press a or b to turn auxiliary setting on or off. Turning the clock display on or off % Press CLOCK to turn the clock display on or off. Each press of CLOCK turns the clock display on or off. # The clock display disappears temporarily when you perform - Pioneer DEH-1200MP | Owner's Manual - Page 10
). Do not use 1 W to 3 W speakers for this unit. ! The black cable is ground. When installing this unit or power amp (sold separately), make sure to connect the ground wire first. Ensure that the ground wire is properly connected to metal parts of the car's body. The ground wire of the power amp and - Pioneer DEH-1200MP | Owner's Manual - Page 11
Connections Connection diagram This product Rear output Antenna jack Fuse (10 A) Section 03 Power 2 speaker system, do not connect anything to the speaker leads that are not connected to speakers. Gray Gray/black Violet Violet/black Front speaker Right Rear speaker Rear speaker Perform these - Pioneer DEH-1200MP | Owner's Manual - Page 12
screwdriver to bend the metal tabs (90°) into place. Dashboard Mounting sleeve 3 Install the unit as illustrated. Nut Firewall or metal support Screw Metal strap DIN front/rear mount This unit can be properly installed either from "Front" (conventional DIN front-mount) or "Rear" (DIN rear-mount - Pioneer DEH-1200MP | Owner's Manual - Page 13
to detach the front panel, the front panel can be fastened with the supplied screw. English Mounting bracket Dashboard or console ! Use either truss (5 mm × 8 mm) or flush surface (5 mm × 9 mm) screws, depending on the bracket screw holes. Removing the unit 1 Extend top and bottom of the trim ring - Pioneer DEH-1200MP | Owner's Manual - Page 14
text informapears when a tion embedded display is changed (e.g., NO TTTL). Switch the display or play another track/file. The unit is mal- You are using a Move player Use only discs featuring either of following two logos. Error messages When you contact your dealer or your nearest Pioneer Service - Pioneer DEH-1200MP | Owner's Manual - Page 15
standard, it may not be possible to play the CD side with this unit. Frequent loading and ejecting of a DualDisc may result in scratches on the disc. Serious scratches can lead to playback problems on this unit. In some cases, a DualDisc may become stuck in the disc loading slot and will not eject - Pioneer DEH-1200MP | Owner's Manual - Page 16
be a slight delay when starting playback of audio files embedded with image data. Sequence of audio files The user cannot assign folder numbers and specify playback sequences with this unit. Example of a hierarchy 01 02 MP3 Supply of this product only conveys a license for private, non-commercial - Pioneer DEH-1200MP | Owner's Manual - Page 17
Treble Frequency 10 kHz Gain 12 dB CD player System Compact disc audio system Usable discs Compact (stereo) WMA decoding format ......... Ver. 7, 7.1, 8, 9, 10, 11 (2ch audio) (Windows Media Player) ratio 62 dB (IHF-A network) CEA2006 Specifications Power output 14 W RMS × 4 Channels (4 W and ≦ - Pioneer DEH-1200MP | Owner's Manual - Page 18
sans avoir pris contact au préalable. États-Unis Pioneer Electronics (USA) Inc. CUSTOMER SUPPORT DIVISION P.O. Box 1760 Long Beach, CA 90801-1760 800-421-1404 CANADA Pioneer Électroniques du Canada, Inc. Département de service aux consommateurs 300 Allstate Parkway Markham, Ontario L3R 0P2 1-877 - Pioneer DEH-1200MP | Owner's Manual - Page 19
de la face avant Jack d'entrée AUX 9 (jack stéréo 3,5 mm) a CLOCK b DISP/ SCRL c a/b/c/d d BAND/ESC Section 02 Français Indicateur État ! Syntoniseur : gamme et fré- Section quence 1 d'affichage ! Lecteur de CD en service. 5 LOUD La correction physiologique est en service. 6 - Pioneer DEH-1200MP | Owner's Manual - Page 20
pour mettre la source hors service. Appuyez sur cette touche usagées, respectez les règlements nationaux ou les instructions locales en vigueur dans le pays ou la région enlevez ou remontez la face avant, manipulez-la doucement. ! Évitez de heurter la face avant. ! Conservez la face avant à l'abri - Pioneer DEH-1200MP | Owner's Manual - Page 21
OFF jusqu'à ce que l'appareil se mette hors service. Français 2 Appuyez sur le côté droit de la face avant jusqu'à ce qu'elle soit bien en soit mis hors service. Choix d'une source 1 Appuyez sur SRC/OFF pour parcourir les options disponibles : TUNER (syntoniseur)-CD (lecteur de CD intégré) -AUX - Pioneer DEH-1200MP | Owner's Manual - Page 22
ées grâce aux touches 1 à 6. 1 Appuyez sur a pour mettre en service BSM. Les six fréquences d'émission les plus puissantes sont mémorisées dans l' . Pour annuler la mise en mémoire, appuyez sur b. CD Opérations de base Lecture d'un CD/CD-R/CD-RW 1 Introduisez un disque, l'étiquette vers le haut, dans - Pioneer DEH-1200MP | Owner's Manual - Page 23
lection des informations textuelles désirées 1 Appuyez sur DISP/SCRL. Disques CD TEXT: Temps de lecture-titre du disque-nom de l'interprète du ou b pour mettre la lecture aléatoire en service ou hors service. Quand la fonction lecture aléatoire est en service, RDM est affiché sur l'écran. Si vous - Pioneer DEH-1200MP | Owner's Manual - Page 24
1 Appuyez sur a ou b pour régler le volume de la source. Plage de réglage : SLA +4 à SLA -4 Remarque Vous pouvez également mettre en service, ou hors service, la correction physiologique en appuyant sur EQ/LOUD et en maintenant cette touche enfoncée. Utilisation de l'égaliseur % Appuyez sur EQ/LOUD - Pioneer DEH-1200MP | Owner's Manual - Page 25
sur a ou b pour mettre le réglage auxi- liaire en service ou hors service. Mise en service ou hors service de l'affichage de l'horloge % Appuyez sur CLOCK pour mettre l'affichage de l'horloge en service ou hors service. Chaque pression sur CLOCK provoque l'affichage de l'horloge ou son extinction - Pioneer DEH-1200MP | Owner's Manual - Page 26
un dysfonctionnement. ! Pour éviter un court-circuit, une surchauffe ou un dysfonctionnement, assurez-vous de respecter les instructions suivantes. - Déconnectez la borne négative de la batterie avant l'installation. - Fixez le câblage avec des serre-fils ou de la bande adhésive. Pour protéger le - Pioneer DEH-1200MP | Owner's Manual - Page 27
Connexions Schéma de connexion Ce produit Sortie arrière Jack d'antenne Fusible (10 A) Section 03 Amplificateur de puissance (vendu séparément) Connectez avec des câbles RCA (vendus séparément) Français Jaune Connectez à la borne d'alimentation 12 V permanente. Rouge Connectez à la borne contr - Pioneer DEH-1200MP | Owner's Manual - Page 28
installation finale. ! N'utilisez pas de pièces non autorisées car il peut en résulter des dysfonctionnements. ! Consultez votre revendeur si l'installation Écrou Pare-feu ou support métallique Attache en métal Vis Montage avant/arrière DIN Cet appareil peut être installé correctement soit à partir - Pioneer DEH-1200MP | Owner's Manual - Page 29
Installation Section 04 Montage arrière DIN 1 Déterminez la position appropriée où les trous sur le support et sur le côté de l'appareil se correspondent. 3 Tirez l'appareil hors du tableau de bord. Français 2 Serrez deux vis de chaque côté. Vis Fixation de la face avant Si vous ne souhaitez - Pioneer DEH-1200MP | Owner's Manual - Page 30
lec- l'étendue de ré- tendue de répéti- ture change de pétition de lec- tion de lecture. manière contactez votre distributeur ou le Service d'entretien agréé par Pioneer le plus proche, n'oubliez de CD. ERROR-15 Le disque inséré Utilisez un autre est vierge. disque. ERROR-22, 23 Format CD non - Pioneer DEH-1200MP | Owner's Manual - Page 31
faces avec un CD enregistrable pour l'audio sur une face et un DVD enregistrable pour la vidéo sur l'autre. Comme la face CD des DualDiscs n'est pas physiquement compatible avec le standard CD général, la lecture de la face CD : WMA encodé par Windows Media Player Extension de fichier : .wma Débit - Pioneer DEH-1200MP | Owner's Manual - Page 32
Annexe Informations complémentaires WAV Format compatible : PCM Linéaire (LPCM), MS ADPCM Extension de fichier : .wav Bits de quantification : 8 et 16 (LPCM), 4 (MS ADPCM) Fréquence d'échantillonnage : 16 kHz à 48 kHz (LPCM), 22,05 kHz et 44,1 kHz (MS ADPCM) Disque Hiérarchie des dossiers pouvant ê - Pioneer DEH-1200MP | Owner's Manual - Page 33
Informations complémentaires MP3 La vente de ce produit comporte seulement une licence d'utilisation privée, non commerciale, et ne comporte pas de licence ni n'implique aucun droit d'utilisation de ce produit pour une diffusion commerciale (c'est-à-dire générant des revenus) en temps réel ( - Pioneer DEH-1200MP | Owner's Manual - Page 34
Gain 12 dB Aigus Fréquence 10 kHz Gain 12 dB Lecteur de CD Système Compact Disc Digital Audio Disques utilisables Disques compacts Rapport signal/bruit WMA Ver. 7, 7.1, 8, 9, 10, 11 (2 canaux audio) (Windows Media Player) Format de décodage MP3 ... MPEG-1 & 2 Couche Audio 3 Format du signal - Pioneer DEH-1200MP | Owner's Manual - Page 35
EE.UU. Pioneer Electronics (USA) Inc. CUSTOMER SUPPORT DIVISION P.O. Box 1760 Long Beach, CA 90801-1760 800-421-1404 CANADÁ Pioneer Electronics of Canada, Inc. CUSTOMER archivos en caso de pérdida o robo. ! Acceso a manuales del propietario, información sobre piezas de recambio y mucho más. Es 35 - Pioneer DEH-1200MP | Owner's Manual - Page 36
Conector de entra9 da AUX (conector estéreo de 3,5 mm) 3 SRC/OFF a CLOCK 4 1a6 b DISP/SCRL 5 Ranura de carga de discos c a/b/c/d 6 h (expulsar la pan- talla ! Sintonizador: banda y frecuencia ! Reproductor de CD incorporado: tiempo de reproducción transcurrido e información de texto ! El - Pioneer DEH-1200MP | Owner's Manual - Page 37
a distancia Uso del mando a distancia 1 Apunte el mando a distancia hacia la carátula para que funcione la unidad. Al utilizar el mando a distancia por primera produzcan fugas de la pila, limpie completamente el mando a distancia e instale una pila nueva. ! Para desechar las pilas usadas, cumpla con - Pioneer DEH-1200MP | Owner's Manual - Page 38
unidad. 2 Pulse el lado derecho de la carátula hasta que se asiente firmemente. Si no puede para desplazarse entre: TUNER (sintonizador)-CD (reproductor de CD incorporado)-AUX (AUX) Ajuste del volumen deseada (F1, F2, F3 para FM o AM). Sintonización manual (paso a paso) 1 Pulse c o d. Búsqueda 1 - Pioneer DEH-1200MP | Owner's Manual - Page 39
de mayor intensidad se almacenarán en orden según la intensidad de las señales. Para cancelar el proceso de almacenamiento, presione b. CD Funciones básicas Reproducción de un CD/CD-R/CD-RW 1 Inserte el disco en la ranura de carga de discos con el lado de la etiqueta hacia arriba. 1 Si ya se - Pioneer DEH-1200MP | Owner's Manual - Page 40
Sección 02 Utilización de esta unidad ! Al reproducir archivos MP3 grabados con VBR (velocidad de grabación variable), aparece VBR en lugar del valor de velocidad de grabación. Ajustes de funciones % Pulse F (función) para seleccionar la función. Una vez seleccionada, siga los siguientes pasos para - Pioneer DEH-1200MP | Owner's Manual - Page 41
Utilización de esta unidad Sección 02 Español Ajustes de audio Ajustes de audio % Pulse A (audio) para seleccionar la función de audio. Una vez seleccionada, siga los siguientes pasos para ajustar la función de audio: FAD (ajuste del fader/balance) Puede cambiar el ajuste de fader/balance. 1 - Pioneer DEH-1200MP | Owner's Manual - Page 42
Sección 02 Utilización de esta unidad Activación y desactivación de la visualización del reloj % Pulse CLOCK para activar o desactivar la visualización del reloj. Cada vez que se presiona CLOCK, se activa o desactiva la visualización del reloj. # La visualización del reloj desaparece momentáneamente - Pioneer DEH-1200MP | Owner's Manual - Page 43
tornillos diferentes. Si el tornillo para el cable a tierra se afloja o se cae, puede provocar incendios, humo o averías. Importante ! Cuando esta unidad se instale en un vehículo sin posición ACC (accesorio) en la llave de encendido, el cable rojo se debe conectar al terminal que pueda detectar la - Pioneer DEH-1200MP | Owner's Manual - Page 44
Sección 03 Conexiones Diagrama de conexión Este producto Salida trasera Conector de antena Fusible (10 A) Amplificador de potencia (se vende por separado) Conectar con cables RCA (se venden por separado) Amarillo Conectar al terminal de alimentación constante 12 V. Rojo Conectar al terminal - Pioneer DEH-1200MP | Owner's Manual - Page 45
el manejo del vehículo. - pueda lesionar a un pasajero como consecuencia de un frenazo brusco. ! El láser semiconductor se dañará si se sobrecalienta. Instale esta unidad alejada de zonas que alcancen altas temperaturas, como cerca de la salida del calefactor. ! Se logra un rendimiento óptimo si la - Pioneer DEH-1200MP | Owner's Manual - Page 46
la unidad del salpicadero. 2 Apriete los dos tornillos en cada lado. Tornillo Fijación de la caratula Si no tiene previsto sacar la carátula, ésta se puede fijar con el tornillo suministrado. Carcasa Salpicadero o consola ! Utilice tornillos de cabeza redonda (5 mm × 8 mm) o tornillos de cabeza - Pioneer DEH-1200MP | Owner's Manual - Page 47
Mensajes de error Cuando contacte con su concesionario o con el servicio técnico Pioneer más cercano, asegúrese de anotar el mensaje de error. Mensaje Causa ERROR diferente, y después vuelva a activar el reproductor de CD. ERROR-15 El disco inser- Reemplace el tado aparece en disco. blanco ERROR- - Pioneer DEH-1200MP | Owner's Manual - Page 48
que pueden causar daños al reproductor. No es posible reproducir discos CD-R/CD-RW no finalizados. No toque la superficie grabada de los discos. Cuando con audio comprimido WMA Formato compatible: WMA codificado con Windows Media Player Extensión de archivo: .wma Velocidad de grabación: 48 kbps a - Pioneer DEH-1200MP | Owner's Manual - Page 49
Información adicional Apéndice Español Lista de reproducción M3u: no MP3i (MP3 interactivo), mp3 PRO: no WAV Formato compatible: Lineal PCM (LPCM), MS ADPCM Extensión de archivo: .wav Bits de cuantificación: 8 y 16 (LPCM), 4 (MS ADPCM) Frecuencia de muestreo: 16 kHz a 48 kHz (LPCM), 22,05 kHz y - Pioneer DEH-1200MP | Owner's Manual - Page 50
Apéndice Información adicional MP3 La venta de este producto sólo otorga una licencia para su uso privado, no comercial. No otorga ninguna licencia ni concede ningún derecho a utilizar este producto en transmisiones comerciales (es decir, lucrativas) en tiempo real (terrestres, vía satélite, por - Pioneer DEH-1200MP | Owner's Manual - Page 51
12 dB Agudos Frecuencia 10 kHz Ganancia 12 dB Reproductor de CD Sistema Sistema de audio de discos compactos Discos utilizables Disco compacto WMA Ver. 7, 7.1, 8, 9, 10, 11 (audio 2 canales) (Windows Media Player) Formato de decodificación MP3 MPEG-1 & 2 Audio Layer 3 Formato de señal - Pioneer DEH-1200MP | Owner's Manual - Page 52
. 178-184 Boundary Road, Braeside, Victoria 3195, Australia TEL: (03) 9586-6300 PIONEER ELECTRONICS OF CANADA, INC. 300 Allstate Parkway, Markham, Ontario L3R 0P2, Canada TEL: 1-877-283-5901 TEL: 905-479-4411 PIONEER ELECTRONICS DE MEXICO, S.A. de C.V. Blvd.Manuel Avila Camacho 138 10 piso Col.Lomas
-
 1
1 -
 2
2 -
 3
3 -
 4
4 -
 5
5 -
 6
6 -
 7
7 -
8
-
9
-
10
-
11
-
12
-
13
-
14
-
15
-
16
-
17
-
18
-
19
-
20
-
21
-
22
-
23
-
24
-
25
-
26
-
27
-
28
-
29
-
30
-
31
-
32
-
33
-
34
-
35
-
36
-
37
-
38
-
39
-
40
-
41
-
42
-
43
-
44
-
45
-
46
-
47
-
48
-
49
-
50
-
51
-
52
 |
 |

Owner’s Manual
Mode d’emploi
Manual de instrucciones
CD RECEIVER
AUTORADIO CD
RADIO CD
DEH-1200MP
English
Français
Español