Pioneer DJM-800 Owner's Manual
Pioneer DJM-800 Manual
 |
UPC - 012562796604
View all Pioneer DJM-800 manuals
Add to My Manuals
Save this manual to your list of manuals |
Pioneer DJM-800 manual content summary:
- Pioneer DJM-800 | Owner's Manual - Page 1
DJ MIXER DJM-800 Operating Instructions - Pioneer DJM-800 | Owner's Manual - Page 2
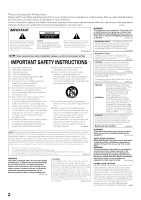
COVER (OR BACK). NO USER-SERVICEABLE PARTS INSIDE. REFER SERVICING TO QUALIFIED SERVICE PERSONNEL. The exclamation point within an equilateral triangle is intended to alert the user to the presence of important operating and maintenance (servicing) instructions NOT USE THIS to replace the in case of - Pioneer DJM-800 | Owner's Manual - Page 3
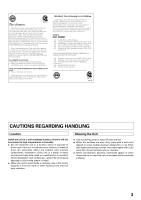
120 Rock band concert in front of speakers, thunderclap 140 heat can adversely affect the cabinet and internal components. Installation of the unit in a damp used inside a carrying case or DJ booth, separate it from the walls or other equipment to improve heat radiation. Cleaning the Unit ÷ Use - Pioneer DJM-800 | Owner's Manual - Page 4
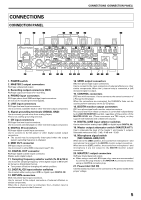
. (Only linear PCM is supported.) 5 MIDI OUT Virtually all the dial and switch information of the DJM-800 can be output in MIDI signal format, allowing external components to be controlled via MIDI. 6 Other functions ¶ A control cable can be used to connect the unit to a Pioneer DJ CD player, thus - Pioneer DJM-800 | Owner's Manual - Page 5
Hz) 48 k 96 k MIDI OUT R MASTER 1 L components. When the L channel only is connected, a L+R monaural signal is output. 15. CONTROL connectors Ø3.5 mm mini-connector. Use to connect to the control connector of a Pioneer DJ CD player. When the connectors are connected, the DJM-800's fader can be used - Pioneer DJM-800 | Owner's Manual - Page 6
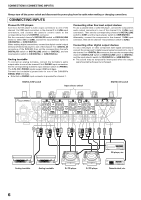
DJM-800's PHONO inputs support MM cartridges. Connect the turntable's ground wire to one of the DJM-800's SIGNAL GND terminals. ÷ Note that no PHONO input connector is provided for channel 1. Connecting other line level output devices To use a cassette deck or other CD player, connect the component - Pioneer DJM-800 | Owner's Manual - Page 7
of the effector. If the effector has only monaural output, connect to the DJ mixer's L channel input only. The signal from the effector will be input to both L and R channels. When using an external effector, set the effect selector to [SND/RTN]. Power amplifier Cassette deck (RCA plug input - Pioneer DJM-800 | Owner's Manual - Page 8
HEADPHONES Microphone The MIC 1 jack on the upper surface of the operating panel can be used to connect a microphone with Ø6.3 mm phone plug or XLR plug. The the accessory power cord to the AC inlet on the back of the player, then connect the plug to a standard wall outlet or to the - Pioneer DJM-800 | Owner's Manual - Page 9
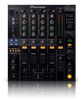
FUNCTIONS OF PARTS OPERATION PANEL POWER MIC MIC 1 MIC 2 CD /DIGITAL LINE CD /DIGITAL LINE PHONO /DIGITAL LINE PHONO /DIGITAL PHONO MASTER LEVEL PROFESSIONAL MIXER 1 2 MIC 1 3 LEVEL 0 MIC 2 4 LEVEL 0 5 HI -12 6 +6 EQ LOW -12 +6 7 MIC 8 OFF ON TALK OVER HARMONIC SWEEP - Pioneer DJM-800 | Owner's Manual - Page 10
FUNCTIONS OF PARTS (OPERATION PANEL) 11. TRIM adjust dial Use to adjust the input level for each channel. (adjustable range: -∞ to +9 dB, mid-position is about 0 dB) 12. Channel equalizer high-range adjust dial (HI) Use to adjust the treble (high-range) frequency sound for each channel. (adjustable - Pioneer DJM-800 | Owner's Manual - Page 11
FUNCTIONS OF PARTS (OPERATION PANEL) 30. effects section 41. Sound-color effect select buttons/indicators (HARMONIC, SWEEP, FILTER, CRUSH) Use to select and enable/disable sound-color effects (P. 18). The button for the selected function will flash, and the effect will be applied equally to channels - Pioneer DJM-800 | Owner's Manual - Page 12
effect name. Switching Operation Upper/ Lower Row Display At MIDI start Upper Lower MIDI START At MIDI stop MIDI snapshot Upper Lower Upper Lower MIDI STOP SNAP SHOT 2. Channel (%/ms): Lights in accordance with the unit used for each effect. 4. Beat display section Displays the location of - Pioneer DJM-800 | Owner's Manual - Page 13
OPERATIONS (BASIC OPERATIONS) MIXER OPERATIONS BASIC OPERATIONS 2 3 TRIM 4 HI, MID, LOW 5 6 1 POWER 7 MASTER LEVEL 8 BALANCE 1. Set rear panel POWER switch to ON. 2. Set the input selector switch for the desired channel to choose the connected component. ¶ When using CD input or LINE input, the - Pioneer DJM-800 | Owner's Manual - Page 14
switch is set to [THRU]. [Using the Cross Fader to Start Playback] FADER START FUNCTION By connecting the optional Pioneer DJ CD Player control cable, the channel fader and cross fader can be used to start CD playback. When the mixer's channel fader lever or cross fader lever are moved, the CD - Pioneer DJM-800 | Owner's Manual - Page 15
simply. For example, when a 1/1 beat echo sound is used to cutoff the input sound, a sound in synch with the channels in synch with the rhythm (auto beat pan). Also, short auto pan can be performed, allowing sounds to be distributed to right/left very quickly, an effect impossible to perform manually - Pioneer DJM-800 | Owner's Manual - Page 16
output repetitively. Also, when sounds are changed from 1/1 beat to 1/2 or 1/4 in synch with the beat, a roll sound effect can be produced. Example Original Effect ON 1/1 roll Repeat 13. REVERSE ROLL Sounds of 1/16, 1/8, 1/4, 1/2, 1/1, 2/1, 4/1, 8/1, or 16/1 beat are recorded, inverted, and output - Pioneer DJM-800 | Owner's Manual - Page 17
automatically, the display's BPM counter will flash. ¶ The effective range in the AUTO mode is 70 to 180 BPM. It may not be possible to measure some tracks accurately. In this case, use the TAP mode for manual BPM input. [Using the TAP Button for Manual BPM Input] If the TAP button is tapped two - Pioneer DJM-800 | Owner's Manual - Page 18
is first turned on, all effects default to OFF (indicators are lighted). 2. Use the sound-color effect parameter dial (COLOR) to adjust the quantitative parameter for the effect. ¶ The parameter can be adjusted independently for each channel. ¶ The color of the harmonic indicator changes to indicate - Pioneer DJM-800 | Owner's Manual - Page 19
is turned ON, if the selected channel's sound is not output to the master output, the effect sound will not be heard. (*2) When effect is disabled (OFF), the effect sound will not be heard, even if monitor is set to effector. Sound-color effects Name 1 HARMONIC 2 SWEEP 3 CRUSH 4 FILTER Parameter - Pioneer DJM-800 | Owner's Manual - Page 20
the transmission and receipt of data. The DJM-800 uses the MIDI protocol for transmitting and receiving data about component operation and BPM (timing clock). DJ CD Player MIDI sequencer OUT Audio IN BPM =120 BPM =120 IN MIDI OUT DJM-800 MIDI START /STOP TIME SYNCHRONIZING AUDIO SIGNALS TO - Pioneer DJM-800 | Owner's Manual - Page 21
/TAP TAP CUE EFFECT SELECT CH SELECT TIME MIC (SOUND COLOR FX) (FADER START) (HEAD PHONES) MIDI LEVEL/DEPTH EFFECT ON/OFF HI LOW HARMONIC SWEEP CRUSH FILTER • EFFECT SEL EFFCH2 0 0 0 1 1 1 1 - EFFCH1 0 1 1 0 0 1 1 - EFFCH0 1 0 1 0 1 0 1 - 1 2 3 4 MIC CF.A CF.B MST SNAPSHOT Once the DJM-800 is - Pioneer DJM-800 | Owner's Manual - Page 22
the points below. Sometimes the trouble may originate from another component. Thus, also check the other electrical appliances also in use. If the trouble cannot be rectified even after checking the following items, contact your dealer or nearest PIONEER service center. Symptom No power No sound - Pioneer DJM-800 | Owner's Manual - Page 23
) Weight 8.0 kg (17.64 lb) Maximum dimensions 320 (W) × 381 (D) × 108 (H) mm replacement parts, operating instructions, service manuals, or accessories, please call the number shown below. 800 - 782 - 7210 Please do not ship your product to Pioneer without first calling the Customer Support - Pioneer DJM-800 | Owner's Manual - Page 24
H. P. MONO SPLIT/STEREO SW. EFFECT CH SELECT CH 1-4 CF_A/B Effect Processor MIC Master BEAT EFFECT (Others) Effect SW. MIX Ratio Effect Out EFFECT CUE CH 1- 4 In COLOR EFFECT (HARMONIC) Freqency Counter Send to CPU Effect Processor CH 1- 4 Out Effect Control (from CPU) CH 1- 4 In
-
 1
1 -
 2
2 -
 3
3 -
 4
4 -
 5
5 -
 6
6 -
 7
7 -
8
-
9
-
10
-
11
-
12
-
13
-
14
-
15
-
16
-
17
-
18
-
19
-
20
-
21
-
22
-
23
-
24
 |
 |
Operating Instructions
DJ MIXER
DJM-800