Pioneer DV-C302D Owner's Manual
Pioneer DV-C302D Manual
 |
View all Pioneer DV-C302D manuals
Add to My Manuals
Save this manual to your list of manuals |
Pioneer DV-C302D manual content summary:
- Pioneer DV-C302D | Owner's Manual - Page 1
DVD PLAYER DV-C302D Operating Instructions - Pioneer DV-C302D | Owner's Manual - Page 2
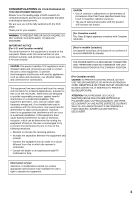
model properly. After you have finished reading the instructions, put them away in a safe place for future reference. • This player is not suitable for commercial use need for manufacturer's instructions, and should use a the mast and supporting structure, grounding service. mounting accessory - Pioneer DV-C302D | Owner's Manual - Page 3
be fully satisfied with the DVD player. Thank you for your support. WARNING: TO PREVENT FIRE OR SHOCK HAZARD, DO NOT EXPOSE THIS APPLIANCE TO RAIN OR MOISTURE. IMPORTANT NOTICE [For U.S. and Canadian models] The serial number for this equipment is located on the rear panel. Please write this serial - Pioneer DV-C302D | Owner's Manual - Page 4
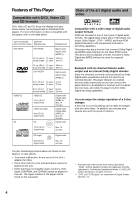
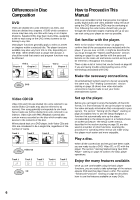
(for CDs). • Discs other than the ones indicated above cannot be played on this unit. • DVDs that have incompatible region numbers, DVDAudio, DVD-ROM, and CD-ROM cannot be played on this unit. The region number of the player can be found on the rear panel. State of the art digital audio and video - Pioneer DV-C302D | Owner's Manual - Page 5
mark indicates this may not be possible with certain discs. Energy-saving design This unit is designed to use minimal electricity when this player is in standby mode. Regarding the amount of power consumed in standby mode, refer to 'Specifications' on page 62. This product incorporates copyright - Pioneer DV-C302D | Owner's Manual - Page 6
"Before Using" on page 8 to confirm that all the accessories were included with the player. If you are new to DVD, it might be beneficial for you to go through the "Names and Functions" section starting on page 9 to get familiar with the parts and buttons on the main unit and remote control as they - Pioneer DV-C302D | Owner's Manual - Page 7
Window 11 Rear Panel 12 Remote Control 13 Making Connections 15 Connecting Your DVD Player 15 Audio Connections 17 Video Connections 19 System Control Connections 19 Setting Up the Player 20 Using the Setup Navigator 20 Getting Started Using Your DVD Player 24 Playing DVDs, Video CDs - Pioneer DV-C302D | Owner's Manual - Page 8
batteries. Make sure to match the plus (+) and minus (-) polarity guides on the batteries with the marks inside the battery compartment. Remote control unit 3 Close the cover. AA/R6P batteries Operating instructions (this manual) Remote control operation 7m 30°30° 8 Notes • Do not mix old and - Pioneer DV-C302D | Owner's Manual - Page 9
is loaded and when no disc is loaded. Turns off when a disc format other than DVD is loaded in the player. 6 OPEN/CLOSE 0 button Press to open and close the disc tray (pages 24 and 27). 7 DISC button Use to select discs in the player directly (page 24). 8 DISC CHANGE button Press to select the next - Pioneer DV-C302D | Owner's Manual - Page 10
Point the remote control toward the remote sensor to operate the player (page 8). $ SUB WOOFER button Press to turn the SUB WOOFER (LFE) channel on and off when listening to sources being output from the 5.1 channel discrete audio outputs (page 32). % SURROUND button Press to turn the surround (rear - Pioneer DV-C302D | Owner's Manual - Page 11
the currently loaded disc contains an audio signal with a sampling frequency of 96 kHz. 2 ANGLE indicator Indicates Multi-Angle playback is DVD (page 51). 9 TOTAL indicator Indicates that the disc in the player is stopped and DISPLAY has been pressed (page 52). 0 DTS indicator Indicates DTS audio - Pioneer DV-C302D | Owner's Manual - Page 12
AUDIO OUT (2CH) 1 2 L AUDIO OUT (5.1CH) FRONT SURROUND L CENTER R R SUB WOOFER 9 8 AC IN 7 1 CONTROL IN jack Use to connect this player to another component bearing the Pioneer Î mark. This lets you control optical (OPT.)) Use to output the digital audio signal recorded on discs. You can - Pioneer DV-C302D | Owner's Manual - Page 13
CD and CD, each press changes the audio output as follows. = Stereo = 1/L (Left) = 2/R (Right) ™ 5 SETUP button* Press when the player is in either play or stop mode to open and close the Setup screen (page 28). 6 MENU button* Use to display or close the DVD menu screen (page 25). 7 PREVIOUS - Pioneer DV-C302D | Owner's Manual - Page 14
shortly before the location where it was stopped. Pressing twice causes the disc to return to the beginning of the disc when playback starts again (page 27). + CLEAR button Works in conjunction with a number of player functions. Use to cancel repeat and random playback, and to edit programs (pages - Pioneer DV-C302D | Owner's Manual - Page 15
included with this player. Use this illustration as a guide to setting up your home system. An explanation of each type of audio and video connection available can be found on pages 17 to 19. To determine the best audio and video connection setup for your system, refer to the manuals supplied with - Pioneer DV-C302D | Owner's Manual - Page 16
on the player to the S-VIDEO IN jack on the TV or monitor using an S-video cord (not included) (page 19). VIDEO IN S-VIDEO IN S-video cord (Not included) CONTROL IN VIDEO OUT S-VIDEO OUT VIDEO OUT SELECT DIGITAL OUT OPT. Y COMPONENT VIDEO OUT PB PR AUDIO OUT (2CH) 1 2 L AUDIO OUT (5.1CH - Pioneer DV-C302D | Owner's Manual - Page 17
• Use a coaxial cable (not supplied) to connect the coaxial digital output on the player to the coaxial digital input on an AV amplifier or receiver. DV-C302D When a DVD recorded in Dolby Digital, DTS, or MPEG is loaded, noise will be output if you have made connections via the digital audio jacks - Pioneer DV-C302D | Owner's Manual - Page 18
on the front panel to select 2 channel analog audio output (pages 22 and 31). DV-C302D 5.1 CHANNEL AUDIO OUT 5.1 channel audio refers to the current industry surround sound standard requiring two front speakers, a center speaker, two surround (rear) speakers and a sub woofer. Although in actuality - Pioneer DV-C302D | Owner's Manual - Page 19
to the amplifier using an audio or video cord, even when using only digital components. • For details, refer to the operation manuals of the connected components. DV-C302D MAKING CONNECTIONS VIDEO OUT VIDEO OUT SELECT VIDEO IN TV or monitor CONTROL IN CONTROL OUT Pioneer component with - Pioneer DV-C302D | Owner's Manual - Page 20
up for the first time Some DVDs start playing automatically when loaded in the player. Because the Setup Navigator cannot be used if a disc is playing, it is recommended to set up the player using the Setup Navigator before loading a DVD for the first time. If a DVD has been loaded, be sure to - Pioneer DV-C302D | Owner's Manual - Page 21
used by the player in menus and onscreen messages. Additionally, the language that is established at this setting will also be used for the default audio setting Note There are two screen formats that can be used to display wide-screen format DVDs: letter box and pan&scan. When "Standard (4:3)" is - Pioneer DV-C302D | Owner's Manual - Page 22
below in the section 'To coordinate your speaker system for 5.1 channel output'. Not Connected Select if you have not made analog audio connections. * Factory setting [Center Speaker] Audio1 2 Video Language General Setup Navigator Amp Connection Center Speaker Present Not Present Center speaker is - Pioneer DV-C302D | Owner's Manual - Page 23
refer to the instructions supplied with the component the player is connected to to determine what digital audio formats can be player using the Setup Navigator or if you exit the Setup Navigator, the Setup screen General menu appears. Press Setup to close the Setup screen. To change other player - Pioneer DV-C302D | Owner's Manual - Page 24
ready to start using the player to enjoy DVDs, Video CDs, and CDs. 1 2 2 Press OPEN/CLOSE 0 (0 on the front panel). The disc tray comes out. 3 Load a disc. • Load a disc with the label side facing up, using the disc tray guide to align the disc. • Labels indicating disc numbers (1 through 3) are - Pioneer DV-C302D | Owner's Manual - Page 25
DVD or Video CD disc jacket and accompanying documentation for more information. To navigate a menu screen • Although individual DVD titles may differ, when a menu screen is displayed, use the cursor buttons (2/ 3/5/∞) and ENTER on the remote control USING YOUR DVD PLAYER 5 Example: When a DVD - Pioneer DV-C302D | Owner's Manual - Page 26
display. Skipping back to the previous chapter (track) Press PREVIOUS 4 (4 1 on the front panel). STANDBY/ON 0 41 ¡¢ 78 3 41 ¡¢ Forward and Reverse Scanning - DVD/Video CD/CD • Press once to skip back to the start of the chapter (track) currently playing. • Press twice to skip back to the - Pioneer DV-C302D | Owner's Manual - Page 27
STARTED USING YOUR DVD PLAYER 5 Stopping Playback and Switching Power Off - DVD/Video CD/CD 5 2 5 5 5 4 ¢ 1 3 ¡ e 8 E7 1 1 Press STOP 7 (7 on the front panel). Playback stops. 2 Press OPEN/CLOSE 0 (0 on the front panel). • The disc table comes out. • The tray rotates and the disc - Pioneer DV-C302D | Owner's Manual - Page 28
screen. If you choose not to use the [Setup Navigator], be sure to make the necessary settings in the Setup screen Audio 1, Audio 2, Video, and Language menus as described on the following pages. Some DVDs start playing automatically when loaded in the player. If a DVD has been loaded, be sure to - Pioneer DV-C302D | Owner's Manual - Page 29
additional functions of the player that can be adjusted to further personalize performance of the player. In this manual, functions that are Disc format(s) DVD only DVD / Video CD All compatible formats Note If a setting applicable only to DVDs is changed while a Video CD or CD is loaded, a blue DVD - Pioneer DV-C302D | Owner's Manual - Page 30
of outputting DTS digital audio for DVDs recorded in DTS. When this player is connected to an AV component that has a built-in DTS decoder, select "DTS". If your system is not equipped to decode DTS, select "Off". Refer to the operating instructions supplied with your audio components if you are - Pioneer DV-C302D | Owner's Manual - Page 31
AV Amplifier or Receiver This player is capable of both 2 channel stereo and 5.1 multichannel surround sound audio output. Use this setting to select which analog outputs are connected to an AV component. Make adjustments in the [Audio Out] setting in the Setup screen Audio 2 menu. 1 Audio2 Video - Pioneer DV-C302D | Owner's Manual - Page 32
operations, the settings on this page have already been set by the player. • If you have not made connections to the 5.1 CH OUT jacks on the rear panel of the player, it is not necessary to make any changes to this setting. 1 Use the cursor buttons (2/3) to select the speaker. Every time the cursor - Pioneer DV-C302D | Owner's Manual - Page 33
recorded in different aspect ratios, the image's height to width ratio can be switched to match the TV or monitor being used. Make changes to the TV screen TV screen format available on the disc is automatically selected. Differences in screen sizes and DVD formats The number of screen size - Pioneer DV-C302D | Owner's Manual - Page 34
have already been set by the player. Setting the on-screen display (OSD) language This setting is used to establish the language that General OSD Language EEnngglilsishh Audio Language - Efrnagnliçsahis Subtitle Language - JEasppaanñeosle Auto Language - On Setup player's OSD language Move - Pioneer DV-C302D | Owner's Manual - Page 35
DVD or turn the subtitles off using the remote control (this page). • Select one of the audio languages programmed on a DVD using the remote control (page 36). • Change the audio output type when using the subtitle language may not be possible with some discs. In this case, the mark will be displayed - Pioneer DV-C302D | Owner's Manual - Page 36
is only one language recorded on the disc. • Switching the audio language may not be possible with some titles. In this case, the mark is displayed. • For some titles, selection can be made using the DVD menu. In these cases, press MENU to display the DVD menu screen and then make your selection - Pioneer DV-C302D | Owner's Manual - Page 37
cannot be made when a disc is playing. Stop playback of the disc before attempting to make any changes. Selecting an audio language preference The audio language that you normally listen to can be selected from the various audio languages on a DVD. Even when the audio language is changed during - Pioneer DV-C302D | Owner's Manual - Page 38
either "List of Languages" or "Code". 3 If you select "List of Languages", use the cursor buttons (5/∞) to select the language. List of Languages ja: Japanese Selecting a DVD menu language preference Expert In addition to containing different audio languages, DVD may also contain menu screens in - Pioneer DV-C302D | Owner's Manual - Page 39
control subtitle and audio language based on program content When the Auto Language function is used, foreign movies are shown with the original audio of forced subtitles Expert Even when the subtitles are turned off, some DVDs will nevertheless display them on the screen. This setting allows you to - Pioneer DV-C302D | Owner's Manual - Page 40
the angle of playback when viewing DVDs with multi-angle programming (page 43). • Repeat chapters or titles on DVDs, or repeat tracks, 1 disc, or all discs (ALL) with CDs and Video CDs. You can also repeat just a specified part of a chapter or track (page 44). • Play DVD titles or chapters, Video CD - Pioneer DV-C302D | Owner's Manual - Page 41
speed in four steps using STEP/SLOW e and E. 1/16 - 1/8 - 1/4 - 1/2 Press and hold STEP/SLOW e during DVD playback. • Slow playback Selecting the type of paused image to display Expert This function lets you view a clear still-image when DVD playback is paused. Make disc.) * Factory setting 41 - Pioneer DV-C302D | Owner's Manual - Page 42
Disc - DVD/Video CD/CD This player offers different ways of accessing the information on a DVD, Video CD, or CD. Using SEARCH MODE, you can search for titles or chapters on a DVD button(s) of the desired title, chapter/track or of the specific time where you would like to begin playback. • To select - Pioneer DV-C302D | Owner's Manual - Page 43
the button. Notes • You can use the Multi-Angle function only with discs featuring recordings of images shot from different camera angles. • During Multi-Angle playback, the ANGLE indicator in the display lights. • For some discs, selection can be made using the DVD menu. In this case, press MENU - Pioneer DV-C302D | Owner's Manual - Page 44
Disc Repeat Repeat Off 2 ALL Disc Repeat 2 • During ALL disc repeat playback, if a DVD is loaded in the player, repeat playback is canceled, and normal playback of the DVD to clear the specified location that was set using A-B. Notes • With some DVD discs, there may be times when repeat playback - Pioneer DV-C302D | Owner's Manual - Page 45
. "Random All" appears on the screen, and random playback begins. All tracks on all CDs and Video CDs loaded will play in a random order (DVD discs loaded will be ignored). To change titles, chapters, or tracks during random play • Press NEXT ¢ and the next randomly selected track starts playing - Pioneer DV-C302D | Owner's Manual - Page 46
PLAY Play Program 1 DVD 2 VCD 3 ??? PROGRAM Exit 2 Use the number buttons or DISC (1 through 3) to enter a disc number. • If this is the first step you are programming, the number of the disc that is currently in the play position will appear automatically. • If the player has already read the - Pioneer DV-C302D | Owner's Manual - Page 47
the cursor to the appropriate field using the cursor buttons (2/3). 5 Press the number button(s) of the number you want to change. 6 Press PROGRAM to exit the program screen. Notes • If a chapter is programmed for a disc that has not yet been read by the player ("???" is displayed), and a CD or - Pioneer DV-C302D | Owner's Manual - Page 48
the Parental Lock Level This player lets you set the Parental Lock if the DVD has a parental lock level recorded on it. With Parental Lock capable discs, you can block access to material you feel is inappropriate for your children. Refer to the DVD disc jacket and the accompanying documentation - Pioneer DV-C302D | Owner's Manual - Page 49
Lock level to a higher or lower level according to the settings printed on the DVD disc jacket or accompanying documentation. If you use the Condition Memory function to save the settings for a particular disc, the Parental Lock level is saved as well. Because it is saved in memory, Parental - Pioneer DV-C302D | Owner's Manual - Page 50
even if the DVD is removed from the player (With Video CDs, the LAST MEMORY location is erased from memory when the disc is changed or ejected begins at the start of the disc if you press PLAY 3. • This function is possible for DVDs and Video CDs only, and cannot be used with CDs. To clear the Last - Pioneer DV-C302D | Owner's Manual - Page 51
5 Memorizing Settings for Often Viewed DVDs (Condition Memory) - DVD You can store in memory settings for DVDs you often watch. Settings remain in memory even if you remove the disc from the player, or switch power to the player to standby. If you load a disc that has its settings memorized - Pioneer DV-C302D | Owner's Manual - Page 52
is displayed superimposed over the video image on the screen. Note • Depending on the format and type of disc being used, not all screens may be displayed. • When the Angle indicator is being displayed during playback of DVDs that contain multi-angle information, the disc number is hidden by the - Pioneer DV-C302D | Owner's Manual - Page 53
display off. Information about the titles and chapters or tracks on a disc is displayed. When the information exceeds the space on the screen, use the cursor buttons (2/3) to move to other screens. DVD Information: DVD Title Chapter Title Chapter 01 1~ 1 06 1~ 1 02 1~ 1 07 1~ 1 03 1~ 1 08 - Pioneer DV-C302D | Owner's Manual - Page 54
Screen Saver On and Off Expert As a protective function against residual images on the TV screen or monitor, a phenomenon referred to as " SETUP Exit Settings: On Off* *Factory setting Resetting the Player to System Settings To reset the player, press and hold 7 (stop) on the front panel when - Pioneer DV-C302D | Owner's Manual - Page 55
, contact your nearest PIONEER authorized service center. Lens cleaners are commercially available, but special care should be exercised in their use since some may cause damage to the lens. AFTER USING DISCS, STORE THEM UPRIGHT After playing a disc, always remove it from the player and return it - Pioneer DV-C302D | Owner's Manual - Page 56
VENTS Do NOT use the player on top PIONEER authorized service center or your dealer for a replacement. CAUTION: WHEN PLACING THE UNIT IN A STEREO RACK WITH GLASS DOORS Be sure there is ample space between the unit and the glass doors when opening the disc table using the remote control. If the disc - Pioneer DV-C302D | Owner's Manual - Page 57
Language Code List Language codes are used when setting the audio and subtitle language preferences. (See page 38) -Gaelic (gd) Galician (gl) Guarani (gn) Gujarati (gu) Hausa (ha) Input-code Language Input-code Language 1001 0514 0618 0405 0920 0519 1412 1821 2608 1115 0512 0101 0102 0106 0113 - Pioneer DV-C302D | Owner's Manual - Page 58
recording or cause picture problems. Remote control operation is not possible. The rear panel control input jack on the player is being used. \ Point the remote control at the component that the player is connected to (page 19). The remote control is too far from the player, or the angle with - Pioneer DV-C302D | Owner's Manual - Page 59
. Connect the digital output on the player to the digital input on a receiver or amplifier with a built in DTS decoder to hear DTS audio. Noticeable difference in DVD and CD volume. DVDs and CDs use different recording methods. \ This is not a malfunction. Audio mix does not sound right or sounds - Pioneer DV-C302D | Owner's Manual - Page 60
be able to select the camera image you want. Some DVD discs are recorded with the angles of more than one camera used for filming, and these can be selected using this player. These types of discs are called multi-angle discs. Digital output (Optical) Normally, audio is converted to an electric - Pioneer DV-C302D | Owner's Manual - Page 61
control. You can use menus recorded on discs with PBC for easy, interactive search for desired scenes, and playback. You can also enjoy viewing high-resolution/standard resolution still images. Regional restriction codes (region number) Regional restriction codes are built in to DVD players and DVD - Pioneer DV-C302D | Owner's Manual - Page 62
Specifications General System ... DVD system and Compact Disc digital audio system Power requirements AC 120 V, CONTROL IN Minijack (3.5 ø) Accessories Remote control unit 1 AA (R6P) dry cell batteries 2 Audio cord 1 Video cord 1 Power cord 1 Operating Instructions 1 Note The specifications - Pioneer DV-C302D | Owner's Manual - Page 63
to locate the nearest Pioneer Authorized Independent Service Company, or if you wish to purchase replacement parts, operating instructions, service manuals, or accessories, please call the player Be sure to follow the necessary steps and precautions whenever moving or transporting the player (page - Pioneer DV-C302D | Owner's Manual - Page 64
Lifetime Selecting fine audio equipment such as safe level: • Start your volume control at a low setting. • Slowly increase . We Want You Listening For A Lifetime Used wisely, your new sound equipment will provide Australia, TEL: [03] 9586-6300 PIONEER ELECTRONICS DE MEXICO S.A. DE C.V. San
-
 1
1 -
 2
2 -
 3
3 -
 4
4 -
 5
5 -
 6
6 -
 7
7 -
8
-
9
-
10
-
11
-
12
-
13
-
14
-
15
-
16
-
17
-
18
-
19
-
20
-
21
-
22
-
23
-
24
-
25
-
26
-
27
-
28
-
29
-
30
-
31
-
32
-
33
-
34
-
35
-
36
-
37
-
38
-
39
-
40
-
41
-
42
-
43
-
44
-
45
-
46
-
47
-
48
-
49
-
50
-
51
-
52
-
53
-
54
-
55
-
56
-
57
-
58
-
59
-
60
-
61
-
62
-
63
-
64
 |
 |

DV-C302D
Operating Instructions
DVD PLAYER