Pioneer DVL-909 Operating Instructions
Pioneer DVL-909 Manual
 |
View all Pioneer DVL-909 manuals
Add to My Manuals
Save this manual to your list of manuals |
Pioneer DVL-909 manual content summary:
- Pioneer DVL-909 | Operating Instructions - Page 1
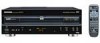
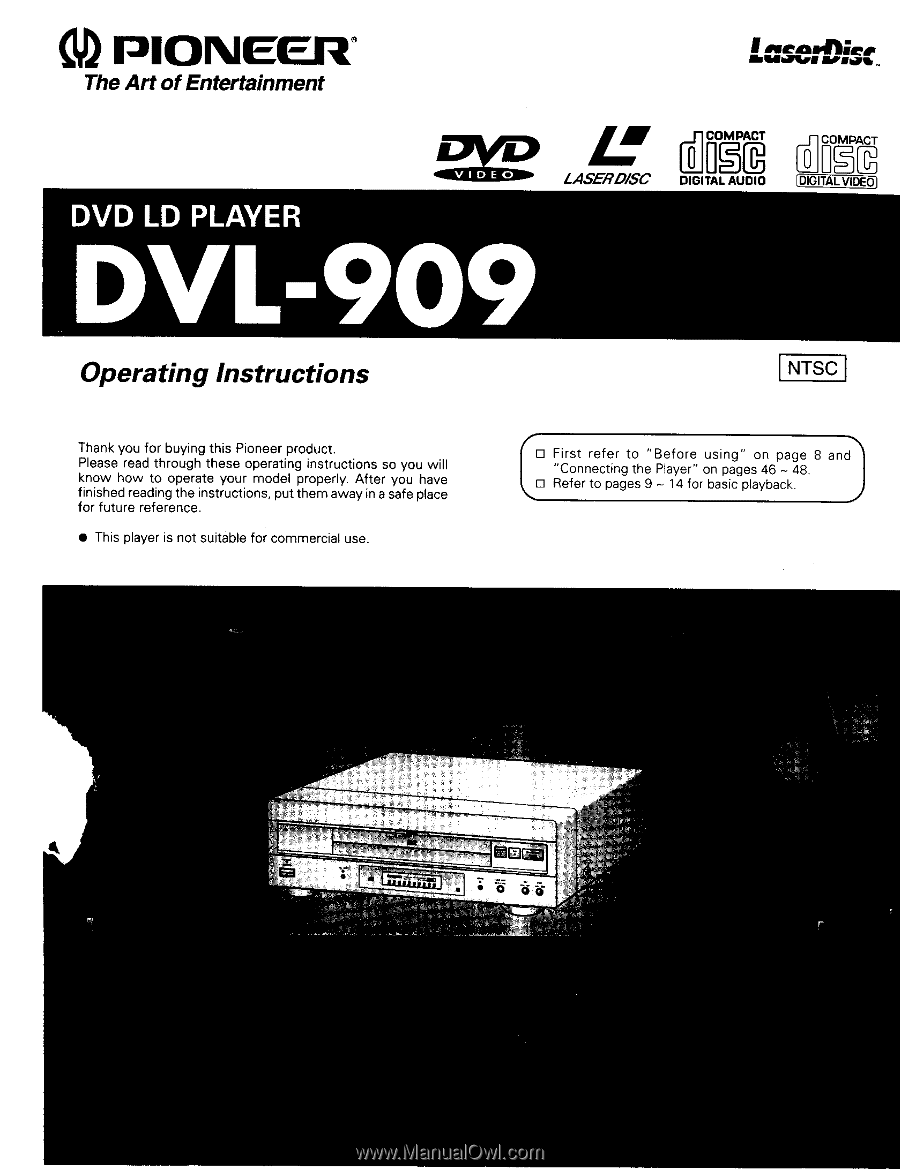
| Operating Instructions Thank you for buying this Pioneer product. Please read through these operating instructions so you will know how to operate your model properly. After you have finished reading the instructions, put them away in a safe place for future reference. • This player is not - Pioneer DVL-909 | Operating Instructions - Page 2
NOT REMOVE COVER (OR SACK) NO USER SERVICEABLE PARTS INSIDE REFER SERVICING TO QUALIFIED SERVICE PERSONNEL The exclamalion point within an equilateral Iriangle is rntended to alert ti_e user Io the presence of _mpor tant operating and maintenance Isen4icirlgl instructions in the lilerat ule - Pioneer DVL-909 | Operating Instructions - Page 3
or an experienced radio/TV technician for help. Information to User Alteration or modifications carried out without appropriate authorization may invalidate the user's right to operate the equipment. CAUTION • Uae of controls or adjustments or performance of procedures other than those specified - Pioneer DVL-909 | Operating Instructions - Page 4
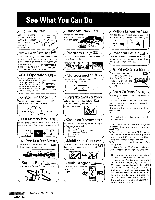
sides of a laserdisc i Program Play*_l _ s you play back selected titles and chapters I ny desired order r Parental Level* _1--, s you select a "parental level" (user Macrovision Corporation and other rights owners Use of this copyright protection technology must be authorized by Macrovision - Pioneer DVL-909 | Operating Instructions - Page 5
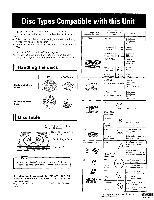
@ Digital audio (max 20 rnin.) (Audio part) Digital audio + video {max 5 rnin.] (Video part) Digital audio + video (max 5 rain.) (Videe part) SINGLE VDIIDSECO ,_ LD /..ff L_ER_ /.ff 12 cm (5 in.)/ single-sided LOG 30 cm (12 in) In these operating instructions, the VSO is treated as a kind of - Pioneer DVL-909 | Operating Instructions - Page 6
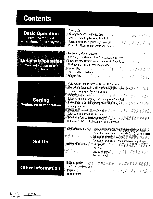
Skip Forward/Skip Back ':st_|ng Playback & _W tching Power OEF Continuing Playbackfrom where you Stopped _ _ L_ _ _ _ __ PJaybackby Menu Selection _'.... Searching for a Desired Video Scene/Audio Track Part } Quick LD Side Changing(Quick Turn) Outline of GUI (Graphical User Interface) - Pioneer DVL-909 | Operating Instructions - Page 7
Applicable discs s 10 12 14 17 19 21 24 26 27 28 32 33 47 48 * Does not operate with certain disc functions• Contents - Pioneer DVL-909 | Operating Instructions - Page 8
Checking accessories Audio cord Remote control unit Video cord Power cord Other included items • Warranty card • Operating Instructions (this manual) Batteries ... II Inserting batteries into the remote control II ! II I While pressing the back cover, pull out in the direction indicated by - Pioneer DVL-909 | Operating Instructions - Page 9
Basic Operation Playing LDs 10 Playing DVDs, CDs and Video CDs 11 Chapter (Track) Skip Forward/Skip Back 12 Stopping Playback & Switching Power OFF .......... 13 Continuing Playback from where you Stopped ..... 14 Basic Operation _\/RR11RR'> - Pioneer DVL-909 | Operating Instructions - Page 10
with the label for the desired side facing up, using the disc table guide to align the dfsc. Pressing the remote control's DISC SIDE A!B button switches between sides A and B. The A side or B side indicator lights on the player to confirm the selected side I I Press the PLAY D,button. • Press the - Pioneer DVL-909 | Operating Instructions - Page 11
table comes out. • The LD disc table and the DVD/CD disc table come out if you press the remote controls OPEN/CLOSE --_button• Load a disc. • Load a disc with the label side facing up, using the disc table guide to align the disc. • You cannot play DVDs that have no region number (refer to page 56 - Pioneer DVL-909 | Operating Instructions - Page 12
player Skippinbgacktotheprevioucshapte(trrack) Press the PREV 1 - Pioneer DVL-909 | Operating Instructions - Page 13
Press the OPEN/ CLOSE A button. • Press the LD • button or the DVD/ CD --_ button on the player. • The disc table comes out. When removing an LD Remove the disc. When remowng a DVD/CD Press the POWER button. • The disc table goes back in, power switches OFF, and the S]ANDB¥ indicator lights - Pioneer DVL-909 | Operating Instructions - Page 14
automatically canceled for that disc • If you register more than five DVDs in LAST MEMORY, detairs of the latest disc are memorized, while power cord, be sure to cancel the "OFF" indication in the display window by pressing the POWER button on the player or the POWER button on the remote control - Pioneer DVL-909 | Operating Instructions - Page 15
Detailed Operation Playback by Menu Selection 16 Searching for a Desired Video Scene/Audio Track Part1 17 Searching for a Desired Video Scene/Audio Track Part2 18 Playback in a Desired Order (Program Play 19 Repeat Play 20 Still/Step Slow Playback 21 Random Play 22 Detailed - Pioneer DVL-909 | Operating Instructions - Page 16
Play Back Control, PBC is indicated in the display window. I', 7£' ] L_ CLASSICS Returningto Menu DisplayduringPlayback In case of DVDs TITLE 1_ is ON, player operation differs depending on the disc For details, read the instructions that come with the disc • With DVDs, menu indications may - Pioneer DVL-909 | Operating Instructions - Page 17
When selecting title number 10, press ®,Q • When a title number is flashing, if you continue preasing _, title numbers advance one at a time. When then perform Program playback (Refer to page 19.) With certain DVDs, search operation may stop In this case, the I_mark Scene/ Audio Track Part 1 - Pioneer DVL-909 | Operating Instructions - Page 18
flashes• • With DVDs, Part 2 _Make a selection following onscreen indications. i • With certain titles, there may be no menu display. In this case, perform the operations described at left, ]]me NumberSearch/ FrameNumberSearch ¢HP/T4ME (_ Press _ twice. [_., 0 I _ I-,,,°o,® I • With DVDs or LDs - Pioneer DVL-909 | Operating Instructions - Page 19
with and cancelingprograms the number buttons. PROGRAm (_ Press C_. (_ With DVDs, select the type of program and press _. • You can confirm programs in order• • With double-sided LDs, program the disc side together with each track number. For example, for track 9 on side B, DISC _IOE DISC SlOE - Pioneer DVL-909 | Operating Instructions - Page 20
play of a title _EF'EAT Press _ twice. • With DVDs, the title continues playing until the end, and then playback starts once more from the beginning of that title • With CDs and Video CDs, the entire disc is repeated • With LDs, a single side is repeated. Repeat play of double-sidedLDs R_r'_AT - Pioneer DVL-909 | Operating Instructions - Page 21
OOOG pR_,M CHPrrlM_ OOOO MODE RANDOM Viewinga Still Frame pAUSE Press _. • Press the PLAY/PAUSE I_/11button on the front of the player • With LDs or DVDs, if still images are unclear, refer to "Field" on page 30, and perform the necessary settings. _: Playback is s!owed During slow playback - Pioneer DVL-909 | Operating Instructions - Page 22
B on an LD: AA_DOM • Press o_E, and then press _ after side B has been selected• With CDs and Video CDs RANDO_A Press _. • "RANDOM" is indicated on the screen, and tracks are played in random order. During random play: _E×T • Press _, and the player selects and starts playing the next - Pioneer DVL-909 | Operating Instructions - Page 23
for Wide Screen TV Software 24 Memorizing Settings for Often Viewed DVDs (Condition Memory 25 Selecting Languages (Multi-Language 26 Changing Information 28 Changing Picture and Sound Quality 29 Quick LD Side Changing (Quick Turn 32 Selecting a Desired Background Color 32 Outline - Pioneer DVL-909 | Operating Instructions - Page 24
Switch to the desired screen With DVDs enabling switching appropnate one for your TV power outage or the power cord is disconnected while power to the player is ON, memorized settings are erased When disconnecting the power cord, be sure to press POWER button on the main unit and the remote control - Pioneer DVL-909 | Operating Instructions - Page 25
power outage or the power cord is disconnected while power to the player is ON, memorized settings are erased. When disconnecting the power cord, be sure to press POWER button on the main unit and the remote control to 30 DVDs in memory. If you memorize settings for more than 30 DVDs, previously - Pioneer DVL-909 | Operating Instructions - Page 26
number and setting differ with each disc, so refer to the disc's instructions • Some titles may not enable switching between languages If this happens, call up a menu, and select the desired title _. Press C_) during playback. LD CD, Video CD I [ $ • Audio type changes each time you press the - Pioneer DVL-909 | Operating Instructions - Page 27
Angle function only with discs featuring recordings of images shot from different camera angles • During Multi-Angle playback, the Angle indicator on the player lights. • Depending on the title, you can also make a selection using a menu To do this, press the _ button when indications are displayed - Pioneer DVL-909 | Operating Instructions - Page 28
displayed with LDs that do not have a TQC (refer to page 56) or after playback of side B finishes There is also no display if Quick Turn is switched ON < DVD > Audio information Chapter remain: Total chapter number < LD > Remaining time of the chapter currently playing andtotalplaytimeofthe - Pioneer DVL-909 | Operating Instructions - Page 29
I I_ [[]IIV_C_alF_ObFIFS_ rrOu"d ! _-'__vir_l Odl__rr_pn_ //, Press _) "MODE". (DVD, Video CD) during play and select II[!_olLi 2, Select the desired mode for the video part of LDs and CDVs. • You can use the same setting for CDV video part as for LDs Changing Picture and Sound Quality - Pioneer DVL-909 | Operating Instructions - Page 30
press O, and select PAUSE MODE. i H__II ,,.°,.00E I °_ ° With LDs, this functions only during play of standard (CAV) discs With long-play (CLV sound quality (D.R.COMP) D.R COMP stands for Dynamic Range Compression On the DVDs, sound has a wide dynamic range Use D,R COMP if sounds such as - Pioneer DVL-909 | Operating Instructions - Page 31
. Switchesto a morespacioussound _y Surround) _, Press _ during play, and select / Virtual Dolby Surround. _su_und 2, Select ON with the (_and / _button. __2 IVlft _10°nbv S_r_gnd fl_ ÷--. • • o-~. =. , _' SRS Labs, Inc's TruSurround system l_llSuno_ has been adopted as virtual - Pioneer DVL-909 | Operating Instructions - Page 32
This function shortens the time required to change from A to the B side, or from the B to the A side when playing an LD. _oPress _ stopped. ....... when play has You can select a color for menu displays and the screen when the player is not playing. _o Press @ _ playing. _ I_I_A,- when the - Pioneer DVL-909 | Operating Instructions - Page 33
On this player, various settings can be selected while watching menu screens and using the remote controller Here we will explain how to access menu screens Because menu screen and you return to the display you had before you pressed _. I;I Outline of GUI (Graphical User Interface) Operation 3_ - Pioneer DVL-909 | Operating Instructions - Page 34
L 4, 444 _q 44 34 _ lrlr_1 4 o_ Outline of GUI (Graphical User Interface) Operation L____.....k J3 - Pioneer DVL-909 | Operating Instructions - Page 35
iN_r_ I_ _L I' 1, I ,L .... ol oTio ,i, 4, Outline of GUI (Graphical User Interface) Operation _ - Pioneer DVL-909 | Operating Instructions - Page 36
I CD,Video CD i (Video CD only) xrf _r _u_ 157 J, B&COLOR 36 •-\/RR 11 RR-. Outline of GUI (Graphical User Interface) Operation - Pioneer DVL-909 | Operating Instructions - Page 37
TITLE button ENTER button_ PREVIOUS button CHP/TIME SUBTITLE button ----_____ ANGLE button _ MENU button RETURN button DIRECTION button \ NEXT button (_) (_ Outline of GUI (Graphical User Interface) Operation 37 - Pioneer DVL-909 | Operating Instructions - Page 38
° t Ex.l: Display content within menus/Button operation (Ex.DVDs) "iqtle name (Only displayed when infromation is include on disc the new setting changes and close the screen. Ex.2: Display content within (Ex: DVDs) Current settings 1 Item numbers can be selected with the /'A _ buttons and - Pioneer DVL-909 | Operating Instructions - Page 39
each function. )ut setting menu: You can select the audio signal or video signal output from the player's digital output jack, TITLEMENU 1/4 I _2TITLE_ I 13 flTLE3 F J4 TRLE4 I 15 TITLE5 I i have been filmed from various angles Outline of GUI (Graphical User Interface) Operation 39 - Pioneer DVL-909 | Operating Instructions - Page 40
page, the details of each item are provided. OUTPUT 3 [_]EXIT U_]ENTER E_RETURN Use when you have selected audio output or video output from the player via the digital output jack. Change the setting to match your amplifier or monitor. On the next page, the details of each item are provided - Pioneer DVL-909 | Operating Instructions - Page 41
screen 'burn" This player features a screen saver function skipping violent or other scenes you don't want your children to see. For details, read the disc's instructions side, or from the B to the A side when playing an LD If subtitle language (see page 27) part way through a movie [O_1 Subtitle - Pioneer DVL-909 | Operating Instructions - Page 42
player's for DVDs I Component for watching video on LDs, CDVs or CDs bearing the GRAPHICS mark With these discs, the player automatically switches to (S) video output (S) video output Component DVDs are player, perform the following pIfropocwedeur retos.the player is ON, switch it OFF While power - Pioneer DVL-909 | Operating Instructions - Page 43
20 19 12 21 08 15 12 01 02 06 13 18 19 25 26 01 05 Press the remote control m_a eand _ buttons to it flash, and then you can switch indication display ON or OFF with the _:_ and _:_ buttons _EXff AS& 10 fo 06 15 fy 06 25 ga 07 01 Outline of GUI (Graphical User Interface) Operation _ >43 - Pioneer DVL-909 | Operating Instructions - Page 44
12 12 12 13 13 13 13 13 13 13 13 13 13 14 14 14 15 15 15 16 Outline of GUI (Graphical 44 User Interface) Operation Input code (lower) 04 12 !4 21 01 O9 18 21 25 01 O5 11 14 19 23 09 23 01 11 12 13 - Pioneer DVL-909 | Operating Instructions - Page 45
Set Up Connecting the Player Connection example 1. To a TV with video input 46 Connection example 2. To panel 49 Rear panel 49 Display window 50 Remote control 51 Other Information Troubleshooting For Proper and Long Use Terms Specifications J52 | 53 55 57 Set-Up Other - Pioneer DVL-909 | Operating Instructions - Page 46
easiest way to hook up the player. Please also refer to the manual for the TV (monitor TV) that you are making connection to oo Supplied video cord Audio cord Supplied audio cord Supplied video cord / S video cable Monaural TV 46 Connecting the Player Stereo TV with S video input terminal - Pioneer DVL-909 | Operating Instructions - Page 47
digital output depending on the amp's inputs. Connect this player's BDRF output (for LD) jack to the Dolby Digital (AC-3) RF input Dolby Digital compatible AV amp i _ indicates the use of separately sold cords I Some DVD format discs feature copy protect With this kind of disc, when a sampling - Pioneer DVL-909 | Operating Instructions - Page 48
it were a component in a system (system control) • If you connect for system control, you cannot operate the player directly by pointing the remote control at it and pressing buttons • When controlling the unit as part of a system, be sure to connect to the amplifier with audio cord even if you - Pioneer DVL-909 | Operating Instructions - Page 49
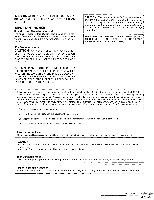
discs other than DVDs. OPEN/CLOSE button DVD/CD disc table (R 11) STANDBY indicator (P. 10, 11) LD disc table (P. 10) PLAY/PAUSE _,/11button (R 10, 11) POWER Display OFF button (FL OFF) Remote sensor STOP • button (P. 13) vitch (P. 13) Display window Disc Side A/B Rear panel Reverse - Pioneer DVL-909 | Operating Instructions - Page 50
l ,II,I I F'S r, Fj _ r F-',: f"- i-, fn-r if_ FI9 :LaserDisc :Compact disc :CD video :DVD :Video CD :During Video CD PBC play :Disc table is opening or is open : playback of the chapter :Both sides of LD repeat playback :Stereo :Playback :Stop :Pause :No disc :Power is turned off :Menu mode - Pioneer DVL-909 | Operating Instructions - Page 51
on the player's rear panel is connected to another component, point the remote control at that component for operation. Operation is not possible when pointed at this player. (Refer to page 48 ) • When using the remote control, first press the POWER switch to turn on the player's power Names and - Pioneer DVL-909 | Operating Instructions - Page 52
remote control doesn't operate 9, TV and other components operate incorrectly. 10.There's no sound. Sound is distorted 11 DVD sound volume level is low • The disc is dirty, • The disc is not correctly roaded in the disc table • The region number is different • There's condensation inside the player - Pioneer DVL-909 | Operating Instructions - Page 53
such a way that they are not likely to be stepped on A damaged power cord can cause a fire or give you an electrical shock Check the power cord once In a while When you find it damaged, ask your nearest PIONEER authorized service center or your dealer for a replacement For Proper and Long Use 53 - Pioneer DVL-909 | Operating Instructions - Page 54
not become dirty in normar use, but if for some reason it should malfunction due to soiling, consult your nearest PIONEER authorized service center. Lens cleaners for LD/CD players are commercially available, but special care should be exercised in their use dnce some may cause damage to the tens - Pioneer DVL-909 | Operating Instructions - Page 55
compressed by AC-3. DIGITAL OOLBY SURROUND Ac_o i6 i T A t For DVD discs, the digital output PCM/[][] jack (coaxial or optical) must be connected lnc Aft rights reserved LD (Laserdisc} j Depending on the signal recording method used, there are two types of Laserdiscs; Standard play discs - Pioneer DVL-909 | Operating Instructions - Page 56
having to reset the condition settings. Regional restriction codes (region number) ] Regional restriction codes are built-in to DVD players and DVD discs for each sales region, If the regional code of the DVD player does not match one of the regional codes of the DVD disc, playback will not be - Pioneer DVL-909 | Operating Instructions - Page 57
(PCM RCA jack AC*3 RF output (for LD RCA jack CONTROL IN Minijack (3.5o] CONTROL OUT Minijack (3.50) Accessories Remote control unit 1 AA!R6P dry cell batteries 2 Audio cord 1 Video cord 1 Power cord 1 Operating Instructions 1 Warranty card 1 NOTE: The - Pioneer DVL-909 | Operating Instructions - Page 58
replacement parts, operating instructions, service manuals, or accessories, please call the number shown below. Please do not ship your product to Pioneer without first calling the Customer Department at the above listed number for assistance. PIONEER ELECTRONICS SERVICE, INC. CUSTOMER SUPPORT
-
 1
1 -
 2
2 -
 3
3 -
 4
4 -
 5
5 -
 6
6 -
 7
7 -
8
-
9
-
10
-
11
-
12
-
13
-
14
-
15
-
16
-
17
-
18
-
19
-
20
-
21
-
22
-
23
-
24
-
25
-
26
-
27
-
28
-
29
-
30
-
31
-
32
-
33
-
34
-
35
-
36
-
37
-
38
-
39
-
40
-
41
-
42
-
43
-
44
-
45
-
46
-
47
-
48
-
49
-
50
-
51
-
52
-
53
-
54
-
55
-
56
-
57
-
58
 |
 |
PlONE-ER
°
The Art of Entertainment
LASERDI$C
DIGITALAUDIO
|
Operating
Instructions
I
NTSC
I
Thank you for buying
this
Pioneer
product.
Please read through
these
operating
instructions
so you
will
know
how
to operate
your
model
properly.
After
you
have
finished
reading the instructions,
put them away in a safe place
for future
reference.
rn
irst
refer
to
"Before
using"
on
page
8 and
I
'Connecting
the Player"
on pages 46 ~ 48.
J
[]
Refer to pages 9 ~ 14 for basic playback.
•
This player is not suitable
for commercial
use.