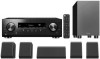
Pioneer HTP-076 Instruction Manual English - Page 9
Rear Panel, Remote, Listening mode button: Press AUTO/DIRECT, SURROUND or STEREO
 |
View all Pioneer HTP-076 manuals
Add to My Manuals
Save this manual to your list of manuals |
Page 9 highlights
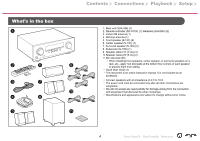
Contents ≫ Connections ≫ Playback ≫ Setup ≫ 1. INPUT SELECTOR dial: Switch the input to be played. 2. 4K indicator: Lights up when doing 4K upscaling or 4K pass through. 3. FL OFF indicator: Lights up when the display is turned off by repeatedly pressing the DIMMER button on the remote controller. 4. ZONE A/B button: Selects an audio output destination from among "ZONE A", "ZONE B" and "ZONE A+B". ( p45) 5. PRESET +/- button: Selects preset radio stations registered when using TUNER. ( p42) 6. Display ( p10) 7. STATUS button: Switches the information on the display and is used to operate RDS ( p44). 8. Listening mode button: Press "AUTO/DIRECT", "SURROUND" or "STEREO" to switch the listening mode. ( p52) 9. Remote control sensor: Receives signals from the remote controller. • The signal range of the remote controller is within about 16´/5 m, at an angle of 20° on the perpendicular axis and 30° to either side. 10. SOUND RETRIEVER button: Turns on/off the Sound Retriever function that provides better sound quality for compressed audio. 11. MASTER VOLUME 12. STANDBY/ON button 13. PHONES jack: Headphones with a standard plug (ø1/4"/6.3 mm) are connected. 14. TUNER button: Switches the input to be played to "TUNER". Also, pressing this button repeatedly switches the input between "AM" and "FM". 15. PERSONAL PRESET 1/2/3 buttons: Registers the current setting conditions such as input selector, listening mode, etc. or call the registered settings. ( p47) 16. BLUETOOTH button: Switches the input to be played to "BLUETOOTH". 17. AUX INPUT jack: Connect a mobile music player, etc. using a stereo mini plug cable (ø1/8″/3.5 mm). 9 Front Panel≫ Rear Panel≫ Remote≫
-
 1
1 -
2
-
3
-
 4
4 -
 5
5 -
 6
6 -
 7
7 -
 8
8 -
 9
9 -
 10
10 -
 11
11 -
 12
12 -
 13
13 -
 14
14 -
15
-
16
-
17
-
18
-
19
-
20
-
21
-
22
-
23
-
24
-
25
-
26
-
27
-
28
-
29
-
30
-
31
-
32
-
33
-
34
-
35
-
36
-
37
-
38
-
39
-
40
-
41
-
42
-
43
-
44
-
45
-
46
-
47
-
48
-
49
-
50
-
51
-
52
-
53
-
54
-
55
-
56
-
57
-
58
-
59
-
60
-
61
-
62
-
63
-
64
-
65
-
66
-
67
-
68
-
69
-
70
-
71
-
72
-
73
-
74
-
75
-
76
-
77
-
78
-
79
-
80
-
81
-
82
-
83
-
84
-
85
-
86
-
87
-
88
-
89
-
90
-
91
-
92
-
93
-
94
-
95
-
96
-
97
-
98
-
99
-
100
-
101
 |
 |
