Pioneer IDK-01 Owner's Manual - Page 7
Controls and displays - ipod dock
 |
UPC - 012562832937
View all Pioneer IDK-01 manuals
Add to My Manuals
Save this manual to your list of manuals |
Page 7 highlights
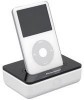
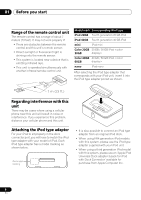
Controls and displays 02 English Deutsch Français Italiano Nederlands Español Chapter 2 Controls and displays Top and front panel Rear panel IN OUTPUT DC IN 12 V CONTROL S - VIDEO VIDEO R AUDIO L 1 2 34 1 iPod connector port Insert your iPod dock connector port to connect and recharge your iPod unit. 2 iPod type adapter pocket Holds the iPod type adapter that matches your iPod unit. 3 Power indicator Lights when your iPod is connected to the dock connector port. 4 Remote sensor See Range of the remote control unit on page 6 for more on this. 1 2 34 5 1 CONTROL IN terminal Connect this to a Pioneer AV receiver (or similar component) CONTROL OUT terminal using the supplied SR cable. This allows you to use the receiver's remote to control this unit. Check your Pioneer receiver's operating instructions for more on this.1 2 S-VIDEO output terminal Connect a TV or AV amplifier with an S-VIDEO input terminal when viewing the iPod video playback. • No video is output to the VIDEO terminal if you make this connection. • The on-screen display for use in control of this system is not available when the SVideo connection is made. 3 VIDEO output terminal Connect a standard (composite) video cable to your TV/AV receiver to view the on-screen display or for iPod video playback. 4 AUDIO output terminal Use to connect a stereo RCA/phono terminal cable to your AV receiver /power amplifier for two-channel audio. 5 AC adapter DC IN 12 V terminal Use to connect the AC adapter to an AC power outlet. Note 1 If you have connected an SR cable to this terminal, you must point the remote control supplied with this unit at the remote sensor of the connected receiver or amplifier. 7 En
-
 1
1 -
 2
2 -
 3
3 -
 4
4 -
 5
5 -
 6
6 -
 7
7 -
 8
8 -
 9
9 -
 10
10 -
 11
11 -
 12
12 -
13
-
14
-
15
-
16
-
17
-
18
-
19
-
20
-
21
-
22
-
23
-
24
-
25
-
26
-
27
-
28
-
29
-
30
-
31
-
32
-
33
-
34
-
35
-
36
 |
 |
