Pioneer VSX23TXH Owner's Manual - Page 95
ZONE Audio Setup, Power ON Level Setup, Volume Limit Setup
 |
UPC - 012562957074
View all Pioneer VSX23TXH manuals
Add to My Manuals
Save this manual to your list of manuals |
Page 95 highlights
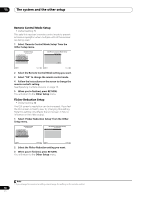
The system and the other setup 11 3 Select the 'Video Input' setting you want. When the multi-channel input is selected as an input function, you can display the video images of other input functions. The video input can be selected from the following: DVD, TV/SAT, DVR, VIDEO, OFF. 4d2.Multi Ch In Setup A/V RECEIVER SW Input Gain : Video Input : +10dB DVD Exit Finish 4 When you're finished, press RETURN. You will return to the Other Setup menu. ZONE Audio Setup If you've made MULTI-ZONE connections (see Using the MULTI-ZONE controls on page 69), you may need to specify your volume setting. 1 Select 'ZONE Audio Setup' from the Other Setup menu. 4d.Other Setup A/V RECEIVER 1. KURO LINK Setup 2. Multi Ch In Setup 3. ZONE Audio Setup 4. Power ON Level Setup 5. Volume Limit Setup 6. Remote Control Mode Setup 7. Flicker Reduction Setup 4d3.ZONE Audio Setup A/V RECEIVER ZONE 2 Volume Level : Variable ZONE 3 Volume Level : Variable Exit Return Exit Finish 2 Select the volume level setting of ZONE 21 and ZONE 3 (VSX-23TXH only). • Variable - Use this setting if you've connected a power amplifier in the sub room (this receiver is simply being used as a pre-amp) and you will be using this receiver's controls to adjust the volume. • Fixed - Use this setting if you've connected a fully integrated amplifier (such as another Pioneer VSX receiver) in the sub room and want to use that receiver's volume controls. With the Fixed setting, the source is sent from this receiver at maximum volume, so make sure the volume is quite low in the sub zone at first, and then experiment to find the correct level. 3 When you're finished, press RETURN. You will return to the Other Setup menu. Power ON Level Setup The volume can be set so that it is always set to the same level when the receiver's power is turned on. 1 Select 'Power ON Level Setup' from the Other Setup menu. 4d.Other Setup A/V RECEIVER 1. KURO LINK Setup 2. Multi Ch In Setup 3. ZONE Audio Setup 4. Power ON Level Setup 5. Volume Limit Setup 6. Remote Control Mode Setup 7. Flicker Reduction Setup 4d4.Power ON Level Setup A/V RECEIVER Power ON Level : LAST Exit Return Exit Finish 2 Select the Power ON Level setting you want. • LAST - When the power is turned on, the volume is set to the same level as when the power was last turned off. • "---" - When the power is turned on, the volume is set to minimum level. • -80.0dB to +12.0dB - Specify the volume to be set when the power is turned, in steps of 0.5 dB. It is not possible to set a volume level greater than the value specified at Volume Limit Setup. 3 When you're finished, press RETURN. You will return to the Other Setup menu. Volume Limit Setup Use this function to limit the maximum volume. The volume cannot be increased above the level set here, even by operating MASTER VOLUME button (or the dial on the front panel). 1 Select 'Volume Limit Setup' from the Other Setup menu. 4d.Other Setup A/V RECEIVER 1. KURO LINK Setup 2. Multi Ch In Setup 3. ZONE Audio Setup 4. Power ON Level Setup 5. Volume Limit Setup 6. Remote Control Mode Setup 7. Flicker Reduction Setup 4d5.Volume Limit Setup A/V RECEIVER Volume Limit : OFF Exit Return Exit Finish 2 Select the Volume Limit setting you want. • OFF - The maximum volume is not limited. • -20.0dB/-10.0dB/0.0dB - The maximum volume is limited to the value set here. 3 When you're finished, press RETURN. You will return to the Other Setup menu. Note 1 If you selected ZONE 2 in the Surround back speaker setting on page 91, you won't be able to change the volume level. 95 En
-
 1
1 -
2
-
3
-
4
-
5
-
6
-
7
-
8
-
9
-
10
-
11
-
12
-
13
-
14
-
15
-
16
-
17
-
18
-
19
-
20
-
21
-
22
-
23
-
24
-
25
-
26
-
27
-
28
-
29
-
30
-
31
-
32
-
33
-
34
-
35
-
36
-
37
-
38
-
39
-
40
-
41
-
42
-
43
-
44
-
45
-
46
-
47
-
48
-
49
-
50
-
51
-
52
-
53
-
54
-
55
-
56
-
57
-
58
-
59
-
60
-
61
-
62
-
63
-
64
-
65
-
66
-
67
-
68
-
69
-
70
-
71
-
72
-
73
-
74
-
75
-
76
-
77
-
78
-
79
-
80
-
81
-
82
-
83
-
84
-
85
-
86
-
87
-
88
-
89
-
 90
90 -
 91
91 -
 92
92 -
 93
93 -
 94
94 -
 95
95 -
 96
96 -
 97
97 -
 98
98 -
 99
99 -
 100
100 -
101
-
102
-
103
-
104
-
105
-
106
-
107
-
108
-
109
-
110
-
111
-
112
-
113
-
114
-
115
-
116
-
117
-
118
-
119
-
120
-
121
-
122
-
123
 |
 |
